Workflow Automation
Workflow Editor
The Workflow Editor is the central environment for creating, managing, testing, and executing workflows. Within the Workflow Editor app, you can design and refine workflows, then export them as JSON files for use with the Workflow Runner.

Figure: In Workflow Editor app, you can create/refine/export/import a workflow.
Workflows
A workflow is a structured sequence of actions or tasks that are executed step by step to achieve a specific outcome. In automation systems, a workflow typically consists of a list of predefined activities—such as reading data, clicking buttons, entering text, or processing information—that are carried out in order, one after another. Each action depends on the completion of the previous step, creating a logical flow from start to finish.
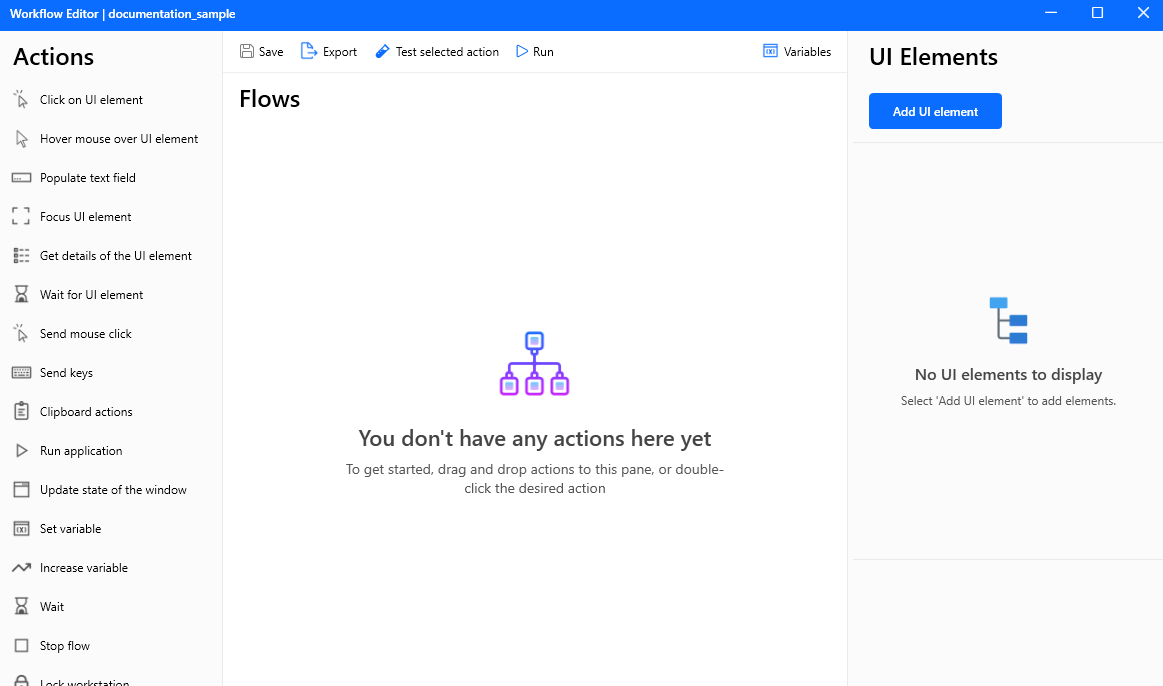
Figure: Workflow environment including various actions.
Export a Workflow
To export a workflow in the Workflow Editor app, select it from the list and click the Export button on the right side. The workflow can be exported and stored on your PC or other systems in two formats. Use .json to run it via Accesskey scripts, or use .idwf to be able to import it later into Workflow Editor.
Import a Workflow
To import a previously saved workflow, click the Import workflow button and select an .idwf file. The imported workflow opens in Workflow Editor, where you can review, edit, test, and export it again.
Tip: You can also import a workflow by dragging an
.idwffile from your file explorer and dropping it onto the workflows window.
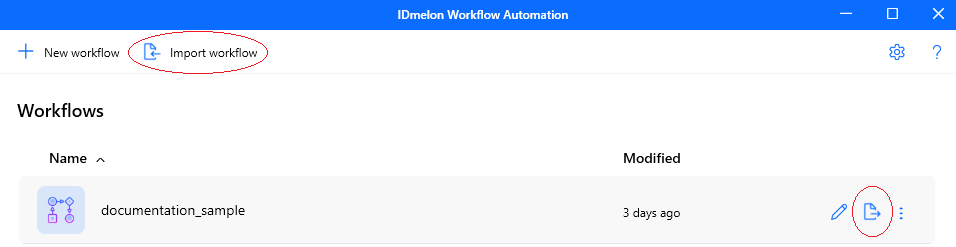
Figure: The specified buttons can be used to export/import a workflow.
Settings
Open Settings from the toolbar at the top of the Workflow Editor to configure the application. The Settings panel is organized into the following groups.
Updates
- Check for updates automatically: when enabled, the app checks for a newer version on its own.
- Update channel: which release channel to receive updates from:
- Stable: recommended; only tested, stable releases.
- Latest: the newest releases, which may be less thoroughly tested.
- Check for updates: check for a new version immediately.
Startup behavior for Workflow Runner
The Startup option controls whether the Workflow Runner starts automatically with Windows:
- Don’t run at startup: the Workflow Runner does not start automatically when the system starts.
- Run at startup: the Workflow Runner starts automatically when the system starts.
The default setting is Run at startup. Changing this setting (either disabling or re-enabling it) requires elevated access, so you must run Workflow Editor as administrator before changing it.
Java applications
The Enable Java Access Bridge option controls whether the picker can capture UI elements from Java (Swing/AWT) applications:
- Disabled: Java applications are not supported.
- Enabled for current user: the Java Access Bridge is enabled for your account only.
- Enabled for all users: the Java Access Bridge is enabled for every account on the computer. This requires administrator rights.
Note: After changing this option, restart any running Java applications so their UI elements become capturable.
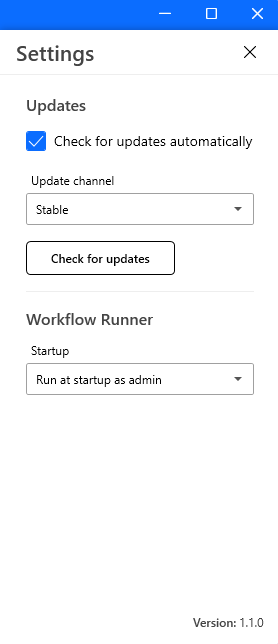
Figure: The Workflow Editor Settings panel.
Trigger condition
The trigger condition determines when a workflow runs automatically. Set it using the Trigger button in the toolbar at the top of the Workflow Editor. The condition you choose is saved with the workflow.
The available trigger conditions are:
| Trigger condition | When the workflow runs |
|---|---|
| Security key presence (card tap) | A registered security key (badge/card) is tapped on the reader. |
| Application launch | A specific application (process) starts. |
| Screen unlock | The Windows session is unlocked. |
| Screen lock | The Windows session is locked. |
| User logon | The user logs on to Windows. |
| Transparent unlock | The workstation is unlocked transparently with the security key. |
| Transparent lock | The workstation is locked transparently with the security key. |
| Window appear | A window matching the criteria you define appears on the desktop. |
| None | Never on its own; runs only inside a chained workflows design. |
The default trigger condition is Security key presence (card tap).
Note: Setting the trigger condition only records when the workflow should run. For the workflow to actually run automatically, export it and then register it: use
automationclifor the Application launch, Screen unlock, Screen lock, User logon, and Window appear triggers, or Accesskey for the Security key presence (card tap), Transparent unlock, and Transparent lock triggers. See Workflow Runner.Note: A workflow whose trigger condition is None is not registered on its own. It runs only as a step in a chained workflows design.
Interrupting a running workflow
Only one workflow runs at a time. When you choose Security key presence (card tap), Application launch, or Window appear, the Stop a running workflow to start this one option controls what happens if another workflow is still running:
- Enabled (the default): the running workflow is stopped and this one starts.
- Disabled: the running workflow is left alone and this trigger is skipped.
The other trigger conditions always stop the running workflow.
Application launch options
When you choose Application launch, configure the following:
- Process to watch for: pick a running process or type its name without the
.exeextension (for example,notepad). - Ignore previously running processes: when enabled, the workflow triggers for each newly started instance, even while another instance is already running. When disabled, it triggers only when the application goes from not running to running.
Window appear options
When you choose Window appear, describe the window to watch for. The criteria are combined, so a window must satisfy all of the ones you fill in:
Pick an open window: an optional shortcut. Choosing a window that is open right now fills in the fields below with its values, which you can then adjust.
Process: pick a running process or type its name without the
.exeextension.Window title: the text to compare against the window’s title, together with the match mode next to it:
Match mode How the title is compared Contains The title must contain this text. This is the default; leave the title empty to match any. Exact The whole title must match. Wildcard *matches any text and?matches any single character (for example,* - Google Chrome).Regex A .NET regular expression, matched anywhere in the title. All of the modes ignore case.
Matching timeout (seconds): how long a newly opened window is given to take on the title you entered. Applications often open a window with a placeholder title and set the real one a moment later, so the window is not judged the instant it appears. The default is
10seconds, and the value must be between1and300.Advanced → Window class (optional): the Win32 class name, for example
Chrome_WidgetWin_1. Use it to tell a main application window apart from its dialogs and pop-ups.Ignore windows that are already open: when enabled (the default), every window opened from now on runs the workflow, even while another matching window is already open. When disabled, the workflow runs only for the first matching window and does not run again until every matching window has closed.
Note: You must give at least one of Process, Window title, or Window class. A Regex title that is not a valid regular expression is rejected as well.
Note: Windows that were already open when the trigger is armed never start the workflow, whichever way Ignore windows that are already open is set. Switching tabs inside an application is not a new window either, so a browser that retitles itself as you browse does not run the workflow again.
Note: Only the windows of the signed-in user are watched, so this trigger does not fire while nobody is signed in.
Note: The Matching timeout applies only to the title. A window whose Process or Window class does not fit is dismissed straight away, because those cannot change after the window is created.
Execution limit
The Execution limit option is available for the Application launch and Window appear triggers, and controls how many times the workflow may run:
- No limit: every time the trigger fires.
- Once per login / unlock: at most once per login session.
- Specific number of times: a fixed number of runs that you enter.
Screen lock and Transparent lock
The screen is locked while a Screen lock or Transparent lock workflow runs, so avoid actions that interact with the user interface, such as clicks, keystrokes, and UI element actions. They cannot reach the desktop and will fail. The Trigger Condition window shows a warning when you select one of these two conditions.
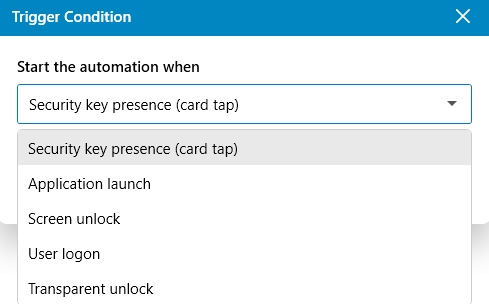
Figure: Choosing when the automation starts in the Trigger Condition window.
Actions
There are two types of actions:
- Element-based actions: These actions depend on UI elements and operate on a specific element (e.g., clicking a UI element).
- Non-element-based actions: These actions are not tied to UI elements and perform operations directly on the system (e.g., running an application).
Available actions are listed below.
Tip: Use the Search actions box above the actions list to quickly filter the available actions by name.
Click on UI element
Simulates a mouse click on a specified UI element, allowing the automation process to interact with buttons, links, checkboxes, or other clickable components within the application interface.
Input Parameters:
| Parameter | Type | Required | Default | Description |
|---|---|---|---|---|
| UI element | UI element | Yes | - | The target element to click. |
| Click type | Enum | Yes | Left click | Allowed: Left click, Double click, Right click |
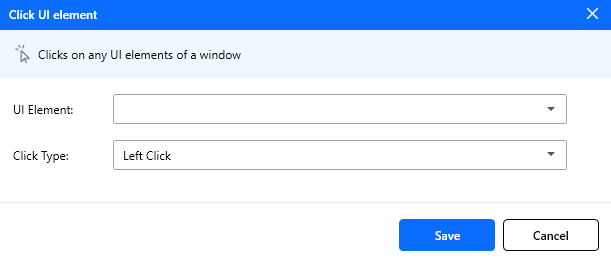
Figure: Click on UI element action configuration.
Hover mouse over UI element
Moves the cursor over a UI element.
Input Parameters:
| Parameter | Type | Required | Default | Description |
|---|---|---|---|---|
| UI element | UI element | Yes | - | The target element to hover over |
Populate text field
Fills a text field with the entered text.
Input Parameters:
| Parameter | Type | Required | Default | Description |
|---|---|---|---|---|
| UI element | UI element | Yes | - | The target text field to populate |
| Text to fill-in | String | Yes | Empty | The text to enter in the text field |
Note: This action can be applied to text-bearing elements: Input, Combo Box, Text, Div, and Custom.
Note: You can use variables instead of static strings. For more details, see variables.
Note: Text to fill-in can be marked as secure text so that its value is masked in the Workflow Editor.
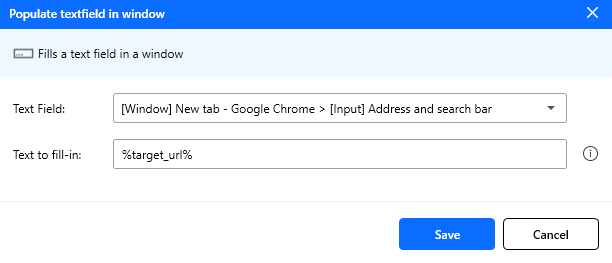
Figure: Populate text field action configuration.
Focus UI element
Sets the focus on a UI element.
Input Parameters:
| Parameter | Type | Required | Default | Description |
|---|---|---|---|---|
| UI element | UI element | Yes | - | The target element to set focus on |
Get details of the UI element
Gets the value of a UI element’s attribute.
Input Parameters:
| Parameter | Type | Required | Default | Description |
|---|---|---|---|---|
| UI element | UI element | Yes | - | The target element to read details from |
| Attribute name | Enum | Yes | Id | Allowed: Id, Name, Class, Enabled, … |
| Bind to variable | String | Yes | Empty | The variable name where the attribute value is stored |
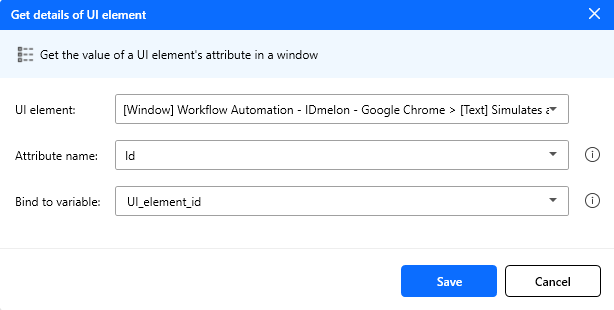
Figure: Get details of the UI element action configuration.
Wait for UI element
Waits until a UI element appears on screen.
Input Parameters:
| Parameter | Type | Required | Default | Description |
|---|---|---|---|---|
| UI element | UI element | Yes | - | The target element to wait for |
| Timeout | Number (Double) | Yes | 10 | Maximum wait time (in seconds) for the element |
Send mouse click
Sends a mouse click event.
Input Parameters:
| Parameter | Type | Required | Default | Description |
|---|---|---|---|---|
| Mouse event | Enum | Yes | Left click | Allowed: Left click, Double click, Right click |
| Delay | Number (Int) | Yes | 0 | Delay before sending the mouse event (milliseconds) |
Send keys
Sends keys to the UI element that is currently focused.
Input Parameters:
| Parameter | Type | Required | Default | Description |
|---|---|---|---|---|
| Text to send | String | Yes | Empty | The text to send to the focused element/window |
| Delay | Number (Int) | Yes | 10 | Delay between keystrokes (milliseconds) |
To simulate a key press, use curly brackets {} (e.g., {enter}). For key combinations, wrap both keys in {} (e.g., {leftctrl}({A})).
Note: You can insert modifiers or special keys using two combo boxes at the bottom of the text field.
Note: For the modifiers, the second key must be added inside a ({}) (e.g., {leftctrl}({A}) for the select all shortcut).
Note: You can also use variables as a part of the text (See Variables).
Note: Text to send can be marked as secure text. While the value is masked, the modifier and special key combo boxes are disabled, because the masked field has no caret to insert the key into.
Some common shortcuts:
- Select all: {leftctrl}({A})
- Copy: {leftctrl}({C})
- Paste: {leftctrl}({V})
- Shift Delete: {rightshift}({delete})
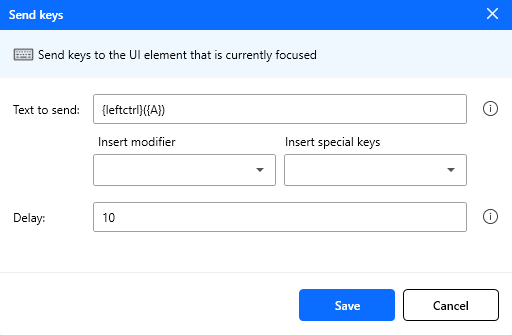
Figure: Send keys action configuration.
Run application
Executes an application.
Input Parameters:
| Parameter | Type | Required | Default | Description |
|---|---|---|---|---|
| Application path | String | Yes | Empty | The executable file path |
| Command line arguments | String | No | Empty | Additional arguments passed after the executable name |
| Working folder | String | No | Empty | The working directory path for the application |
| Window style | Enum | Yes | Normal | Allowed: Normal, Hidden, Minimized, Maximized |
| After application launch | Enum | Yes | Continue immediately | Continue immediately, Wait for application to load, Wait for application to close |
If you want to use the ExitCode variable for next actions, set the After application launch option to Wait for application to load.
Note: Application path, Command line arguments, and Working folder all support variables like
%VariableName%.
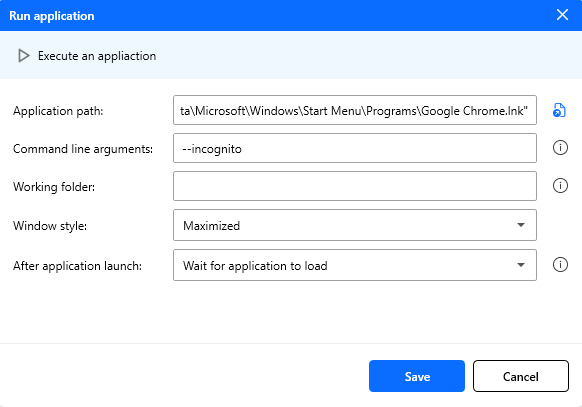
Figure: Run application action configuration.
Window control
Updates the state of one or more windows that match the specified search criteria.
Input Parameters:
| Parameter | Type | Required | Default | Description |
|---|---|---|---|---|
| Find window mode | Enum | Yes | By window UI element | Allowed: By window UI element, By title or class, By window handle |
| Window | UI element | No | Empty | Target window UI element (used when mode is By window UI element) |
| Window title | String | No | Empty | Window title (used when mode is By title or class), supports wildcards ? and * |
| Window class | String | No | Empty | Window class (used when mode is By title or class), supports wildcards ? and * |
| Window handle | Variable | No | Empty | The variable holding the window handle (used when mode is By window handle) |
| Window action | Enum | Yes | Focus on window | Allowed: Focus on window, Move to background, Maximize window, Minimize window, Close window |
Note: If multiple windows match the criteria, use When multiple match to control whether the action is applied to the first match only or to all matches.
Note: In By window handle mode, pick one of the
WindowHandlevariables created by this workflow’s Display message actions, or type your own variable name. See Window handle variables.
Wildcards
In By title or class mode, both the Window title and Window class values support wildcards. Use wildcards when only part of the title or class is predictable, so you can match a window without typing its exact text. The available wildcard characters are:
| Wildcard | Match behavior |
|---|---|
* | Matches any sequence of characters, including none. |
? | Matches exactly one character. |
Matching is case-insensitive, and the whole value must match the pattern (not just part of it). For example:
*Notepadmatches any title that ends withNotepad.Report *matches any title that starts withReport(such asReport 2026).Untitled - ?otepadmatchesUntitled - Notepad.
Note: Wildcards are simpler than regular expressions and are only available for the Window title and Window class in the Window control action. If you need more advanced pattern matching for a UI element, use a regular expression in the element selector instead.
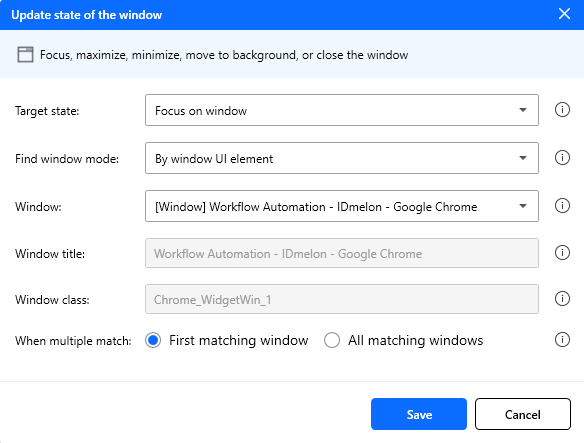
Figure: Window control action configuration.
Set variable
Set the value of a new or existing variable, create a new variable or overwrite a previously created variable.
Input Parameters:
| Parameter | Type | Required | Default | Description |
|---|---|---|---|---|
| Variable | String | Yes | Empty | A variable name (existing or new) |
| Value | String/Int/Double | Yes | Empty | The value assigned to the variable |
Note: You can use variables in the form of %variable_name% for assigning values. For more details, see variables.
Note: Value can be marked as secure text so that it is masked in the Workflow Editor.
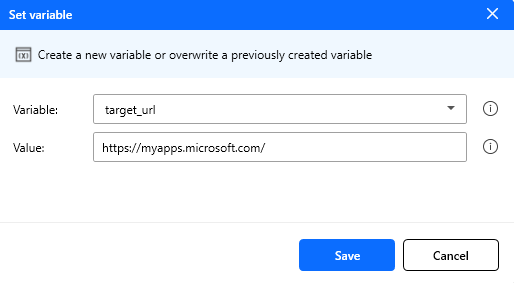
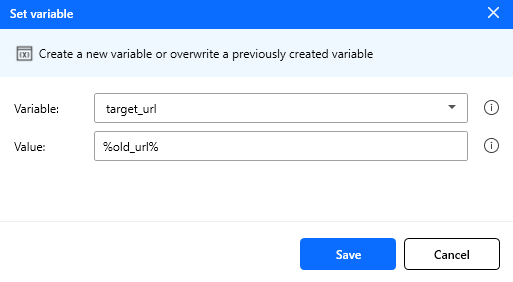
Figure: Set variable action configuration.
Increase variable
Increases the value of a variable by a specific amount.
Input Parameters:
| Parameter | Type | Required | Default | Description |
|---|---|---|---|---|
| Variable name | String | Yes | Empty | The numeric variable to increase |
| Increase by | Number (Int/Double) | Yes | Empty | A numeric value or a variable containing a numeric value |
Note: Negative numbers can also be used to decrease the value of a variable.
Wait
Suspends the execution of the flow for a specific amount of seconds.
Input Parameters:
| Parameter | Type | Required | Default | Description |
|---|---|---|---|---|
| Duration | Number (Double) | Yes | Empty | The duration in seconds |
In addition to numbers, you can also make use of variables (See Variables).
Stop flow
Terminates the flow.
Input Parameters:
| Parameter | Type | Required | Default | Description |
|---|---|---|---|---|
| With status | Enum | Yes | Success | Allowed: Success, Failure |
Lock workstation
Locks the workstation’s display.
Input Parameters:
No inputs needed.
Clipboard
Interacts with the Windows clipboard. Use it to put text on the clipboard, clear the clipboard, or read the current clipboard text into a variable.
Input Parameters:
| Parameter | Type | Required | Default | Description |
|---|---|---|---|---|
| Action | Enum | Yes | Set clipboard text | Allowed: Set clipboard text, Clear clipboard content, Retrieve clipboard text |
| Clipboard text | String | No | Empty | The text to place on the clipboard (used with Set clipboard text). Supports variables like %VariableName% |
| Bind to variable | String | No | Empty | The variable that receives the clipboard text (used with Retrieve clipboard text) |
Note: Clipboard text applies only to Set clipboard text, and Bind to variable applies only to Retrieve clipboard text. Clear clipboard content needs no additional input.
Note: Clipboard text can be marked as secure text so that it is masked in the Workflow Editor.
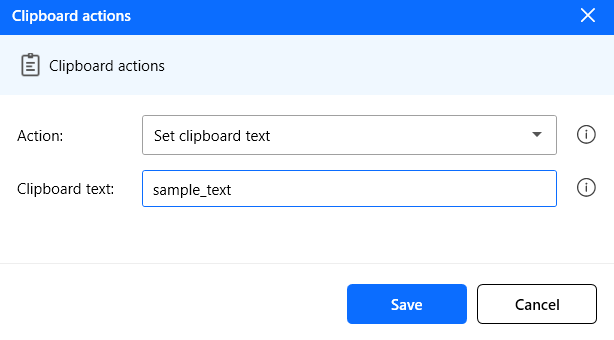
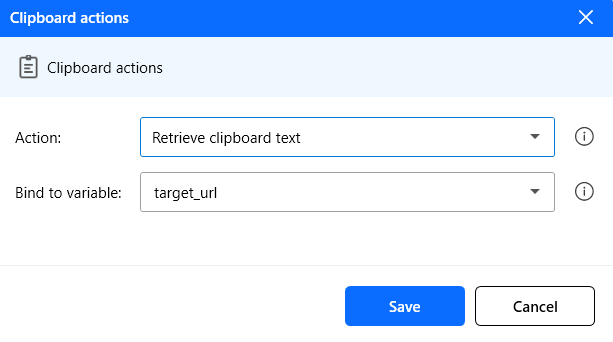
Figure: Clipboard action configuration.
Call Accesskey function
Calls an Accesskey function and retrieves its result. Select a function from the Function name drop-down; the window then shows that function’s Description, its Inputs, and its Outputs.
Input Parameters:
| Parameter | Type | Required | Default | Description |
|---|---|---|---|---|
| Function name | String | Yes | Empty | The Accesskey function name to call |
Function inputs and outputs:
The Inputs depend on the selected function. Each input shows its data type in parentheses (for example, String, Int32, Boolean), and required inputs are marked with a red asterisk (*). The control used depends on the type:
- Boolean inputs are shown as a checkbox (for example, Onboard If Doesn’t Exist).
- Other types (such as
StringandInt32) are shown as a text field.
Functions that authenticate the user also expose these inputs:
- Wait for Security Key Presence (Boolean): when checked, the call waits for the user to tap their security key before it runs.
- Security Key Presence Timeout (Seconds) (Int32): how long the call waits for that tap before it times out.
The function’s Outputs are stored in variables (shown as badges in the Outputs row, for example username and password) that you can use in later actions. See Variables.
Note: To test the function and see the result, after selecting the function and filling the required inputs, click on the Test button next to the function’s drop-down.
Note: A badge (or a card) must be cached during execution. So you need to tap your badge on the reader before testing this action.
Note: If Accesskey fails to process the request, the workflow does not stop. The error details returned by Accesskey are stored in the workflow variables, so you can check them with an If action and decide how to continue.
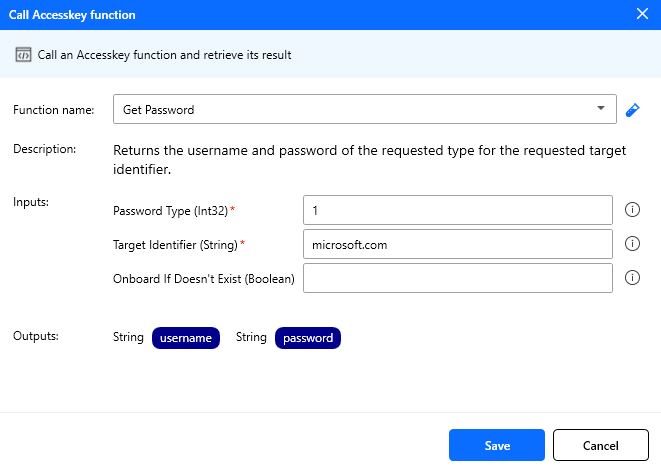
Figure: Call accesskey function action configuration.
Run PowerShell script
Executes some custom PowerShell script and retrieves its output into a variable.
Input Parameters:
| Parameter | Type | Required | Default | Description |
|---|---|---|---|---|
| Script | String | Yes | Empty | The PowerShell code to execute (variables are resolved beforehand) |
| Timeout | Number (Double) | Yes | 0 | Maximum wait time in seconds (0 means no timeout) |
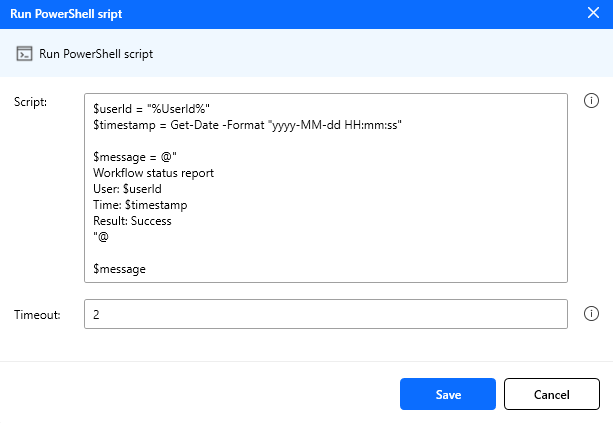
Figure: Run powershell script action configuration.
Display message
Shows a message dialog to the user and, optionally, captures which button they click into a variable.
Input Parameters:
| Parameter | Type | Required | Default | Description |
|---|---|---|---|---|
| Title | String | No | Empty | The dialog title. Supports variables like %VariableName% |
| Message | String | No | Empty | The message body. Supports variables |
| Icon | Enum | Yes | Information | Allowed: Information, Warning, Error |
| Buttons | Enum | Yes | OK | Allowed: OK, Cancel, Dismiss, OK / Cancel, Yes / No, Yes / No / Cancel, Retry / Cancel |
| Default button | Enum | Yes | First button | The button focused by default: First button, Second button, Third button |
| Position | Enum | Yes | Center | Where the dialog appears on screen (Center, Top, Bottom, the four corners, and the side edges) |
| Auto-close (s) | Number (Double) | No | 0 | Seconds before the dialog closes on its own. Leave empty or 0 to wait for the user |
| Always on top | Boolean | No | false | Keep the dialog above other windows |
| Don’t wait for result | Boolean | No | false | Show the dialog and continue the workflow immediately, without waiting for it to close |
| Output variable | Variable | No | Empty | Stores the clicked button’s text (empty if the dialog is dismissed or times out) |
Note: Use the Output variable with an If action to branch the workflow based on which button the user clicked (for example, run different actions for Yes and No).
Note: Don’t wait for result is available only for the single-button dialogs (OK, Cancel, and Dismiss), because their outcome is known in advance. When it is enabled, Output variable is disabled.
Note: When Don’t wait for result is enabled, the action also stores the dialog’s window handle in a
WindowHandlevariable, so a later Window control action can close the dialog. See Window handle variables.
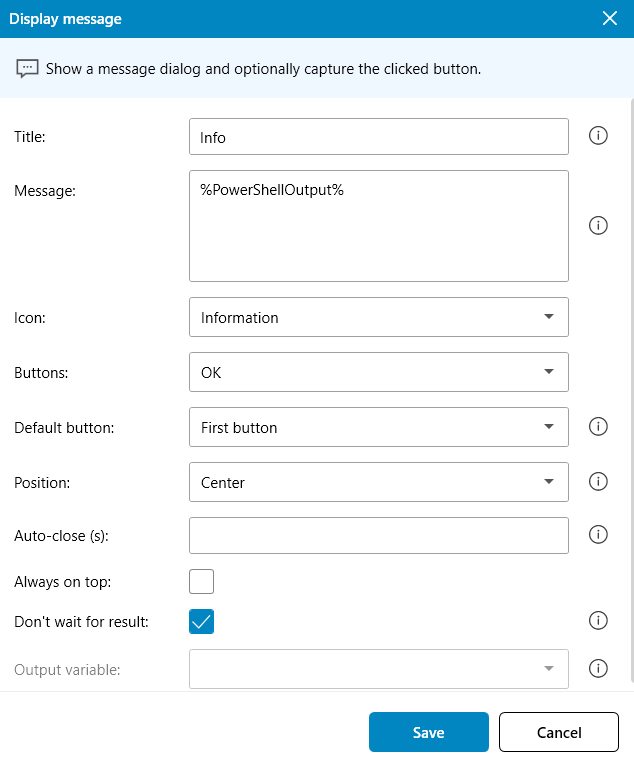
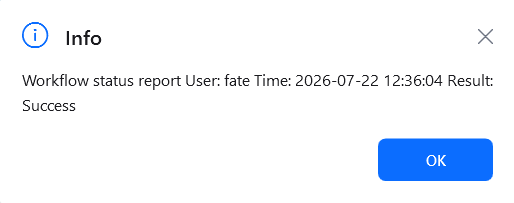
Figure: Display message action configuration.
Conditional Actions
Conditional actions are workflow steps that execute only when specific conditions are met. They are useful for tasks like checking the value of a variable, verifying whether an element exists on screen, or controlling the flow of automation based on dynamic criteria.
If
Checks if two values match.
Input Parameters:
| Parameter | Type | Required | Default | Description |
|---|---|---|---|---|
| First operand | String/Number | Yes | Empty | The first value, variable, or expression to compare |
| Operator | Enum | Yes | Equal to (=) | Comparison rule between first and second operands |
| Second operand | String/Number | Yes | Empty | The second value, variable, or expression to compare |
Allowed operators: Equal to (=), Not equal to (!=), Greater than (>), Greater than or equal to (>=), Less than (<), Less than or equal to (<=), Contains, Does not contain, Starts with, Ends with, Is empty, Is not empty, Is defined, Is not defined.
Note: The Is empty, Is not empty, Is defined, and Is not defined operators take no second operand, so the second operand field is hidden when you select one of them.
Note: Use Is defined or Is not defined to check whether a variable exists before you read it. With the other operators, the action fails when the first operand is not a defined variable.
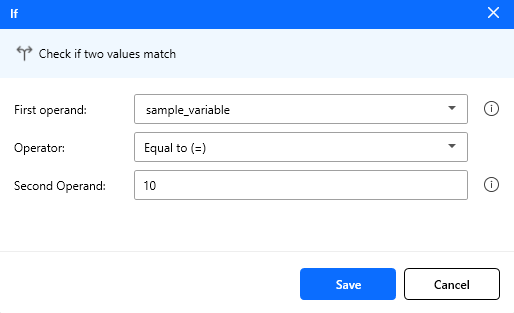
Figure: If conditional action configuration.
Else if
Starts a block of actions that run only if earlier If or else if checks fail, and this condition is true.
Input Parameters:
| Parameter | Type | Required | Default | Description |
|---|---|---|---|---|
| First operand | String/Number | Yes | Empty | The first value, variable, or expression to compare |
| Operator | Enum | Yes | Equal to (=) | Comparison rule between first and second operands |
| Second operand | String/Number | Yes | Empty | The second value, variable, or expression to compare |
Allowed operators: Equal to (=), Not equal to (!=), Greater than (>), Greater than or equal to (>=), Less than (<), Less than or equal to (<=), Contains, Does not contain, Starts with, Ends with, Is empty, Is not empty, Is defined, Is not defined.
Else
Starts a block of actions when none of the preceding if or else if conditions are met.
Input Parameters:
No inputs needed.
If UI element exists
Checks whether a UI element exists on the screen.
Input Parameters:
| Parameter | Type | Required | Default | Description |
|---|---|---|---|---|
| UI element | UI element | Yes | - | The target element to check |
| If UI element | Enum | Yes | Exist | Allowed: Exist, Doesn’t exist |
| Timeout | Number (Double) | Yes | 2 | Search timeout in seconds |
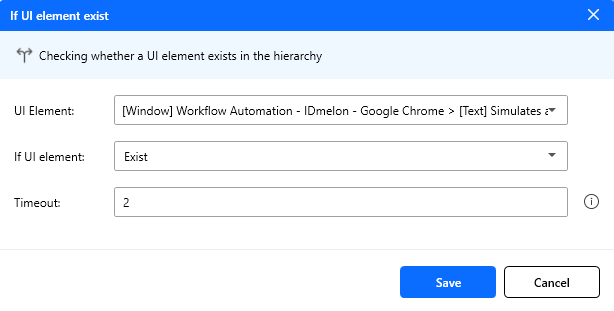
Figure: If UI element exists action configuration.
If file exists
Checks whether a file exists at a given path, and runs the nested actions when the condition is met.
Input Parameters:
| Parameter | Type | Required | Default | Description |
|---|---|---|---|---|
| File path | String | Yes | Empty | Full path of the file to check. Supports variables |
| If file | Enum | Yes | Exist | Allowed: Exist, Doesn’t exist |
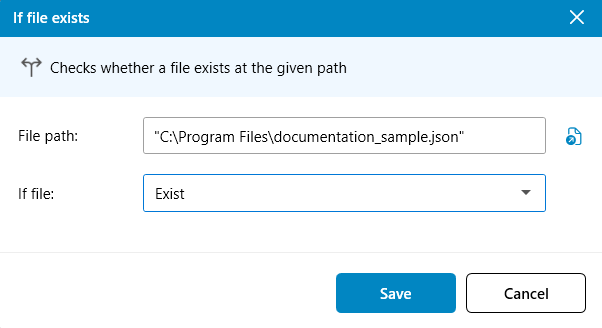
Figure: If file exists action configuration.
Loops
Loops are workflow actions that repeat a set of steps until a specified condition is met. They are useful for iterating over collections or repeatedly checking values.
For loop
Iterates a block of actions for a specific number of times.
Input Parameters:
| Parameter | Type | Required | Default | Description |
|---|---|---|---|---|
| Start from | Number (Int) | Yes | Empty | The starting value of the loop counter (variables allowed) |
| End to | Number (Int) | Yes | Empty | The ending value of the loop counter (variables allowed) |
| Increment by | Number (Int) | Yes | Empty | The increment step for the loop counter (variables allowed) |
Note: You can use variables instead of static numbers. For more details, see Variables.
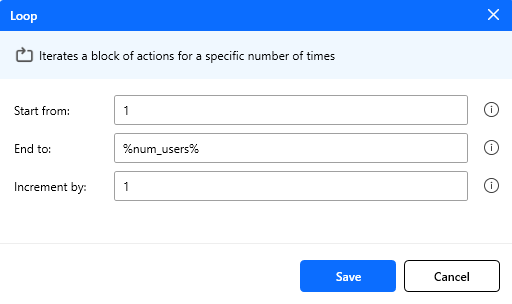
Figure: For loop action configuration.
Loop condition
Iterates a block of actions as long as a specific condition proves to be true.
Input Parameters:
| Parameter | Type | Required | Default | Description |
|---|---|---|---|---|
| First operand | String/Number | Yes | Empty | The first value, variable, or expression to compare |
| Operator | Enum | Yes | Equal to (=) | Comparison rule between first and second operands |
| Second operand | String/Number | Yes | Empty | The second value, variable, or expression to compare |
Allowed operators: Equal to (=), Not equal to (!=), Greater than (>), Greater than or equal to (>=), Less than (<), Less than or equal to (<=), Contains, Does not contain, Starts with, Ends with, Is empty, Is not empty, Is defined, Is not defined.
Next loop
Used inside a loop to skip the current iteration and jump directly to the next one when certain conditions are met.
Exit loop
Immediately terminates a loop when a specific condition is met, stopping any further iterations.
Read CSV from file
Reads a CSV file from your PC or system and loads it into a data table variable.
Input Parameters:
| Parameter | Type | Required | Default | Description |
|---|---|---|---|---|
| CSV file path | String | Yes | Empty | Full path to the .csv file to read (you can also use the select file button on the right side for convenience) |
| First line is header | Boolean | No | false | If enabled, the first row is treated as column names; otherwise, columns are auto-named (Col 1, Col 2, …) |
| Trim fields | Boolean | No | false | If enabled, trims leading/trailing spaces for each field value |
| Store result in | Variable | Yes | Empty | Name of the variable that receives the output DataTable |
Note: CSV file path supports variables like
%VariableName%.
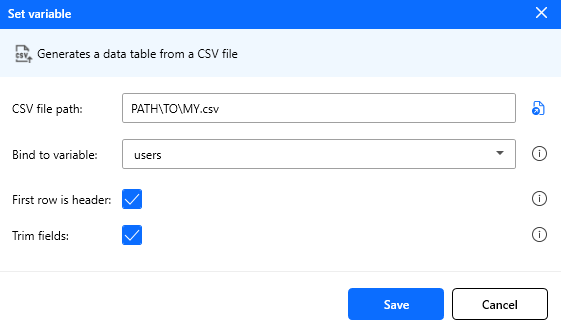
Figure: Read CSV from file action configuration.
Read text from file
Reads the entire content of a text file into a variable.
Input Parameters:
| Parameter | Type | Required | Default | Description |
|---|---|---|---|---|
| File path | String | Yes | Empty | Full path of the text file to read. Supports variables (or use the select-file button on the right) |
| Encoding | Enum | Yes | UTF-8 | Character encoding used to read the file. Allowed: System default, UTF-8, Unicode, Unicode (Big-Endian), ASCII, UTF-32 |
| Bind to variable | Variable | Yes | Empty | The variable that receives the file’s text content |
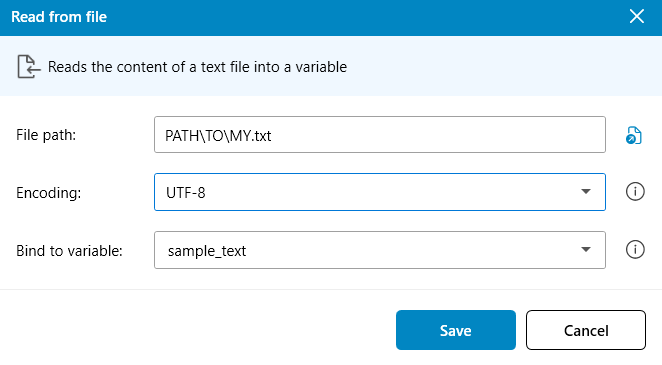
Figure: Read text from file action configuration.
Find in data table
Searches a column in a source data table and stores matching rows in a new data table variable.
Input Parameters:
| Parameter | Type | Required | Default | Description |
|---|---|---|---|---|
| Data table | Variable | Yes | Empty | Source variable containing the input DataTable |
| Text to find | String | Yes | Empty | Text to search for in the selected column. Supports variable placeholders |
| Column name or index | String | Yes | Empty | Target column by exact name or zero-based index (0, 1, …) |
| All matches | Boolean | No | false | If enabled, returns all matching rows; otherwise, returns only the first matching row |
| Match case | Boolean | No | false | If enabled, text comparison is case-sensitive |
| Match entire cell | Boolean | No | false | If enabled, value must match the full cell text; otherwise, substring matching is used |
| Store result in | Variable | Yes | Empty | Variable name that receives the output DataTable with matched rows |
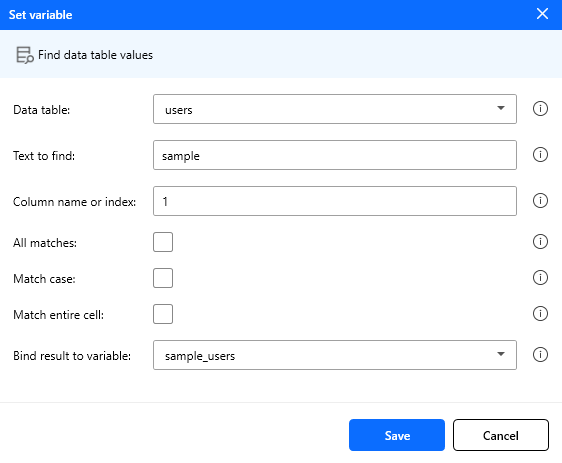
Figure: Find in data table action configuration.
Run subflow
Runs another subflow from the same workflow. Use this action to reuse a shared sequence of actions or to organize a large workflow into smaller, named parts. For more details on creating and managing subflows, see Subflows.
Input Parameters:
| Parameter | Type | Required | Default | Description |
|---|---|---|---|---|
| Subflow | Enum | Yes | Empty | The subflow to run from this workflow |
Note: At least one subflow must already exist in the workflow before this action can be configured.
Note: A subflow cannot call itself, either directly or indirectly through another subflow that is already running. This prevents unwanted infinite loops. If such a recursive call is detected, the workflow stops with an error.
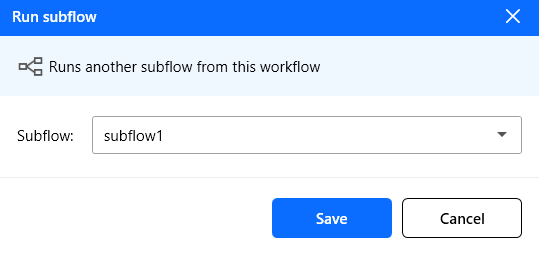
Figure: Run subflow action configuration.
Exit subflow
Ends the current subflow immediately and returns to the flow that called it. The remaining actions of the subflow are skipped, and the caller continues with the action after its Run subflow action.
Input Parameters:
No inputs needed.
Note: This action ends only the current subflow, not the whole workflow; to stop the workflow entirely, use Stop flow.
Note: This action can be used only in a subflow. It appears in the actions list while a subflow tab is selected, and it cannot be added to the Main flow. Copying it into Main is skipped as well.
Secure text
Some action fields hold values that should not stay visible on screen, such as a password or a PIN. These fields have a lock icon on their right side. Click the icon to display the value as secure text; click it again to display it as plain text. The lock icon is highlighted while the field is masked, and the field’s content is shown as •••••• both in the action window and in the flow description.
The fields that support secure text are:
- Text to fill-in in the Populate text field action.
- Text to send in the Send keys action.
- Value in the Set variable action.
- Clipboard text in the Clipboard action.
Note: Displaying a value as secure text only masks it on screen. The value is still stored in the workflow file as plain text and is not encrypted.
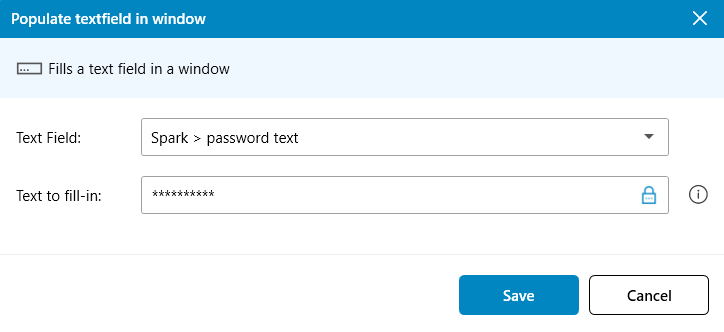
Figure: A field whose value is displayed as secure text.
Variables
Variables are placeholders that store values during workflow execution. These values can be reused across different actions, making workflows dynamic and flexible. To reference a variable in another action, use the format %variable_name%, which substitutes the stored value at runtime.
You can see the list of the currently generated variables by clicking on the variables icon at the top right corner of the menu items.
Define a variable
To define a new variable, select the Set variable action from the actions list.
To increase/decrease the value of a numeric variable, select the Increase variable action from the actions list.
Note: Variable names are case sensitive.
Note: The value of a variable can be updated multiple times in different flows.
Note: When setting the value of a variable, make sure that its type is selected correctly according to its use. For example, in loops, the variable must be of type numeric. Otherwise, you will encounter an error when executing the workflow.
Note: When choosing a variable name, make sure that you have not created it before; otherwise, it will be assigned the last value set for it and may cause interference.
Predefined variables
The variables CardId and UserId are reserved; one is the ID of the card tapped on the reader, and the other is the username of the card’s owner.
Window handle variables
Variable names that start with WindowHandle are reserved for window handles and cannot be used as ordinary variable names.
When a Display message action has Don’t wait for result enabled, the workflow continues while the dialog stays open, so the dialog needs to be closed later. The action stores the dialog’s window handle in a numbered WindowHandle variable: WindowHandle1 for the first such action in the workflow, WindowHandle2 for the next, and so on. To close that dialog, add a Window control action, set Find window mode to By window handle, select the matching WindowHandle variable, and set Window action to Close window.
Variable scope
To use a variable in an action, it must be defined in the previous flows.
When a variable is defined, it remains available throughout the workflow execution.
Variable types
A variable can be of type string, number, or a JSON string. A variable can be assigned different values during the execution of a workflow.
Using variables in actions
To access a variable in an action, use the format %var_name%. For example, if you have defined a variable named username, and you want to fill it in a text field, select the Populate text field action from the actions list, and set the value of the Text to fill-in to %username%. When the workflow is running, it will be replaced with the actual value of the username.
- To access values from a JSON variable, use dot notation.
Example JSON
{> “user”: {> “id”: 123,> “name”: “user1”> }> }
If the variable name is X:
X.user.id -> 123
X.user.name -> user1
- To access values from a data table, use row/column indexing.
Example data table:
| id | name |
|---|---|
| 123 | abc |
Syntax:
X[row][columnNameOrIndex]
Examples:
X[0]['id'] -> 123
X[0][1] -> abc
Insert a variable into a field
Fields that accept variables have a variable icon on their right side. Click it to open the list of the variables defined in the workflow, filter the list with the search box, and select one to insert it into the field wrapped in % (for example, %username%) at the cursor position. This saves typing the name and avoids typos.
Note: Fields that also support secure text show the variable icon next to the lock icon, and the picker works whether the value is displayed as plain or secure text.
Shared variables
In the Variables panel, each variable has a Shared checkbox. Shared variables are passed to the next workflows in a chained workflows design: when the workflow finishes, the values of its shared variables travel along the connections and become available to the workflows that run after it.
A workflow also keeps its own shared variables between its own runs. When it runs again inside the same design, it starts with the values it shared the last time, so it can carry state (a counter, for example) from one run to the next. This applies to every workflow except one whose trigger condition is None, and the remembered values are discarded when the registered design changes or the Workflow Runner service restarts.
Note: Sharing a variable only matters inside a chained design. In a workflow that runs on its own, the setting has no effect.
Note: Values arriving from a preceding workflow take precedence over the ones the workflow remembers from its own previous run.
Note: The trigger context variables
UserIdandCardIdalways take precedence over incoming shared variables with the same name.
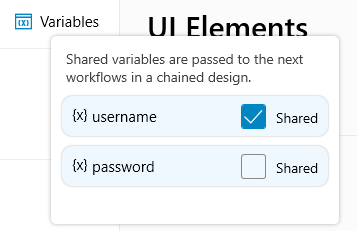
Figure: Marking a variable as shared in the Variables panel.
UI Elements
A UI element (User Interface Element) is a distinct, identifiable component of a software interface that an automation process can recognize, interact with, and manipulate during execution. For example, buttons, text boxes, hyperlinks, or images are UI elements.
You can add these elements to the workflow and perform actions (like clicking) on them.
To add UI elements to the workflow, click on the Add UI element button at the top right of the workflow editor window.
UI Element Picker
When you click on the Add UI element, the UI Element Picker window opens in Capture mode.
In Capture mode, add elements directly from the target app:
- Hover your mouse over the target UI element until a red highlight rectangle appears.
- Confirm the element label shown at the top of the rectangle.
- Press and hold Ctrl, then left-click to add that element to the list.
Some UI controls include nested child elements (for example, a button that contains a text element). Always verify the highlighted element name before adding, so you capture the correct one.
Inspector Mode
Use Inspect when hovering is difficult or when you need more precise selection.
- Click Inspect in the picker window.
- In the tree, expand the target window and its child nodes to find the exact UI element.
- Select a concrete element (not a container/placeholder), then click Add selected.
- The selected element is highlighted on screen, and once added it appears in the elements list.
- If the UI tree changes, click Refresh to reload the inspector tree.
- Press Done once you have added all of the intended elements.
The picker prevents duplicate additions of the same element path.
If Add selected is disabled, choose a valid supported UI element node.
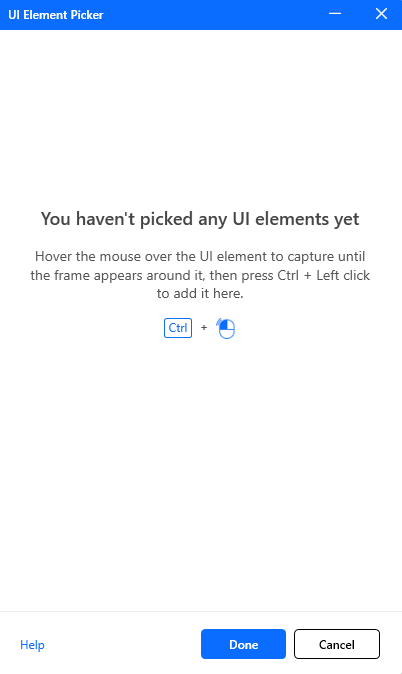
Figure: The UI element picker environment.
Java application support
The picker can also capture UI elements from Java (Swing/AWT) applications through the Java Access Bridge. Enable it during installation, or later from the Settings panel, where you can choose to enable it for the current user or for all users.
UI Element Selector
UI elements are organized in a hierarchical tree structure, where each element is represented as a node with parent–child relationships. The root node typically corresponds to the application window, and all interface components—such as panels, buttons, and text fields—are arranged beneath it in nested layers. To access or interact with a specific element, the automation process must traverse the correct path through the tree, starting from the root and moving step by step down to the target node.
Therefore, in order to find an element properly, it is necessary to set attributes that will help in the process of finding it. For example, to find a browser window, we can find it by searching for the process name and title of that window.
To edit selectors of a UI element, double-click on the element that exists in the elements tree. The element selector window will appear, which contains:
- Selectors: The list of selectors defined for the element (see Multiple selectors).
- Elements: Contains all intermediate elements—such as window, panels, groups, or parent controls—that lead to the target element.
- Attributes: Contains all attributes of the selected element that help in finding the correct element. You can edit the desired attribute’s value.
Note: To exclude an element from the search operation, uncheck it. When you uncheck a step in the elements list, that step is removed from the effective selector path. The saved path only includes active steps. Use this when an intermediate container is optional, duplicated, or unstable.
Note: To exclude an attribute from matching during search, uncheck it. When you uncheck an attribute, that step remains in the path, but matching ignores that property. Only attributes that are enabled and have a value participate in the search.
Note: The Ordinal attribute identifies an element by its position among sibling elements that match the same selector. Enable it only when a selector still matches more than one element and you need to target a specific one (for example, the second matching row). Prefer more distinctive attributes first, because ordinal positions can change if the interface layout changes.
Guidance: Disable a whole element when the hierarchy level is wrong or unnecessary. Disable an attribute when the property is volatile (titles, generated IDs) but the element itself is still the right node type and position in the tree.
Note: If you want to create a workflow that is going to run on other systems, be careful when choosing the selector and attributes so that the values are not dependent on your system. For example, when the root view of an element is a window, the title of that window is browser-tab-dependent, so you can uncheck the Name attribute to avoid mismatches.
Editing the elements of a selector
Besides checking and unchecking the captured steps, you can change the path itself. The Elements panel offers:
- Add element: the + button next to the Elements heading inserts a new step below the selected one.
- Duplicate, Change, and Delete: available from the three-dot menu at the end of each element row.
- Reorder: drag an element row to a new position in the list.
Add element and Change open a small editor window where you set the step’s Type (the UI element type, such as Window, Pane, or Button) and its Id, Class, and Name attributes. Every other attribute stays in the Attributes panel of the selector window.
Note: When you change the type of an existing element, the attributes that the new type also has are carried over, and the ones it does not have are dropped.
Note: The first and last elements are always part of the path: the first anchors the search and the last is the element the action works on. They cannot be unchecked, and adding, deleting, or reordering elements keeps this in step.
Note: A selector must keep at least one element, so Delete is unavailable when only one is left.
Multiple selectors
A single UI element can have more than one selector. This is useful when the same element can be identified in different ways depending on the situation (for example, the target app looks slightly different across versions, layouts, or machines). When the workflow runs, the enabled selectors are tried in order, and the first one that locates the element on screen is used.
The Selectors panel of the element selector window lets you manage the selectors of the element:
- Add a new selector using the Add selector button.
- Test, Duplicate, Rename, Move up/Move down, or Delete a selector from its context menu.
- Select a selector to view and edit its Elements and Attributes.
Note: Each selector is an independent path with its own elements and attributes. Order your selectors so that the most reliable one comes first. Provide alternative selectors only when a single one cannot reliably match the element in every situation.
Regular expressions
Attribute values support Regular Expressions. To match an attribute with a regular expression, set the attribute’s Operator to Regular Expression and enter the pattern as its value. Choose regular expressions when the property is still the right one but only a pattern is stable, meaning only part of the value is predictable. For example:
Window or tab titles that include a file name, tab title, or counter.
Labels with dates, IDs, or user-specific suffixes.
Note: For example, to match any window whose title starts with
Reportand ends with^Report.*\.pdf$. Matching uses case-insensitive regex. Use this documentation for more information on syntax and behavior.
Variables in values
Attribute values can support workflow variables where the product substitutes placeholders before matching. Use that for data that is not fixed at authoring time.
Stability and portability
Not all attributes are equally stable across machines, sessions, or user actions:
Same machine, different situation: focus, open tabs, document name, list order, and dynamically generated lists can change Name, Text, or Id without changing computers.
Different machines: paths in titles, localization, scaling, and process naming can differ.
Id may be an intentional stable id, or it may be generated when the UI is data-driven; treat it as stable only after you verify it across scenarios.
ProcessName helps distinguish hosts but is environment-dependent if executables or hosting differ.
Practical approach:
Start from the capture and test the selector in realistic conditions (other tabs, other data).
If matching fails, decide whether the failing constraint is wrong in principle (uncheck attribute or step) or partially predictable (use Contains / Starts with / regex).
Prefer the shortest set of constraints that still identifies the control uniquely.
Test selectors
To make sure the selector is set correctly, click the Test button at the top of the selector window. If the element is located on the screen and found, a red rectangle will appear around it.
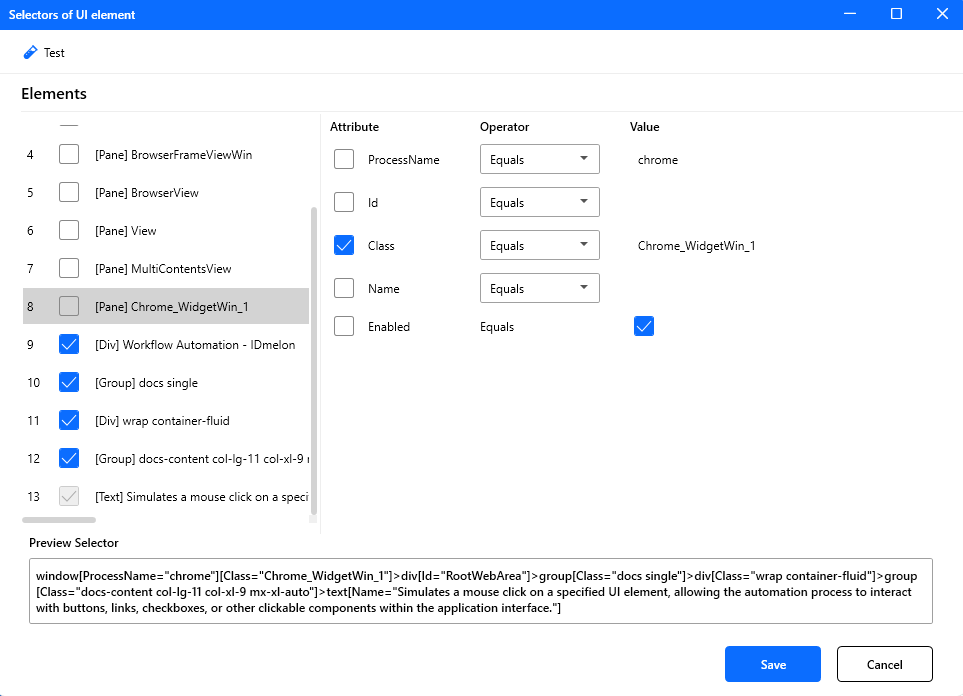
Figure: The UI element selector environment.
UI element tree view
UI elements are shown in a tree, grouped under their window. The tree view provides several aids to help you keep elements organized and connected to your flows:
- Element icons: Each element shows an icon representing its type (button, input, checkbox, and so on), making it easier to identify elements at a glance.
- Relationship highlighting: When you select a UI element in the tree, every flow that uses that element is highlighted in the flows list, and the view scrolls to the first matching flow. This helps you see exactly where an element is used.
- Attention icon for unused elements: An attention icon appears next to any UI element that is not used by any flow, so you can quickly spot and clean up elements that are no longer needed.
- Context menu: Right-click an element to Rename or Delete it.
Deleting a UI element
To delete a UI element from the tree, select the element and press the keyboard Delete key or select the delete option from the context menu. To delete all UI elements of a window, select and delete the window.
Note: When you delete an element, all related flows (element-based actions) will be deleted too.
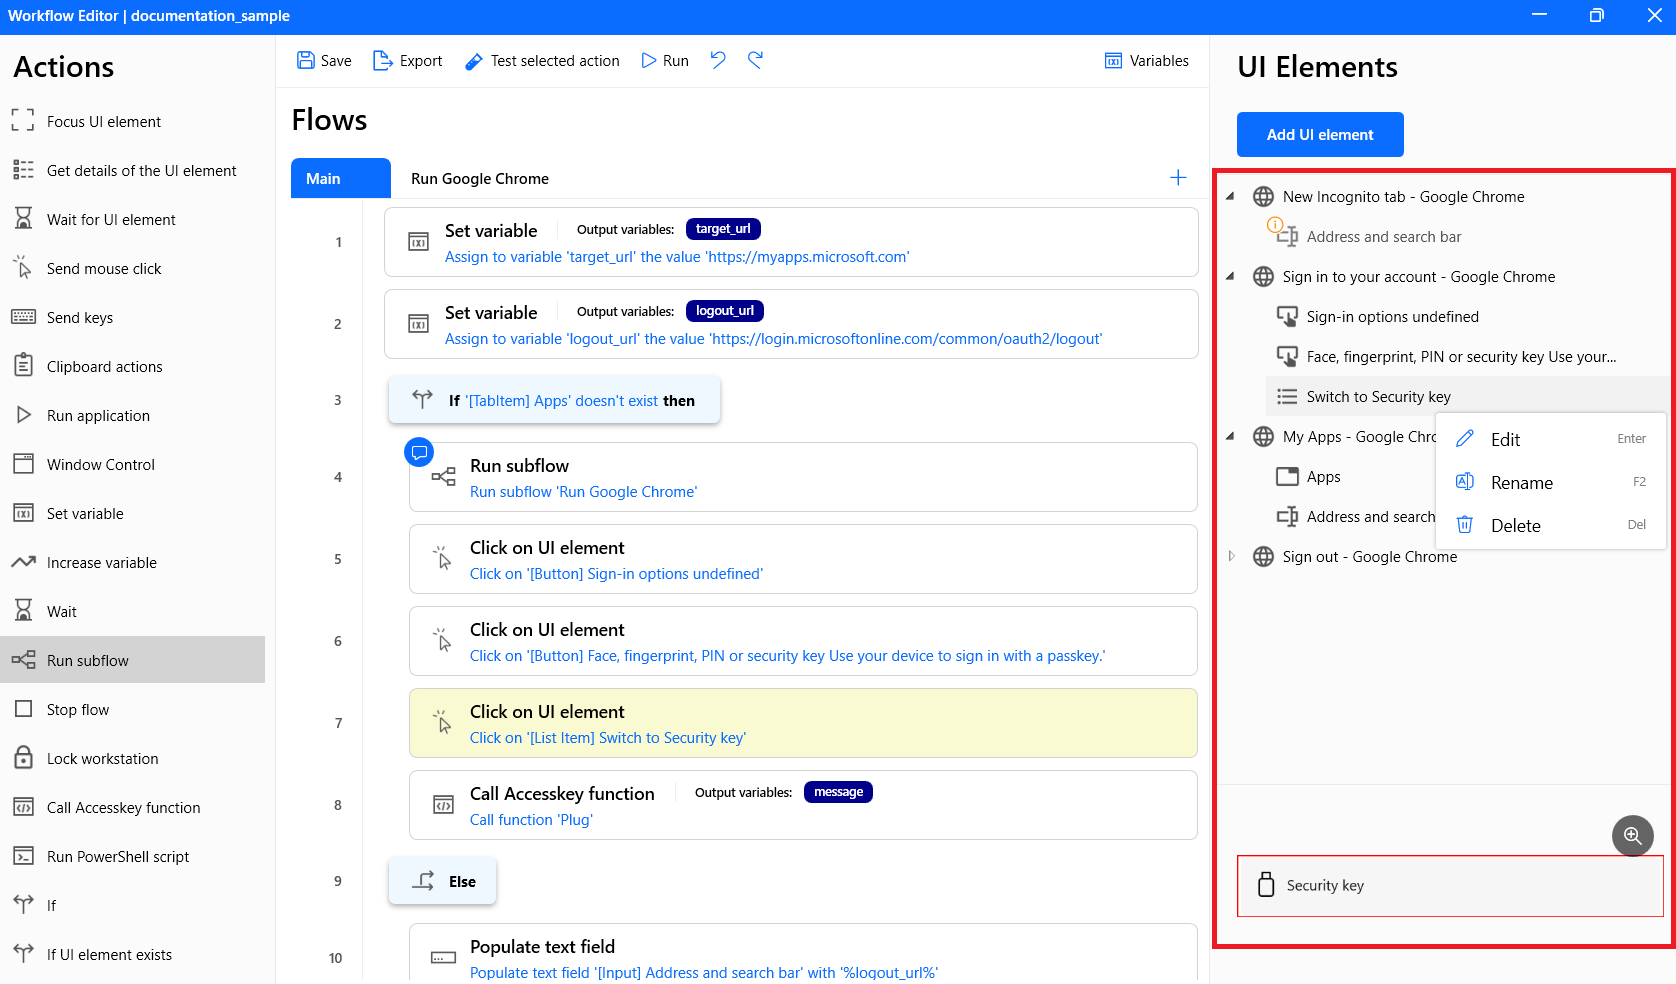
Figure: The UI element tree view environment.
Flows
A flow is an action with specific parameters and conditions that will be executed one by one when the workflow starts.
You can see the list of flows in the middle section of the workflow editor. Each flow shows a line number so you can easily reference and locate actions within the workflow.
Some commands are defined for flows that you can use by clicking the right mouse button on a selected row or rows.
Below is the list of the available commands:
Run from here
To test the workflow from a specific row, select the target row and then select Run from here.
Moving flows
You can move a flow up or down using the Move up and Move down commands.
You can also move one or multiple flows to any rows using mouse drag and drop. For some special actions like Else if, Else, Next loop, Exit loop, and End block, the order of the flows must be respected.
Copy-Paste flows
You can create duplicates from a flow using copy and paste commands (or Ctrl+C and Ctrl+V shortcuts).
Note: For actions that contain variables, make sure variables with the same name do not cause conflicts.
Disable/Enable flows
If you want to disable a flow temporarily to prevent it from running, select Enable/Disable action.
Note: A disabled flow will be ignored from the exported workflow.
Comment a flow
You can attach a comment to any flow to document what it does or why it is needed. Right-click the flow and select Comment, then enter your note. A comment icon appears on the flow, and hovering over it shows the comment text.
Note: Comments are for documentation only and do not affect how the workflow runs.
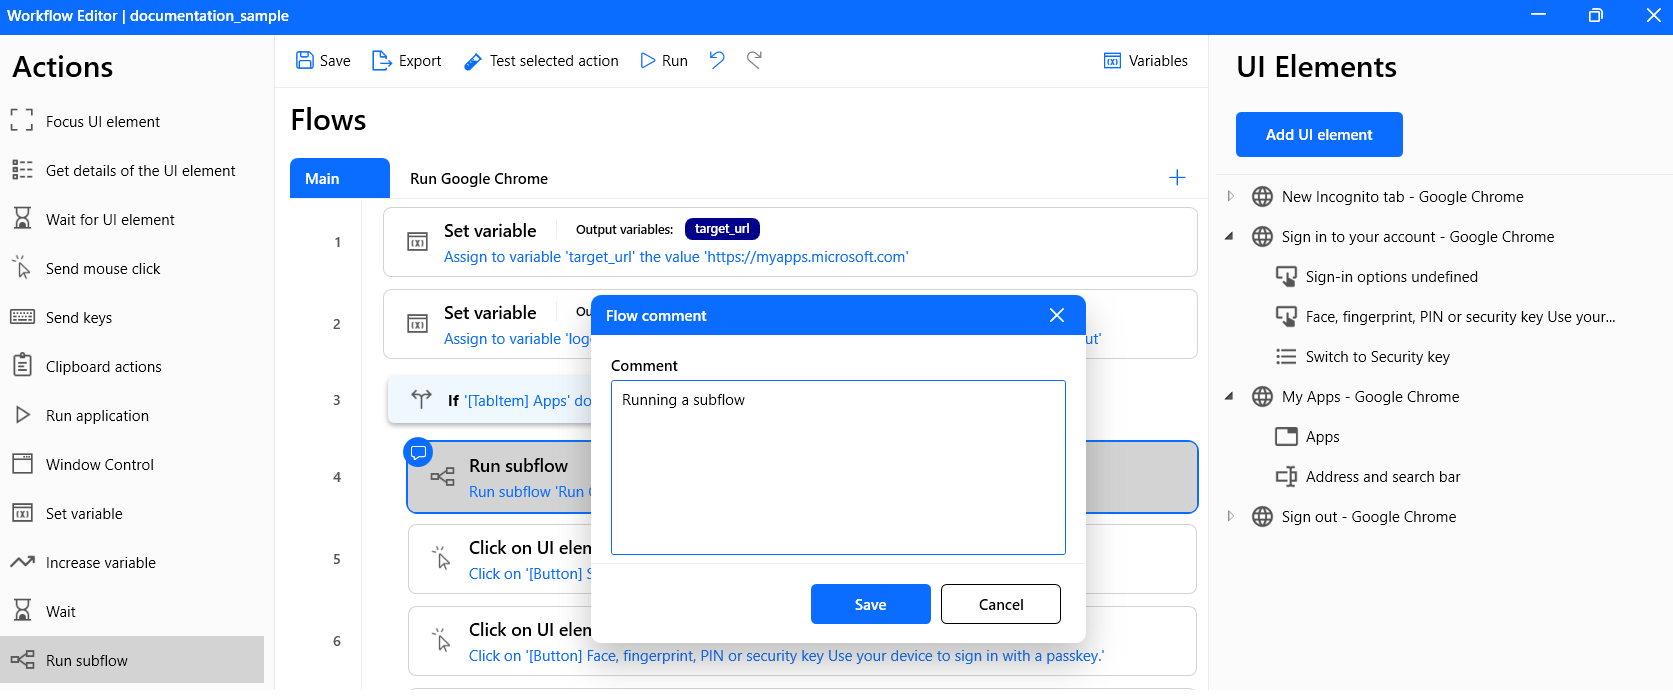

Figure: A Comment for a flow.
Undo/Redo
You can undo and redo changes you make to the flows (such as adding, moving, editing, or deleting actions) using the Undo and Redo buttons in the toolbar, or the Ctrl+Z (undo) and Ctrl+Y (redo) keyboard shortcuts.
Run/Stop workflow
To test the workflow, click on the Run button, and to stop it, click it again.
While the workflow is running, the flows list shows the execution progress:
- A green arrow marks the flow that is currently running.
- A red cross marks a flow that failed during execution. Hover the mouse over the red cross to see the error message for that flow.
Test Selected Action
To test the selected flow, click on the Test selected action button.
Note: When you select multiple flows, this event only affects the first selected flow.
Subflows
Subflows let you split a large workflow into smaller, named parts and reuse a shared sequence of actions. Every workflow has a Main flow, which is the entry point that runs when the workflow starts. In addition to Main, you can create one or more subflows.
Subflows are shown as tabs above the flows list. The Main tab is always present; each subflow you create appears as an additional tab.
Creating and managing subflows
- Click the Add subflow button (the + next to the tabs) to create a new subflow.
- Enter a name for the subflow and choose its Scope (see below).
- Select a subflow’s tab to edit its flows, just like you edit the Main flow.
Right-click a subflow tab to Move left, Move right, Rename, Clone, or Remove it.
Note: The name Main is reserved for the main flow, and each subflow must have a unique name.
Running a subflow
A subflow does not run on its own. To run it, add a Run subflow action to the Main flow (or to another subflow) and select the subflow to run.
Subflow scope
When you create a subflow, you choose how it handles variables:
- Local: The subflow runs with its own isolated copy of the variables. Any variable changes made inside the subflow are discarded when it finishes, so they do not affect the caller. Use this to keep a reusable subflow self-contained.
- Global: The subflow shares variables with the rest of the workflow. Variable changes made inside the subflow persist after it returns. Use this when the subflow is meant to produce results for the caller to use.
Note: The scope is chosen when the subflow is created and cannot be changed afterward.
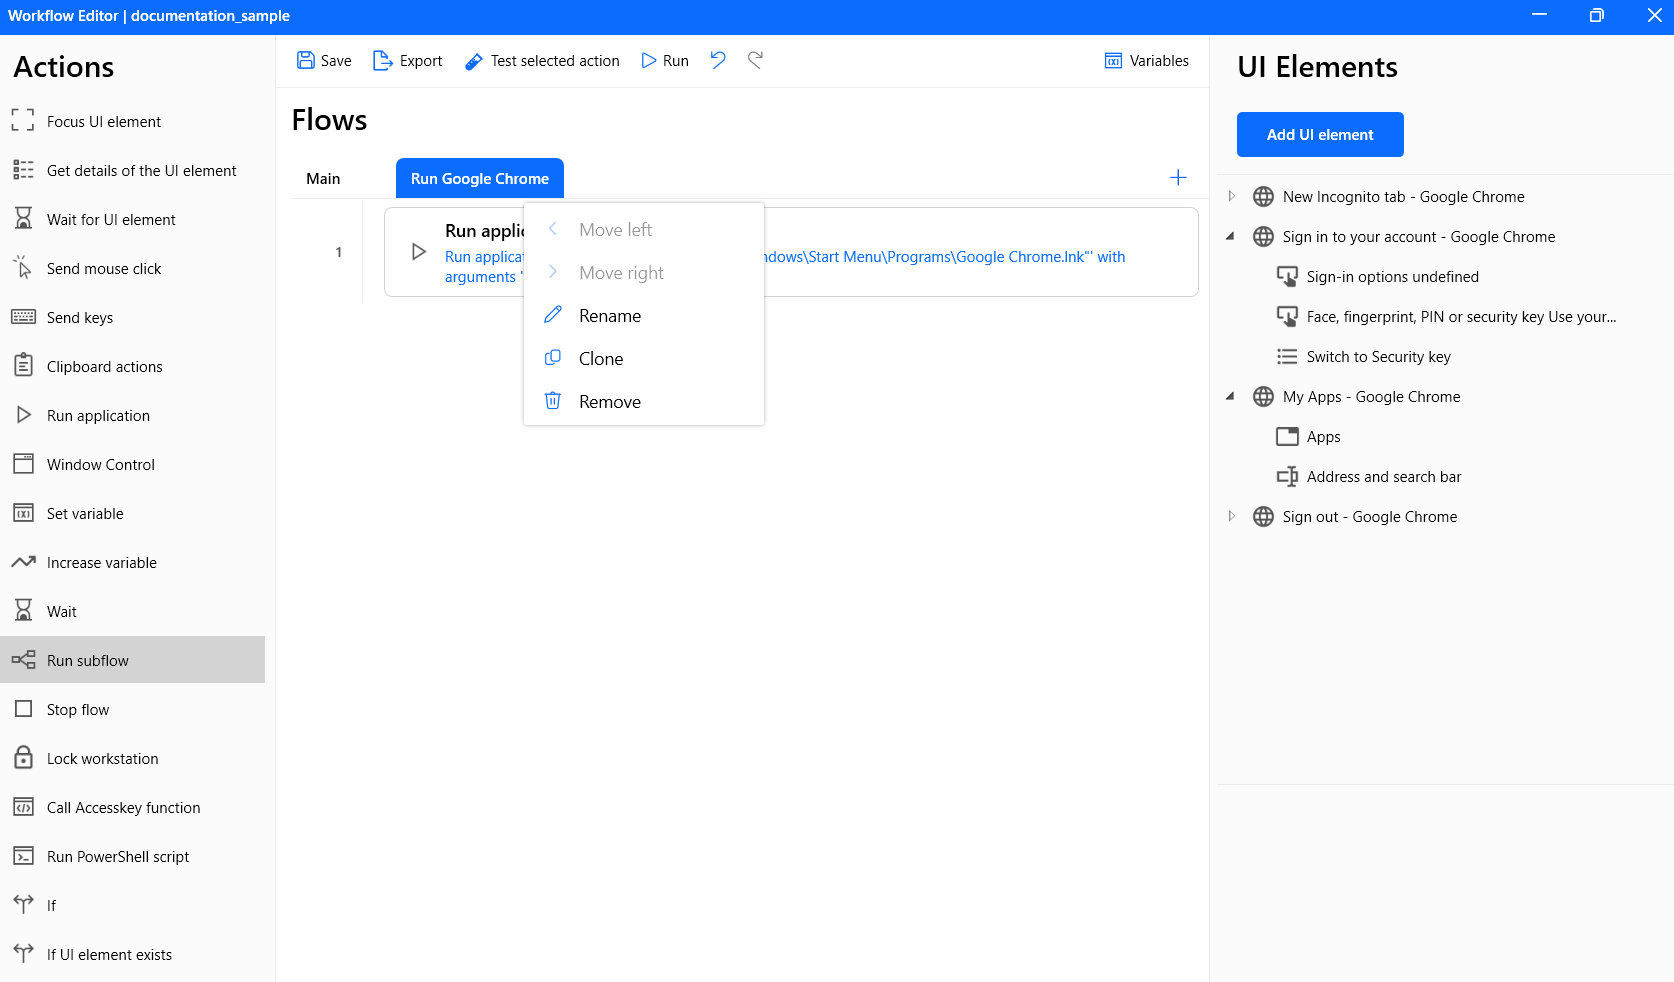
Figure: A subflow that runs Google Chrome.
Report an issue
If something does not work as expected, you can send a report to IDmelon support from the app. Click the Help button in the toolbar at the top of the Workflow Editor and select Report an Issue.
In the Report an Issue window:
- Describe the problem in the What went wrong? box. This field is required.
- Leave Include application logs selected to attach the IDmelon Accesskey and Workflow Automation logs.
- Optionally select Include workflows, then tick the workflows you want to attach as
.idwfpackages. - Click Send.
The report is delivered through IDmelon Accesskey.
Note: Attached workflows may contain sensitive data, so review your selection before sending.
Note: If the report cannot be sent, it is saved as a
.ziparchive in the IDWA_temp folder on your desktop, and the app offers to open the containing folder so that you can email the archive to[email protected]yourself.
Chained Workflows
A chained workflows design links several workflows together so that finishing one starts the next. Each workflow keeps its own actions and trigger condition, and the design decides the order they run in and what happens when one of them fails.
Use it when a task is too large for a single workflow, or when the next step depends on whether the previous step succeeded. For example, sign in, then open an application on success, or show an error message on failure.
Chained Workflows Designer
Designs are created in the Chained Workflows Designer, a separate app installed with Workflow Automation. You can open it in three ways:
- Click the Chained workflows button in the toolbar at the top of the Workflow Editor.
- Use the Chained Workflows Designer shortcut on the desktop or in the Start menu.
- Double-click an existing
.idcwfdesign file.
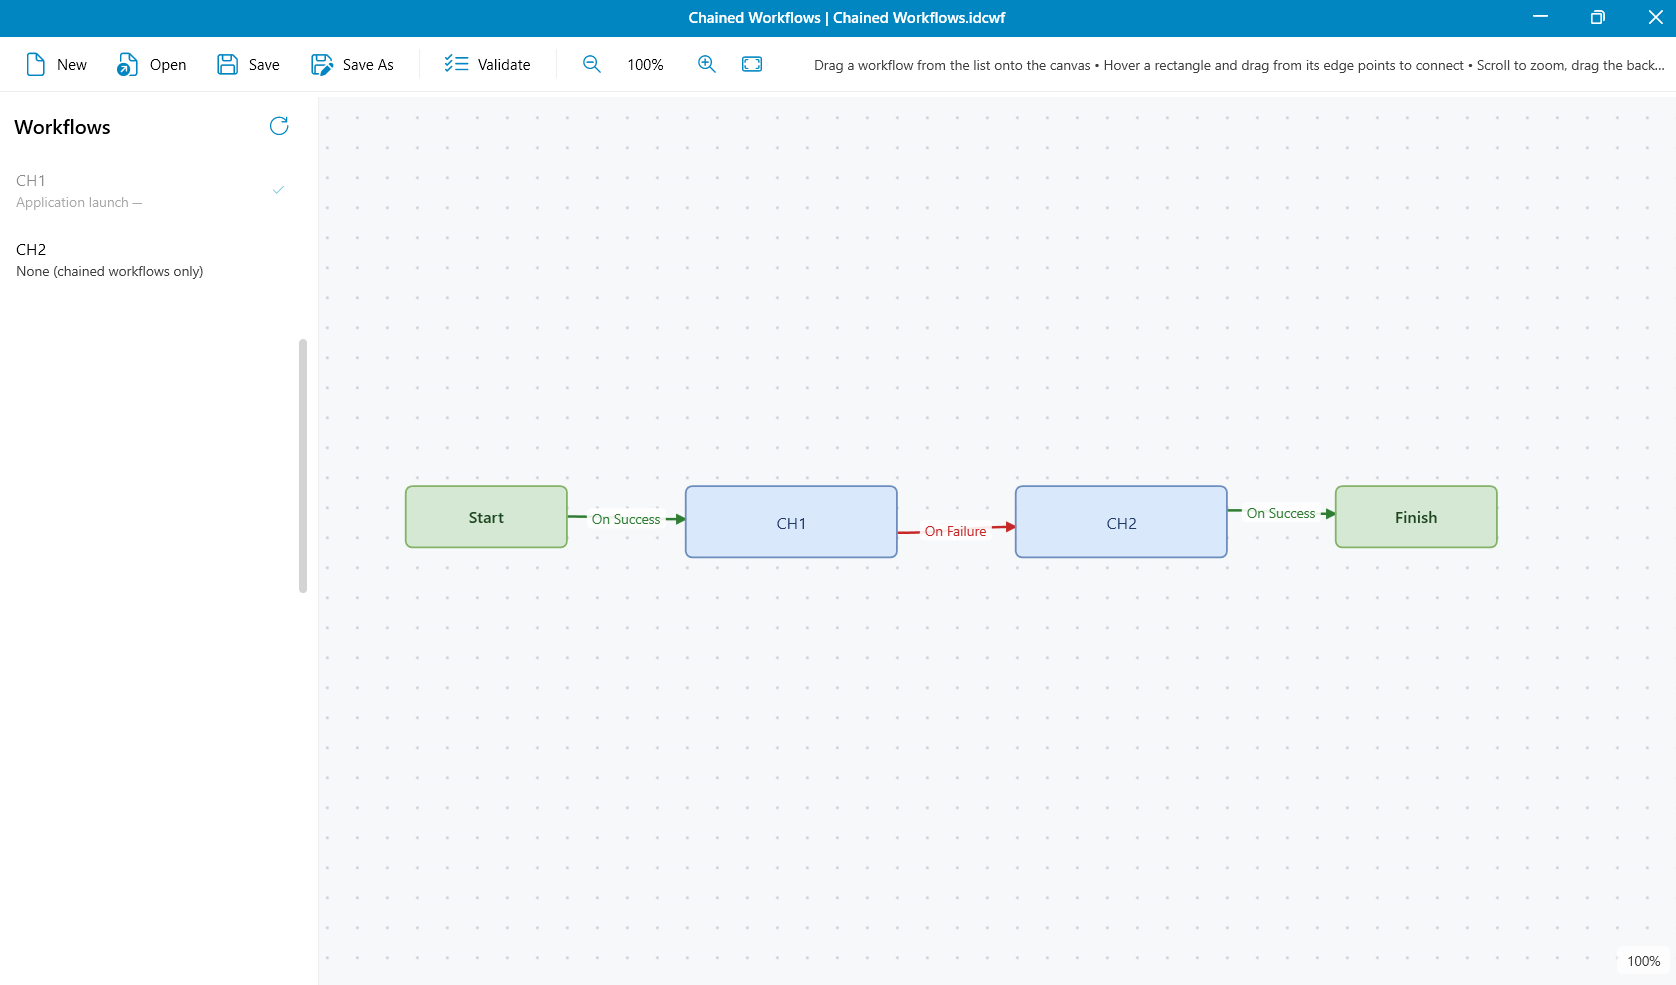
Figure: The Chained Workflows Designer with a design on the canvas.
Building a design
The canvas (designer pane) always contains two fixed rectangles, Start and Finish. Between them you place the workflows:
- Drag (or double-click) a workflow from the list onto the canvas. It appears as a rectangle.
- Hover over a rectangle and drag from one of its edge points to another rectangle to connect them.
- Connect Start to the workflow that begins the chain.
- Connect the last workflow to Finish.
Scroll to zoom, and drag the background to pan.
Every workflow rectangle has two outputs:
| Output | When it is followed |
|---|---|
| On Success | The workflow finished successfully. |
| On Failure | The workflow ended with a failure. |
Connect each output to whichever workflow should run next; you can leave an output unconnected if nothing should follow it.
Entry workflows
A workflow connected directly from Start is an entry workflow: it is the one that can start the chain on its own, using its own trigger condition. It can use any trigger condition except None. A connection from Start only arms the workflow with its own trigger, and None never fires, so a None workflow placed there would never run. Every other workflow in the design runs only when a connection leads to it, no matter what its own trigger condition is.
Connecting Start to more than one workflow creates several independent entries, each starting its own chain when its trigger fires.
For a workflow that should never start on its own, set its trigger condition to None in the Workflow Editor. Such a workflow runs only through the chain, and it is the only kind that can be placed on the canvas more than once.
Validating a design
Click Validate to check the design before you save it. Validation reports errors that prevent the design from running, such as:
- The design contains a loop and would run forever.
- A workflow file referenced by a rectangle no longer exists.
- A workflow (other than one with the None trigger) is placed more than once.
- Two workflows use the same single-instance trigger condition (Security key presence (card tap), Screen unlock, Screen lock, Transparent unlock, Transparent lock, or User logon).
- Two Application launch workflows watch the same process.
- Two Window appear workflows watch for the same window.
- A Window appear workflow has no window criteria, or its title is an invalid regular expression.
It also reports warnings for things that are allowed but probably unintended, such as a workflow that cannot be reached from Start, or one with no path to Finish.
Saving a design
Save writes the design as an .idcwf package. The package is self-contained: it holds the design plus a copy of every workflow it uses, so it can be moved to another computer without the original workflow files.
Running a chained workflows design
To put a design into service, register it with automationcli:
automationcli chained set --path "C:\ProgramData\IDmelon\Workflow Automation\workflows\sample.idcwf"
Add --user "NAME" to apply the design to a single Windows user instead of every user on the machine.
The Workflow Runner then arms only the design’s entry workflows. When an entry’s trigger fires, the chain runs one workflow at a time, following the On Success and On Failure connections until it reaches Finish or runs out of connections.
Shared variables travel along the connections, so a workflow can pass values to the workflows that run after it.
Note: A chained design and individually registered workflows cannot be active at the same time. While a design is set, individually registered workflows are ignored and
automationcli workflows addis blocked. Remove the design to go back to running workflows individually.Note: You can set one design per Windows user, or a single design for all users, but not both at once.
Workflow Runner
Workflow Runner is a Windows service (IDmelon Workflow Runner) that runs your registered workflows automatically, based on each workflow’s trigger condition. It is installed together with Workflow Automation, runs in the background for all users, and starts with Windows.
To make a workflow run automatically:
- In the Workflow Editor, set the workflow’s trigger condition.
- Export the workflow as a
.jsonfile. - Register the exported workflow so the runner picks it up, using the method that matches its trigger:
- Application launch, Screen unlock, Screen lock, User logon, or Window appear: register with
automationcli. - Security key presence (card tap), Transparent unlock, or Transparent lock: register through Accesskey (see Configuring Accesskey).
- Application launch, Screen unlock, Screen lock, User logon, or Window appear: register with
To run several workflows one after another instead of individually, register a chained workflows design (see Registering a chained workflows design).
You can control whether the runner starts with Windows from the Settings panel (see Startup behavior for Workflow Runner).
While a workflow is running
When the runner starts a workflow, an animated spinner appears in the Windows notification area, with a Workflow is running message above it and the workflow’s name in its menu. To end the run before it finishes, right-click the spinner and select Stop workflow.
When the run ends, the spinner is replaced for a few seconds by a green check mark and a Workflow completed message, or a red cross and a Workflow failed message, before the icon disappears.
Note: The spinner appears only when a user is signed in with a desktop available. Stopping a workflow this way is not treated as a failure of the workflow.
Note: In a chained workflows design, stopping a workflow this way stops the whole chain. The On Failure connections are not followed, because the stop is a user decision rather than a workflow failure.
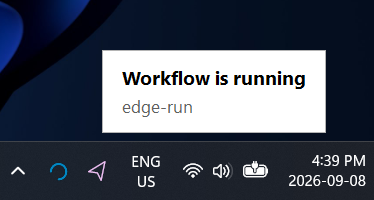
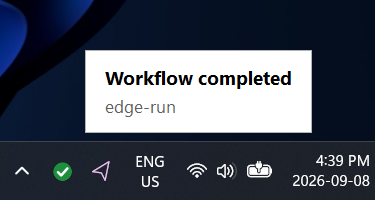
Figure: The workflow indicator while the workflow runs, and when it finishes.
Registering workflows with automationcli
automationcli is a command-line tool, installed with Workflow Automation and available on the system PATH, that registers exported workflows to run on their trigger condition. Registering and removing workflows affects all users on the machine, so run these commands as an administrator.
| Command | Description |
|---|---|
automationcli workflows add --path "PATH.json" [--user "NAME"] | Register a workflow. Use --user to scope it to a specific Windows user; omit it to apply to all users. |
automationcli workflows remove [--path "PATH.json"] [--user "NAME"] | Remove a registered workflow. Without --path, it lists the registered workflows so you can choose one to remove. |
automationcli workflows list | List the registered workflows with their user scope and trigger condition. |
automationcli workflows reset | Clear the list of registered workflows. |
automationcli workflows refresh | Make the runner re-read every registered workflow and re-arm its trigger, without changing the registration. |
Example:
automationcli workflows add --path "C:\ProgramData\IDmelon\Workflow Automation\Workflows\documentation_sample.json"
Note:
automationclihandles the Application launch, Screen unlock, Screen lock, User logon, and Window appear triggers, which the runner watches for directly. The Security key presence (card tap), Transparent unlock, and Transparent lock triggers are driven by Accesskey instead, see Configuring Accesskey.Note: For a Window appear workflow,
automationcli workflows listalso shows the window criteria the workflow watches for, its matching timeout, and its execution limit.Note: Use
refreshafter you export a workflow over one that is already registered. The runner does not watch the workflow files themselves, so it keeps using the trigger condition it read last until you refresh it. The reload takes about a second, and it also re-reads a registered chained workflows design.
Registering a chained workflows design
Use the chained commands to choose which chained workflows design the runner executes.
| Command | Description |
|---|---|
automationcli chained set --path "DESIGN.idcwf" [--user "NAME"] | Set the design to run. Use --user to scope it to a specific Windows user; omit it to apply to all users. |
automationcli chained remove [--user "NAME"] | Remove the design registered for a user, or the all-users design when --user is omitted. |
automationcli chained reset | Remove all registered designs. |
automationcli chained show | Show the designs that are currently set. |
Example:
automationcli chained set --path "C:\ProgramData\IDmelon\Workflow Automation\workflows\sample.idcwf"
Note: Setting a design disables individually registered workflows, and an all-users design cannot be combined with per-user designs.
Managing the Workflow Runner service
Use the service commands to control the IDmelon Workflow Runner service, for example after changing a registration. These commands must be run as an administrator.
| Command | Description |
|---|---|
automationcli service start | Start the Workflow Runner service. |
automationcli service stop | Stop the Workflow Runner service. |
automationcli service restart | Restart the Workflow Runner service. |
Configuring Accesskey
Use Accesskey to register a workflow for the Security key presence (card tap), Transparent unlock, or Transparent lock trigger.
Export the desired workflow from the Workflow Editor.
In PowerShell, run the command that matches the workflow’s trigger condition to activate the automation.
For the Security key presence (card tap) trigger:
accesskeycli workflow-automation -s -t automation-app --action execute --workflow-path "PATH_TO_WORKFLOW_FILE"For the Transparent unlock trigger, add the
--trigger-condition onTransparentUnlockoption:accesskeycli workflow-automation -s -t automation-app --action execute --workflow-path "PATH_TO_WORKFLOW_FILE" --trigger-condition onTransparentUnlockFor the Transparent lock trigger, add the
--trigger-condition onTransparentLockoption:accesskeycli workflow-automation -s -t automation-app --action execute --workflow-path "PATH_TO_WORKFLOW_FILE" --trigger-condition onTransparentLockTo disable the automation, enter the following command in PowerShell:
accesskeycli workflow-automation -t automation-app -r
Uninstalling Workflow Automation
When you uninstall Workflow Automation, your personal data (workflows and application settings) is kept by default.
If you also want to remove this data, select the remove user data option in the uninstaller before continuing. When this option is selected, your saved workflows and settings are permanently deleted along with the application.
Note: Removing user data cannot be undone. If you might reinstall later and want to keep your workflows, leave this option unchecked or export your workflows as
.idwffiles first.