Deploying IDmelon Kiosk Using Intune
This guide provides step-by-step instructions for deploying IDmelon Kiosk for Kiosk Mode Policy using Microsoft Intune.
Step 1: Add IDmelon Kiosk App to Intune
- Access the Endpoint Manager Microsoft Intune.
- Navigate to Apps > All apps.
- Add a New Microsoft Store App
- Click on + Create at the top of the screen.
- From the dropdown, select Microsoft Store app (new).
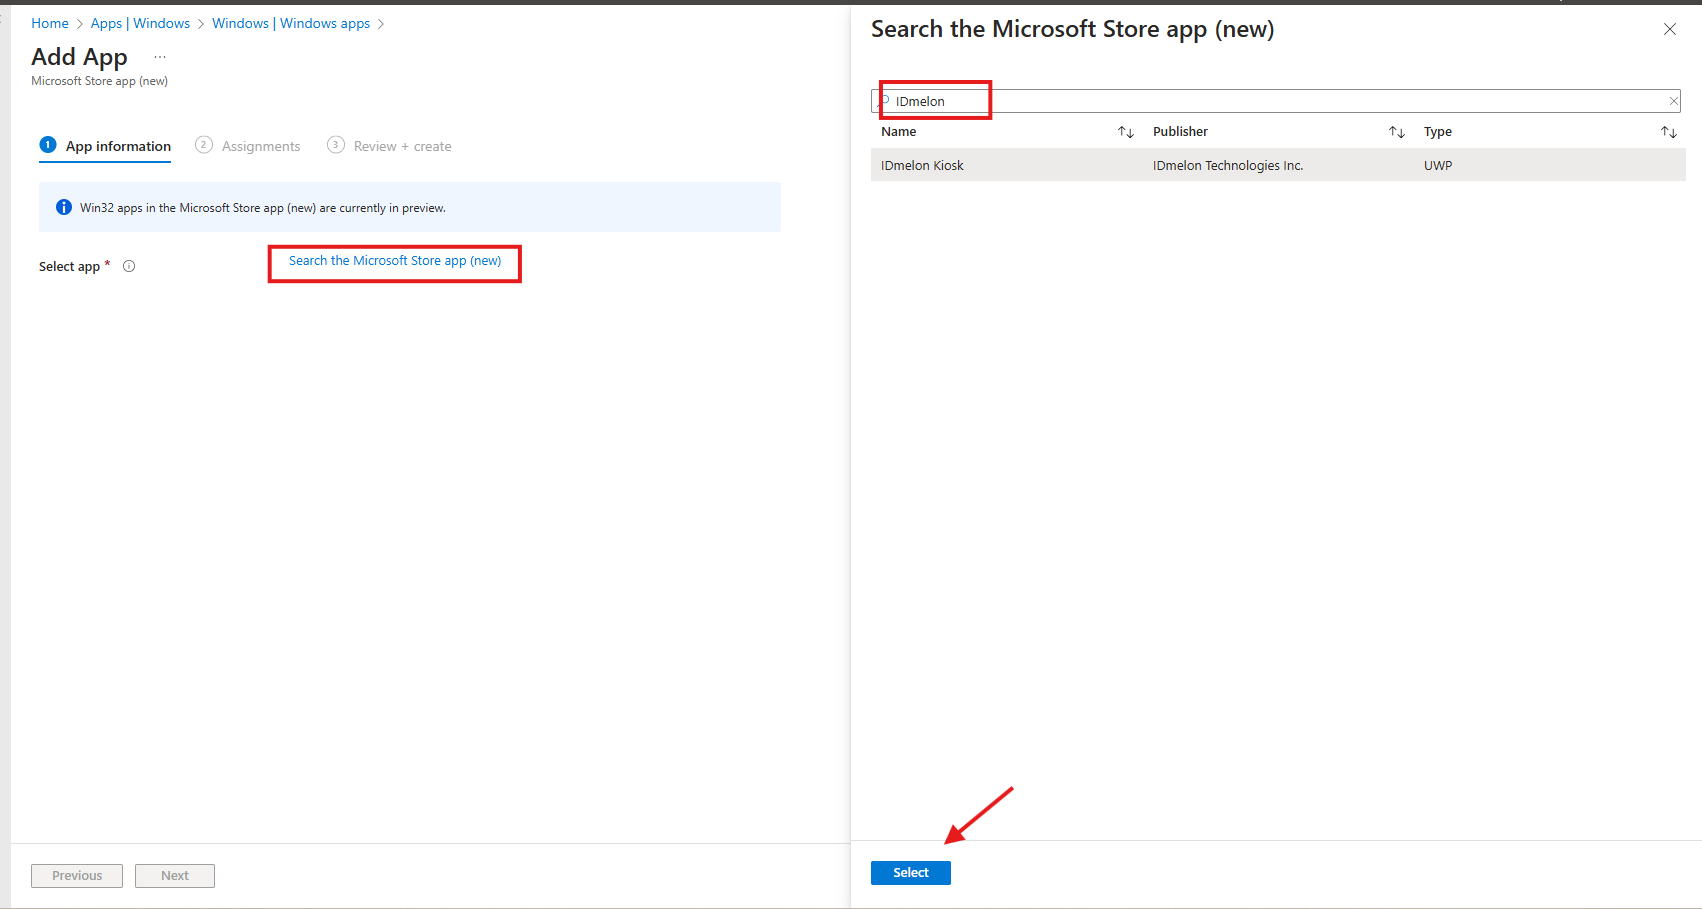
- Search for IDmelon Kiosk in the Microsoft Store and select it.
- In the App Information pane, click Search the Microsoft Store app (new).
- A search window will appear.
- In the search field, type IDmelon Kiosk.
- Press Enter.
- Locate IDmelon Kiosk from the search results.
- Click on the app name to select it.
- Configure App Information
- Change the Install behavior to System
- Click Next to continue.

- Assignments:
- Decide who gets the app.
- Under Required, click Add Group and select the device or user groups you want to deploy the app to.
- Click Next when done.

- Decide who gets the app.
- Review + Create:
- Review all the configurations you’ve made.
- Click Create to add the app and its dependencies to Intune.
Step 2: Create a Kiosk Configuration Policy
- Navigate to Configuration Profiles:
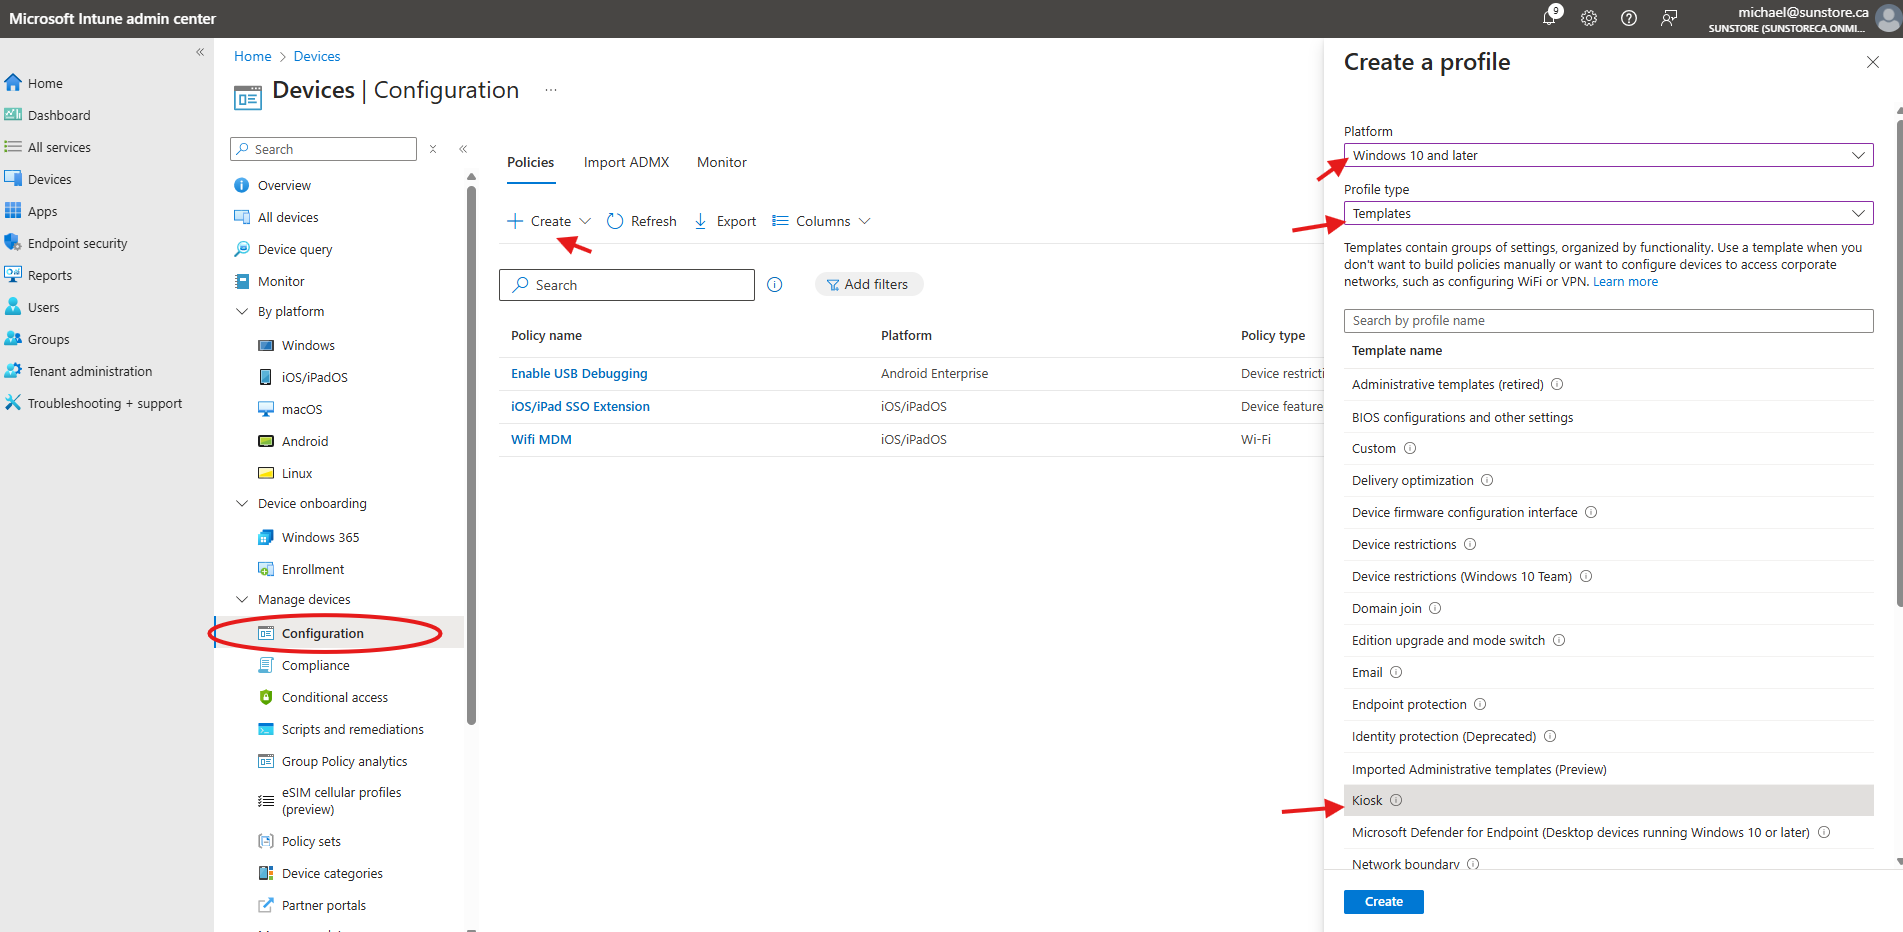
- Go to Devices > Configurations.
- Create a Kiosk Policy:
- Click + Create > New Policy.
- Platform: Choose Windows 10 and later.
- Profile type: Select Templates > Kiosk.
- Configure Basics:
- Name: Enter IDmelon Kiosk Configuration.
- Description: Provide details to identify the profile (optional).
- Click Next to proceed.
- Configuration Settings:
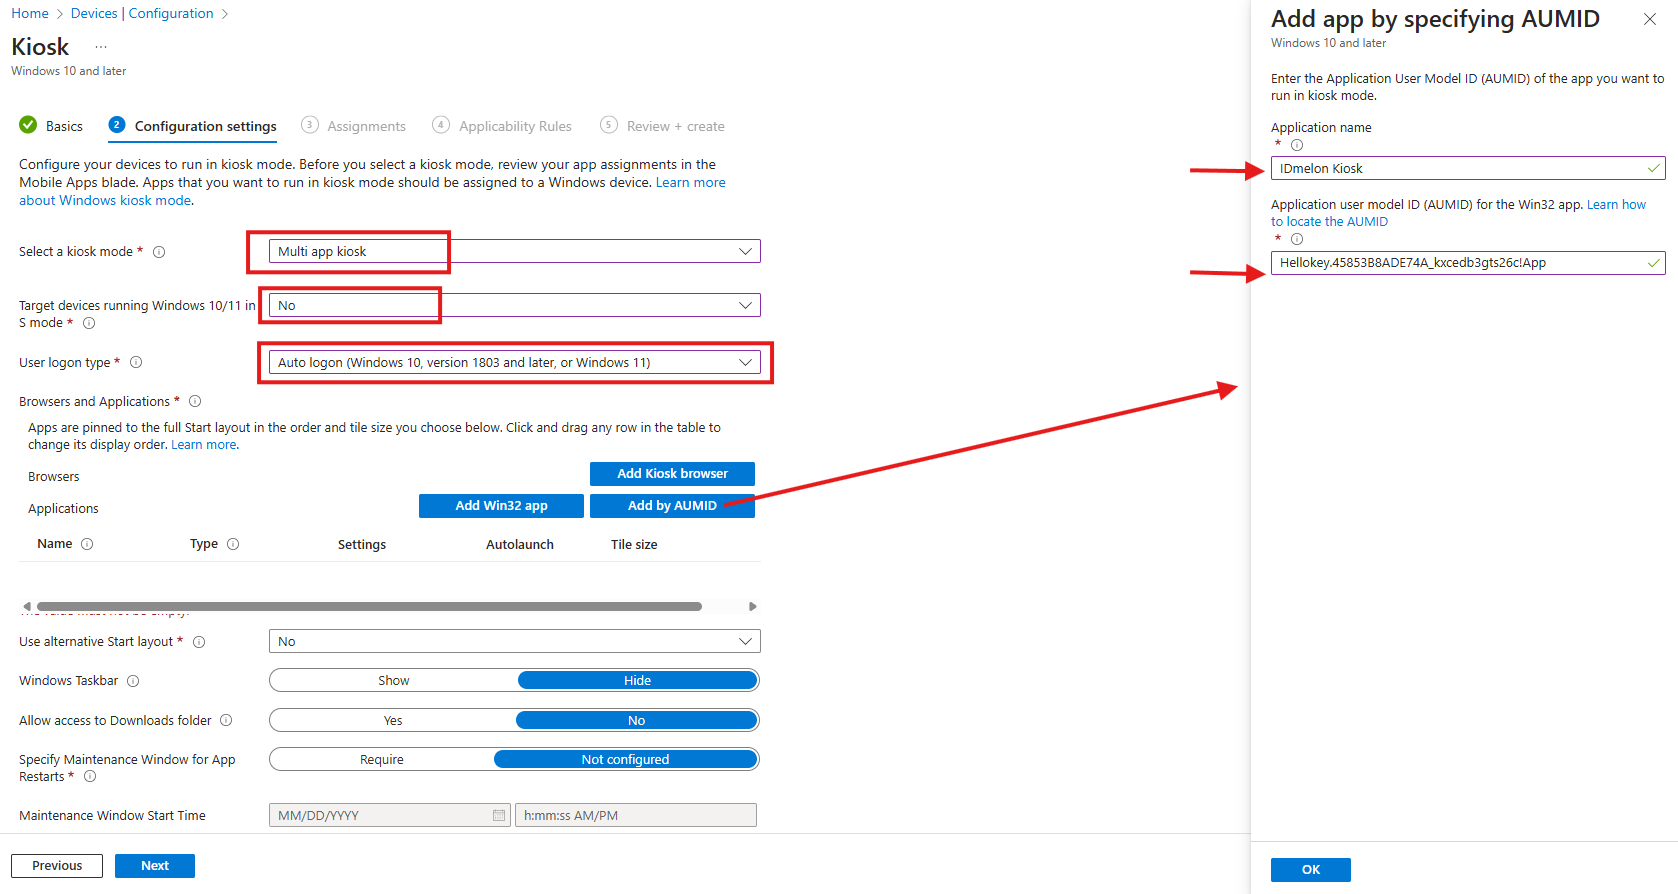
- Kiosk mode: Select Multi-app kiosk.
- Target devices running Windows 10/11 in S mode: Select No.
- User logon type: Choose Autologon.
- Browsers and Applications: Select Add by AUMID.
- App Name: Enter IDmelon Kiosk.
- AUMID: Enter Hellokey.45853B8ADE74A_kxcedb3gts26c!App.
- Click OK to add the app to the kiosk profile.
- Click Next to continue.
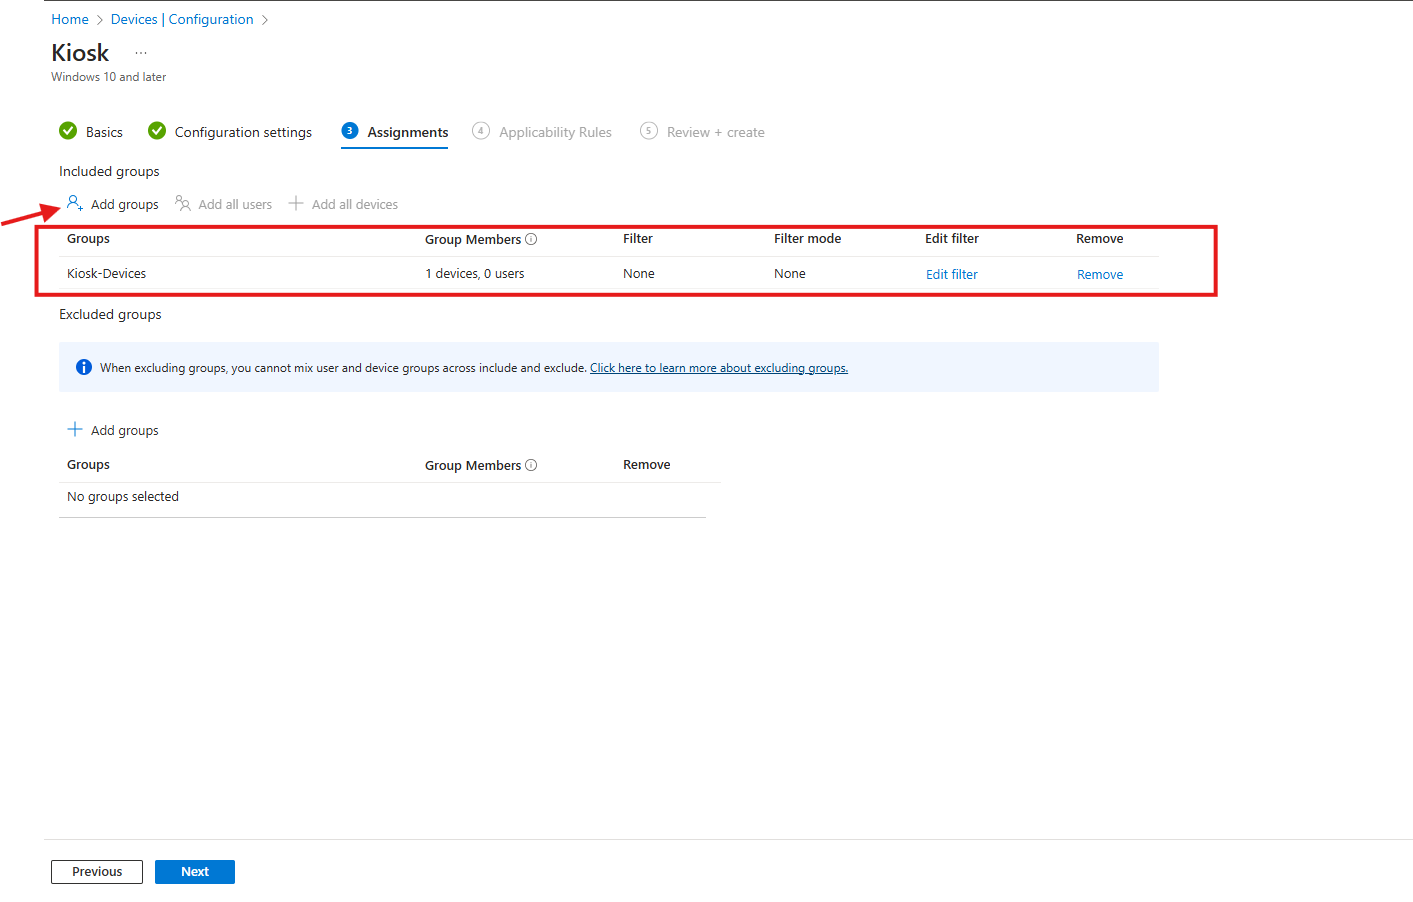
- Assignments:
- Under Included groups, click Add groups.
- Select the device groups that should receive the kiosk configuration.
- Review + Create:
- Click Create to deploy the configuration profile.
Step 3: Configure the Kiosk Settings
Editing the configs.xml file enables you to tailor the IDmelon Kiosk app to your preferences.
Navigate to the App’s Local State Folder:
- In the File Explorer address bar, type or paste the following path and press Enter:
%LOCALAPPDATA%\Packages\Hellokey.45853B8ADE74A_kxcedb3gts26c\LocalStateFor kiosk users, the path is:
C:\Users\kioskUser0\AppData\Local\Packages\Hellokey.45853B8ADE74A_kxcedb3gts26c\LocalState- This path directs you to the LocalState folder where the configs.xml file is stored.
Configuration Keys
<KioskURLs>
    <URL auth_required="true">https://myapps.microsoft.com</URL>
</KioskURLs>
<SelfService>false</SelfService>
<MultiTabMode>true</MultiTabMode>
<ExtensionEnabled>true</ExtensionEnabled>
<EndSessionConfirmation>false</EndSessionConfirmation>
<RestartAppOnEndSession>true</RestartAppOnEndSession>
<ShowURLBar>false</ShowURLBar>
<ShowEndSessionButton>true</ShowEndSessionButton>
<ServerAddress env="prod" />
<ShowFeedbackButton>true</ShowFeedbackButton>
<ExtensionAutoUpdate>true</ExtensionAutoUpdate>
<ExtensionUpdateChannel>stable</ExtensionUpdateChannel>
<AppAutoUpdate silent="false">true</AppAutoUpdate>
<FeedbackEmails from="" to="[email protected]" cc="" />
<KioskIdleTimeoutSeconds>0</KioskIdleTimeoutSeconds>
<UserInteractionMonitoringAppPath>C:\Program Files (x86)\IDmelon\Accesskey</UserInteractionMonitoringAppPath>
<KeepDisplayAwake>false</KeepDisplayAwake>
<Policies>
    <URLAllowList />
    <URLBlockList />
    <URLBarEditingEnabled>false</URLBarEditingEnabled>
</Policies>
- KioskURLs: The addresses that must be opened when the kiosk app starts.
- SelfService: Set it true if the KioskURLs are anything other than myapps.microsoft.com.
- MultiTabMode: Enables (true) or disables (false) multi-tab browsing. Setting this to false activates full-screen mode.
- ExtensionEnabled: Toggles browser extensions on (true) or off (false). Note: The Browser extension is required for the automation process. (When a card taps on the reader, the login automation will start).
- EndSessionConfirmation: Prompts users for confirmation when ending a session if set to true.
- RestartAppOnEndSession: Restarts the Kiosk app on each end session to reload the app configs.
- ShowURLBar: Displays (true) or hides (false) the browser’s URL bar.
- ShowEndSessionButton: Displays (true) or hides (false) the end session button.
- ServerAddress: Target server address (for dedicated environments).
- ShowFeedbackButton: Displays (true) or hides (false) the feedback (report issue) button next to the end session button.
- ExtensionAutoUpdate: Enables (true) or disables (false) Weblogin extension auto updates.
- ExtensionUpdateChannel: The update channel of the Weblogin extension (e.g., stable or latest).
- AppAutoUpdate: Enables (true) or disables (false) app updates. (silent=true -> Updates without displaying a notification UI to the user).
- FeedbackEmails: Customizing support emails for issue reporting.
- KioskIdleTimeoutSeconds: Set the session idle timeout (in seconds). When the timeout occurs, all session information will be cleared, and the kiosk will be ready for the next user to use. set it to 0 to disable it.
- UserInteractionMonitoringAppPath: The path of the User Interaction Monitoring app. If the value of the
KioskIdleTimeoutSecondsis set to 0, there is no need to set this address. - KeepDisplayAwake: Controls whether the system is allowed to follow normal power‑saving rules (default = false) or whether it should keep the display awake at all times.
- Policies: Configurable rules that define the app’s behavior and user experience, such as allowed/blocked URLs, editing permissions, and security limits. (see Policies for more details)
Kiosk URLs
Add your URLs inside <KioskURLs> as <URL> elements.
If the URL requires authentication, set auth_required="true".
If multiple URLs are authenticated by the same platform, set auth_required="true" on only one of them. For example:
<KioskURLs>
    <URL auth_required="true">https://myapps.microsoft.com</URL>
    <URL auth_required="false">https://excel.cloud.microsoft</URL>
    <URL auth_required="false">https://idmelon.com</URL>
</KioskURLs>
Configuring Server Address
The IDmelon Kiosk app allows you to specify the target server address using the ServerAddress tag in the configuration file. By default, it connects to the IDmelon server. If you need to connect to a dedicated environment, follow these steps:
- Locate the ServerAddress tag in the config file. By default, it looks like this:
<ServerAddress env="prod" />
- To connect the app to a custom server (dedicated environments), modify the attributes as follows:
<ServerAddress env="onpremise" base-api="https://sub.domain.com/api/url" />
Weblogin Extension Auto Update
Automatic extension update is enabled by default. To disable it, set the following config to false:
<ExtensionAutoUpdate>false</ExtensionAutoUpdate>
Note: Disabling automatic updates may prevent the application of important bug fixes and new feature enhancements.
Weblogin Extension Update Channel
The default extension update channel is set to Stable. To receive newer versions, such as Latest, update the following config in the app configs:
<ExtensionUpdateChannel>stable</ExtensionUpdateChannel>
The available channels are Stable and Latest.
Policies
Policies includes the following configurations:
URLAllowList→ List of allowed URLsURLBlockList→ List of blocked URLsURLBarEditingEnabled→ Controls whether users can edit the address bar
Examples for the URLAllowList and URLBlockList:
Add each URL between the
<URL></URL>tags.
Use*as a wildcard to match any sequence of characters, and?to match a single character.
All URLs are allowed:
<URLAllowList />
<URLBlockList />
All URLs are blocked:
<URLAllowList />
<URLBlockList>
    <URL>*</URL>
</URLBlockList>
Block all domains except idmelon.com:
<URLAllowList>
    <URL>https://*idmelon.com/*</URL>
</URLAllowList>
<URLBlockList>
    <URL>*</URL>
</URLBlockList>
All domains are allowed except idmelon.com:
<URLAllowList />
<URLBlockList>
    <URL>https://*idmelon.com/*</URL>
</URLBlockList>
Only Microsoft and IDmelon domains are allowed:
<URLAllowList>
    <URL>https://*idmelon.com/*</URL>
    <URL>https://*microsoft.com/*</URL>
    <URL>https://*microsoftonline.com/*</URL>
</URLAllowList>
<URLBlockList>
    <URL>*</URL>
</URLBlockList>
Weblogin Extension Configuration
If the Weblogin Extension is enabled in the kiosk configuration, you can also save the extension configuration as a JSON file next to the configs.xml.
{
    "handlePasskeyRequests": {
        "value": true
    },
    "allowAddingNewPasswords": {
        "value": true
    },
    "allowPasswordUpdatePrompts": {
        "value": true
    },
    "useEmbeddedNumpad": {
        "value": false
    },
    "keystroking": {
        "value": true
    }
}
Save this JSON string as extension_configs.json in the following path:
C:\Users\kioskUser0\AppData\Local\Packages\Hellokey.45853B8ADE74A_kxcedb3gts26c\LocalState
Step 4: Deploy Configuration
There are two deployment methods available:
- Automatically using script – copies the configs.xml file directly into each kiosk user profile via an MDM provider (e.g., Microsoft Intune).
- Automatically using IDmelon Accesskey – applies the configuration in Base64 format through the Accesskey CLI.
This method requires the IDmelon Accesskey to be installed on PCs.
Automatically using script
Below script can be used to copy the config.xml files to any Kiosk user profile. Save it as a ps1 (PowerShell script) file.
# Define the source file to copy
$sourceFile = "C:\KioskProfile\configs.xml"  # Update this to the path of the file you want to copy

# Define the base path for user profiles & get all user directories that start with "kioskUser0"
$profilesPath = "C:\Users"
$kioskUserDirectories = Get-ChildItem -Path $profilesPath -Directory -Filter "kioskUser0*"

# Loop through each kioskUser0 directory
foreach ($userDir in $kioskUserDirectories) {
    # Define the target directory for this user
    $targetDirectory = Join-Path -Path $userDir.FullName -ChildPath "AppData\Local\Packages\Hellokey.45853B8ADE74A_kxcedb3gts26c\LocalState"

    # Create the target directory if it doesn't exist
    if (-not (Test-Path -Path $targetDirectory)) {
        New-Item -Path $targetDirectory -ItemType Directory | Out-Null
        Write-Host "Created directory for user $($userDir.Name) at: $targetDirectory"
    }

    # Define the target file path
    $targetFile = Join-Path -Path $targetDirectory -ChildPath (Split-Path -Path $sourceFile -Leaf)

    # Copy the file
    try {
        Copy-Item -Path $sourceFile -Destination $targetFile -Force
        Write-Host "File copied successfully for user $($userDir.Name) to: $targetFile"
    } catch {
        Write-Host "Failed to copy file for user $($userDir.Name): $_"
    }
}
Create a PowerShell script policy in Intune
- Navigate: Devices > Windows > Scripts and remediations > Platform Scripts.
- Select Add.
- Basics: Name the script (e.g., “Deploy Kiosk configs.xml”).
- Select Next.
- Upload script: Select your .ps1 file.
- Run this script using the logged-on credentials: No (run as System).
- Enforce script signature check: No.
- Run script in 64-bit PowerShell: Yes (recommended on Windows 11).
- Assignments: Assign to desired groups.
- Review + add: Confirm and create the script deployment.
Automatically using IDmelon Accesskey
Starting with Accesskey version 3.9.0, you can set the kiosk configuration in base64 format:
To convert the configs.xml to a base64 string, enter the following command in a PowerShell:
[Convert]::ToBase64String([System.Text.Encoding]::UTF8.GetBytes((Get-Content -Raw -Path "configs.xml"))) > "output.txt"
Replace the content of the file output.txt in the following command:
accesskeycli kiosk -s -c [Base64-String]
You can also do the above steps for the Weblogin Extension configs:
[Convert]::ToBase64String([System.Text.Encoding]::UTF8.GetBytes((Get-Content -Raw -Path "configs.json"))) > "output.txt"
accesskeycli kiosk -s -c [Kiosk-Configs-Base64-String] -e [Extension-Configs-Base64-String]
Step 4: Configure the Automation Workflow (Optional)
Run the below command in either Command Prompt or PowerShell to configure login-logout flow for Microsoft.
With Command Prompt:
accesskeycli workflow-automation -s -t weblogin-extension -a login-logout -u https://myapps.microsoft.com?login_hint=${UserId} -m passkey
With PowerShell:
accesskeycli workflow-automation -s -t weblogin-extension -a login-logout -u https://myapps.microsoft.com?login_hint='${UserId}' -m passkey
Note: Since the login_hint attribute is passed as a parameter, PowerShell requires the ${} syntax to be enclosed in single quotes, like ‘${UserId}’.
Step 5: Set the Self-Service URL (Optional)
If you have set up Self-Service settings in the IDmelon Admin Panel, enter the following command in a PowerShell:
accesskeycli self-service-link -s [Self-Service URL]
By executing this command, the system will automatically handle specific user scenarios.
If the user’s badge is not enrolled, they will be redirected to the designated enrollment page. Similarly, if the user exceeds the allowed number of incorrect PIN attempts, they will be automatically directed to the specified address for a PIN reset.