Entra ID Hybrid Connected PCs
Requirements
- Windows Server 2016 (patch KB4534307), 2019 (patch KB4534321), and 2022
- Windows 10 or 11 clients (version 2004 or later)
- Azure AD Connect (version 1.4.32.0 or later)
- FIDO2 Security Keys
Azure AD Connect
Prerequisites
Prerequisites for Azure AD Connect
Configuration
Sign in as Local Administrator on the server you want to install Azure AD Connect on the server you sign in on will be the sync server.
Go to
AzureADConnect.msiand double-click to open the installation file.In welcome, select the checkbox to agree to the licensing terms, and then select Continue.
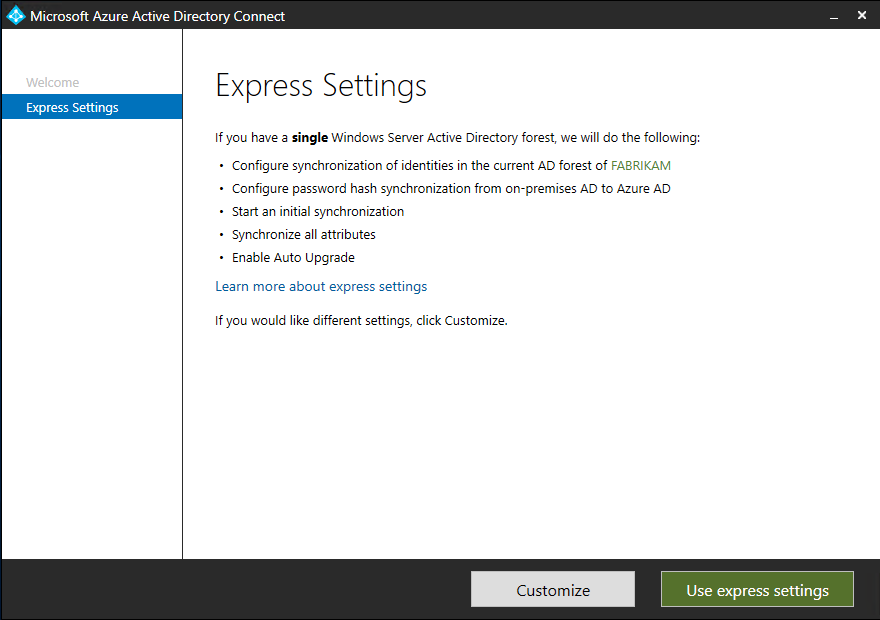
In Express settings, select Use express settings.
In
Connect to Azure AD, enter the username and password of the Hybrid Identity Administrator account, and then select Next.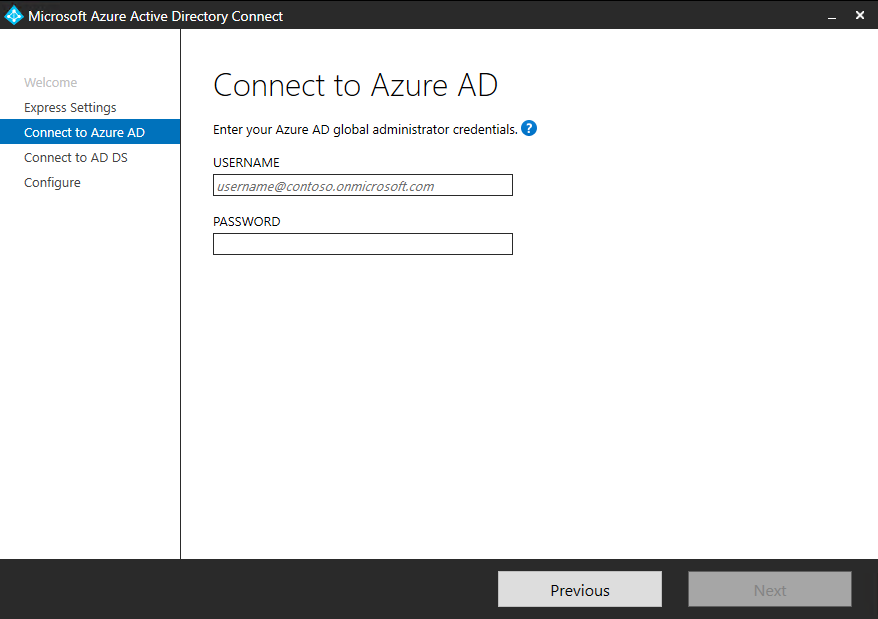
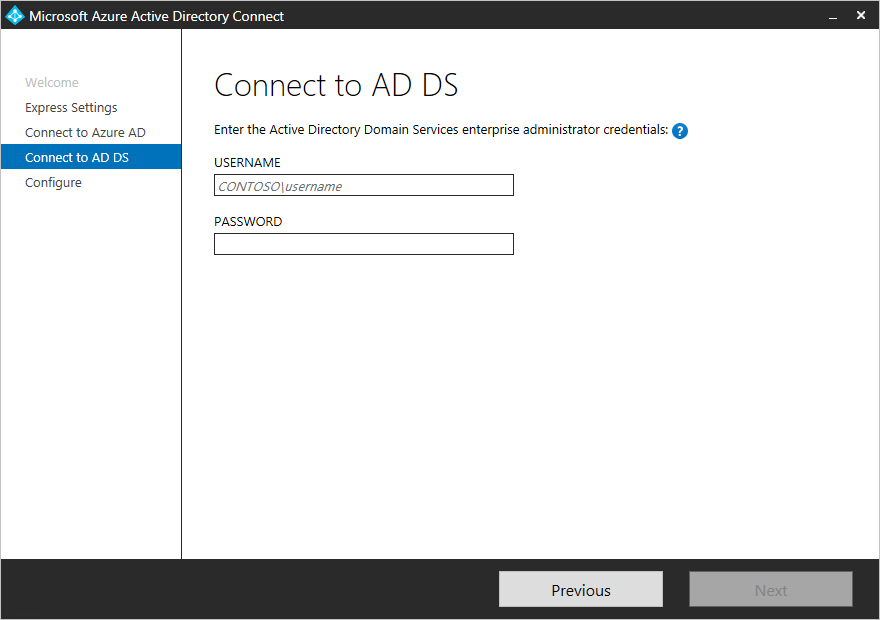
In Connect to AD DS, enter the username and password for an Enterprise Admin account. You can enter the domain part in either NetBIOS or FQDN format, like IDMELON\administrator or idmelon.com\administrator. Then, elect Next.
The Azure AD sign-in configuration page appears only if you didn’t complete the step to verify your domains in the prerequisites.
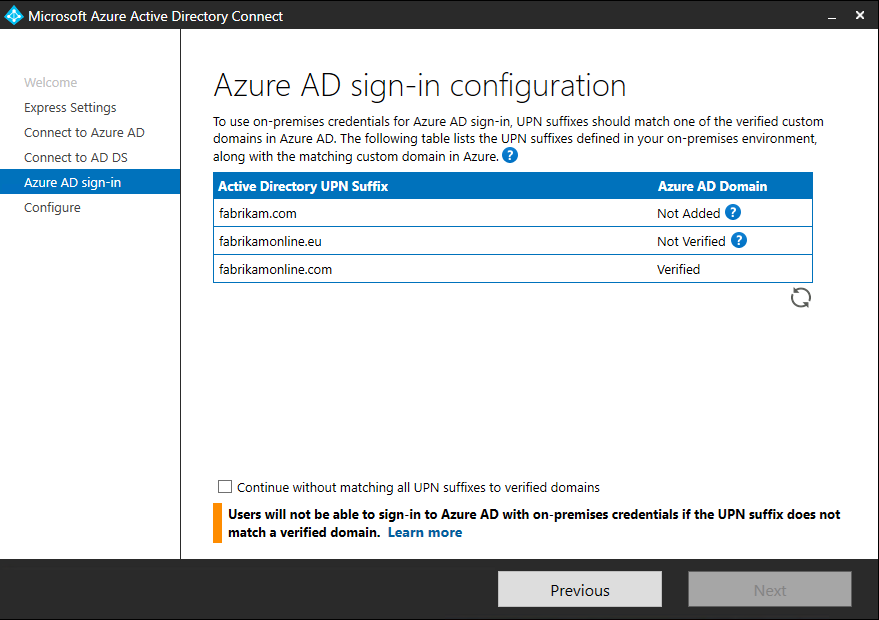
If you see this page, review each domain that is marked Not Added or Not Verified. Make sure that those domains have been verified in Azure AD. When you have verified your domains, select the Refresh icon. In Ready to configure, select Install.
- Optionally in Ready to configure, you can clear the Start the synchronization process as soon as configuration completed checkbox. You should clear this checkbox if you want to do more configuration, such as to add filtering. If you clear this option, the wizard configures syncs but leaves the scheduler disabled. The scheduler doesn’t run until you enable it manually by rerunning the installation wizard.
- If you leave the Start the synchronization process when configuration completes checkbox selected, a full sync of all users, groups, and contacts to Azure AD begins immediately.
- If you have Exchange in your instance of Windows Server Active Directory, you also have the option to enable Exchange Hybrid deployment. Enable this option if you plan to have Exchange mailboxes both in the cloud and on-premises at the same time.
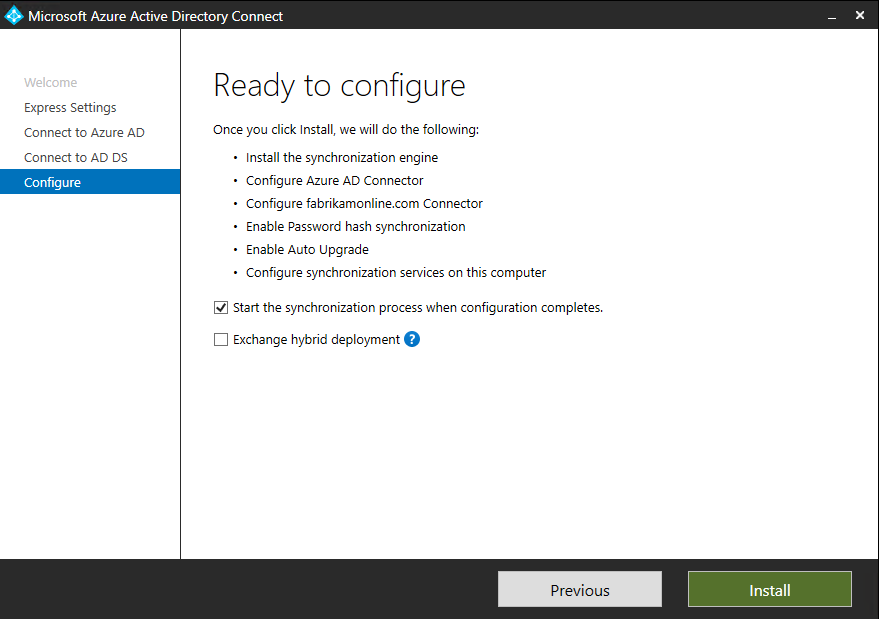
When the installation completed, select Exit.
Before you use Synchronization Service Manager or Synchronization Rule Editor, sign out, and then sign in again.
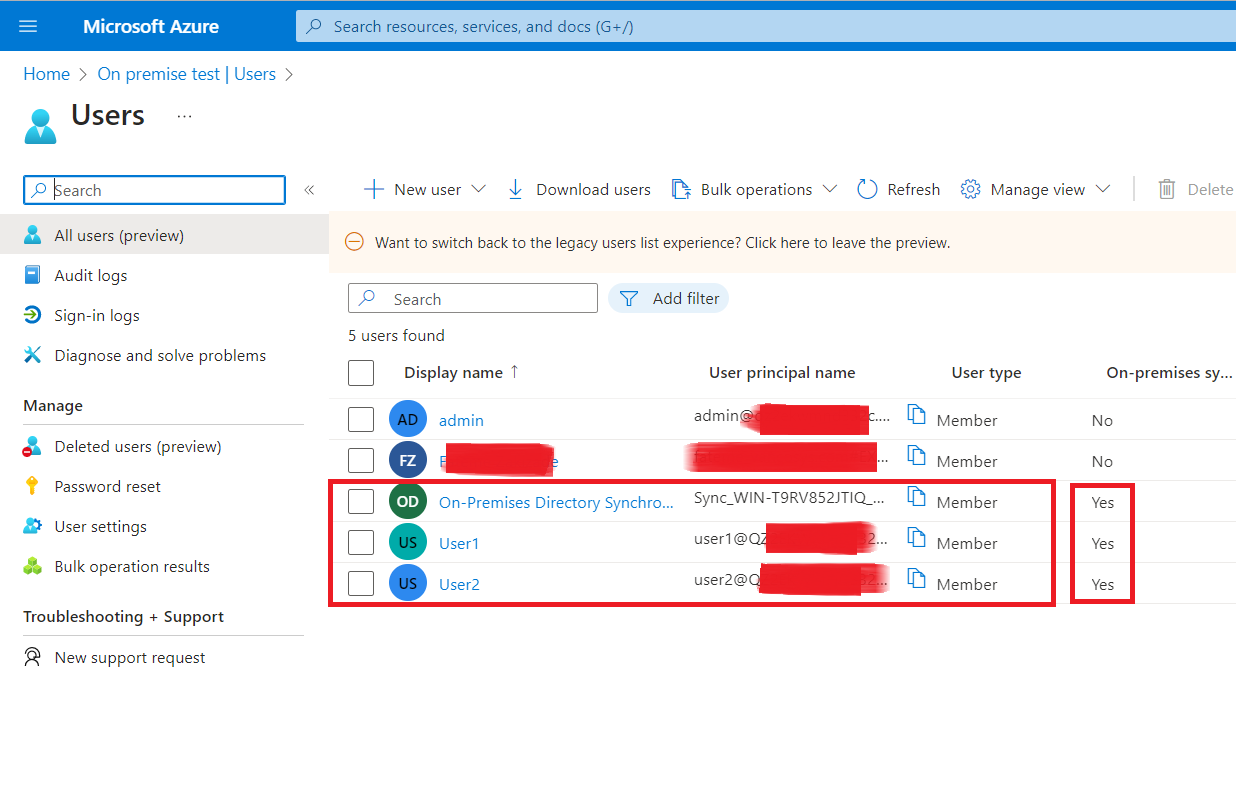
After these steps, you can now check the Azure portal to ensure that the local users are available on the Azure active directory users list.
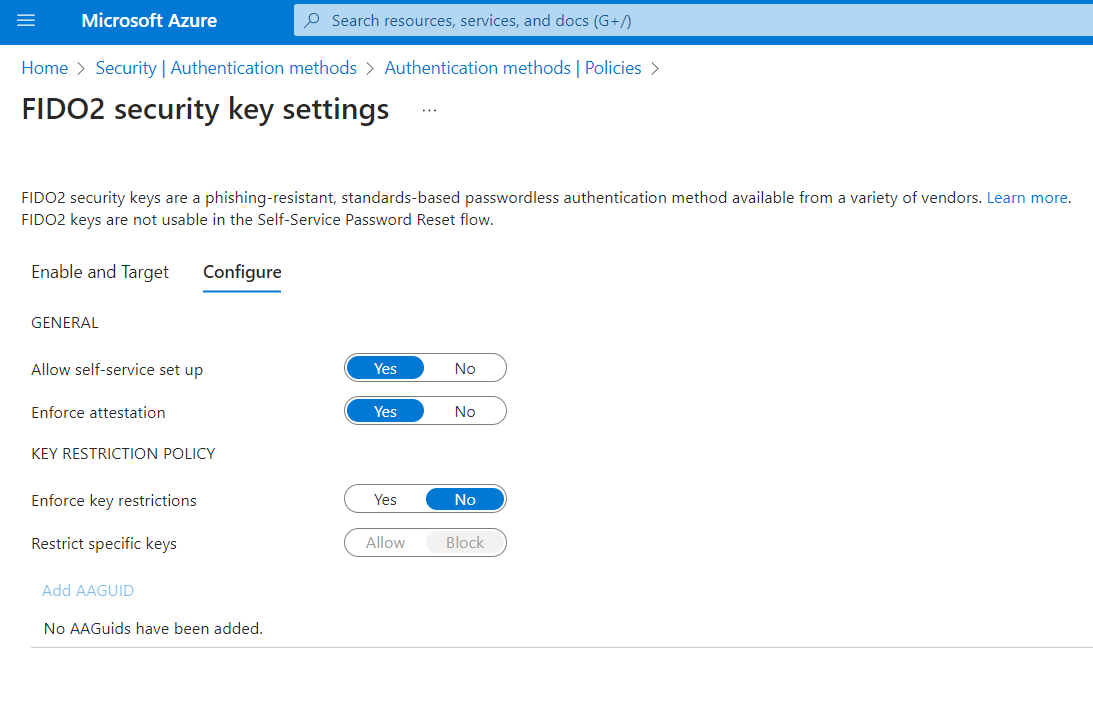
Enable FIDO2 security key method
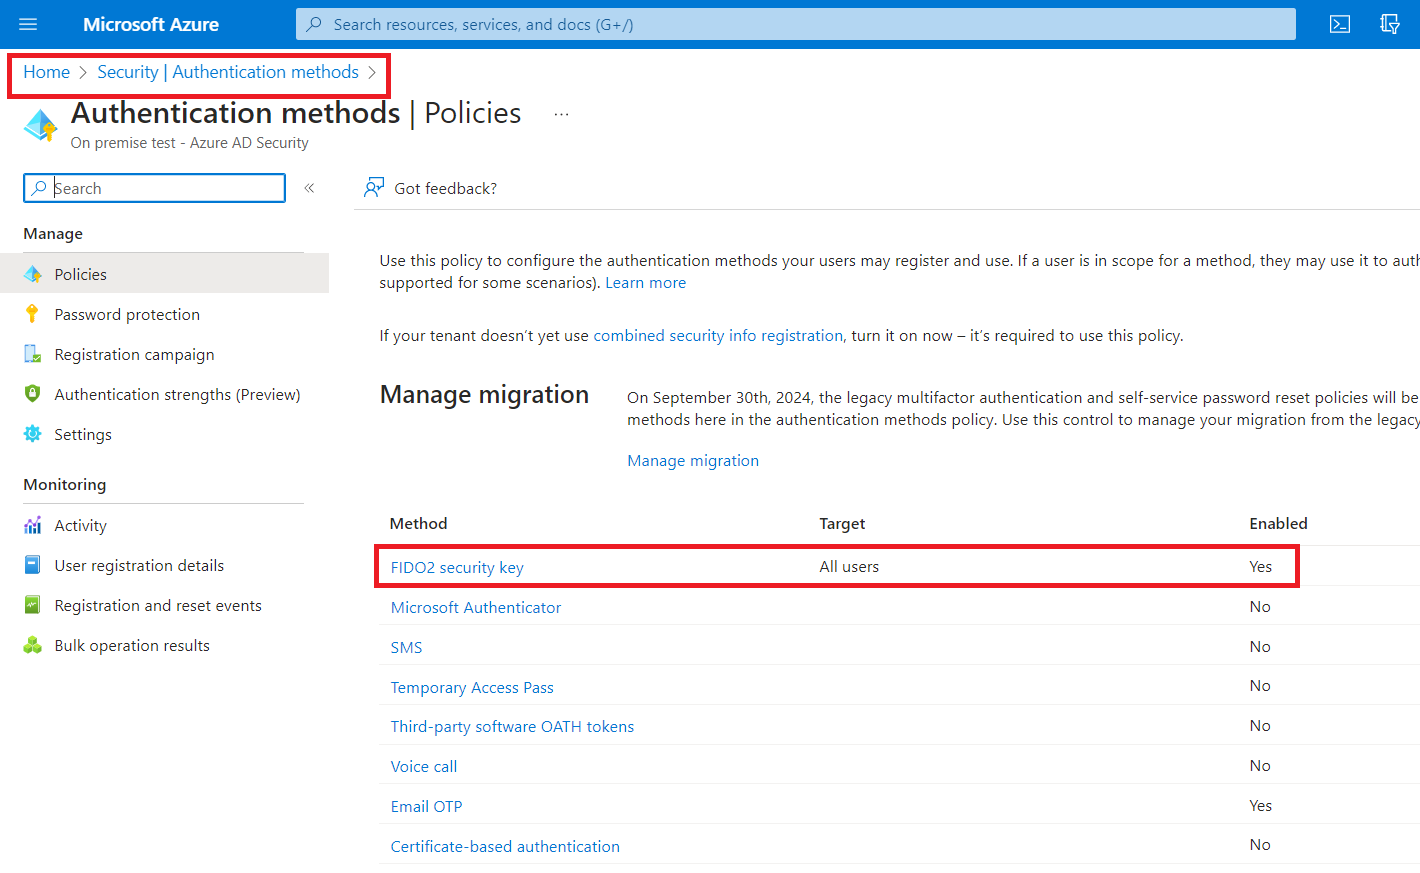
- Sign in to the Azure portal
- Browse to Azure Active Directory > Security > Authentication methods > Authentication method policy.
- Under the method FIDO2 Security Key, click All users, or click Add groups to select specific groups. Only security groups are supported.
- Save the configuration.
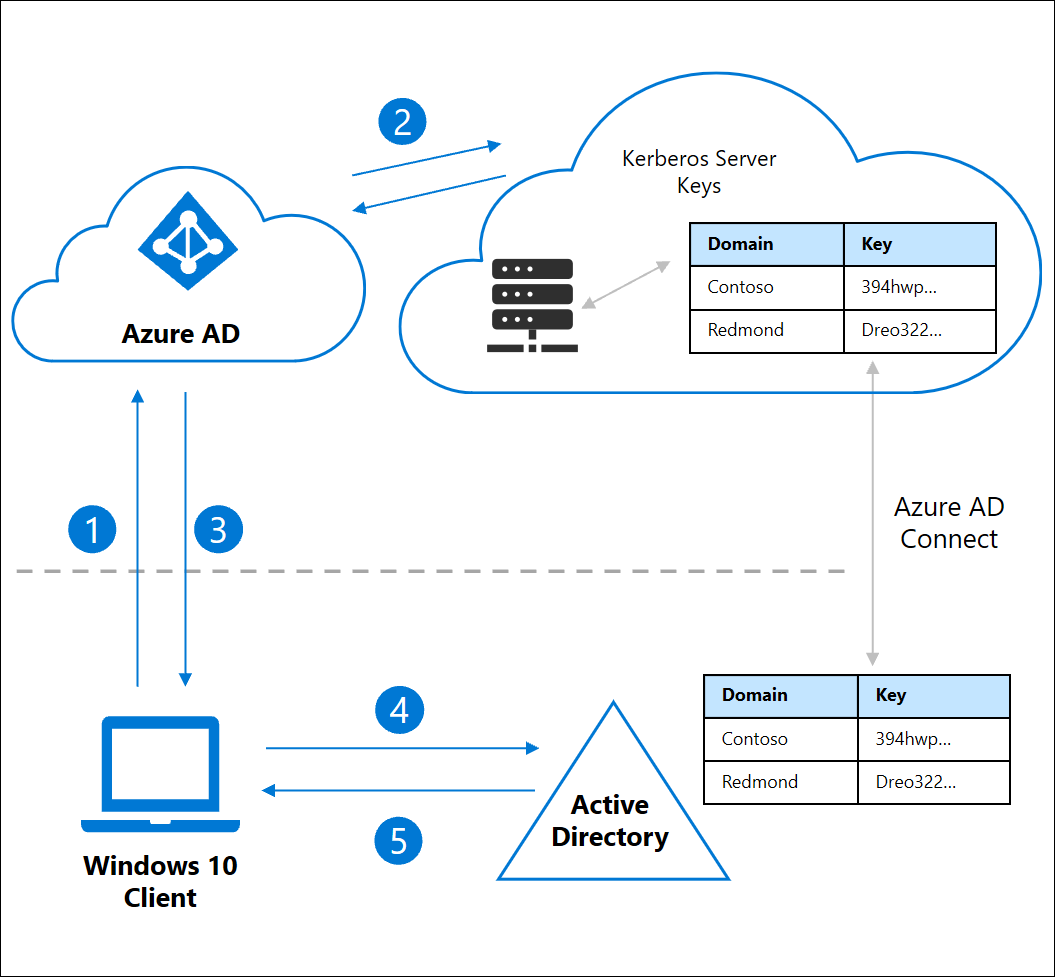
Enable passwordless security key sign-in to on-premises resources by using Azure AD
To enable the security key sign-in option on clients you need to install the Azure AD Kerberos module.
The Azure AD Kerberos PowerShell module
provides FIDO2 management features for administrators.
Important: In some hybrid Azure Active Directories, there may be multiple servers. Make sure to install and execute the following commands on the main Windows server where Active Directory is located.
Install the Azure AD Kerberos PowerShell module
- Open a PowerShell prompt using the Run as administrator option.
- Install the Azure AD Kerberos PowerShell module:
# First, ensure TLS 1.2 for PowerShell gallery access.
[Net.ServicePointManager]::SecurityProtocol = [Net.ServicePointManager]::SecurityProtocol -bor [Net.SecurityProtocolType]::Tls12

# Install the Azure AD Kerberos PowerShell Module.
Install-Module -Name AzureADHybridAuthenticationManagement -AllowClobber
To ensure the installation, enter the following command in PowerShell and make sure that the result is according to the list below.

Create a Kerberos Server object
Administrators use the Azure AD Kerberos PowerShell module to create an Azure AD Kerberos Server object in their on-premises directory.
Run the following steps in each domain and forest in your organization that contain Azure AD users:
- Open a PowerShell prompt using the Run as administrator option.
- Run the following PowerShell commands to create a new Azure AD Kerberos Server object both in your on-premises Active Directory domain and in your Azure Active Directory tenant.
# Specify the on-premises Active Directory domain. A new Azure AD
# Kerberos Server object will be created in this Active Directory domain.
$domain = $env:USERDNSDOMAIN

# Enter an Azure Active Directory global administrator username and password.
$cloudCred = Get-Credential -Message 'An Active Directory user who is a member of the Global Administrators group for Azure AD.'

# Enter a domain administrator username and password.
$domainCred = Get-Credential -Message 'An Active Directory user who is a member of the Domain Admins group.'

# Create the new Azure AD Kerberos Server object in Active Directory
# and then publish it to Azure Active Directory.
Set-AzureADKerberosServer -Domain $domain -CloudCredential $cloudCred -DomainCredential $domainCred
If your organization protects password-based sign-in and enforces modern authentication methods such as multifactor authentication, FIDO2, or smart card technology, you must use the -UserPrincipalName parameter with the User Principal Name (UPN) of a global administrator.
Replace [email protected] in the following example with the UPN of a global administrator.
# Specify the on-premises Active Directory domain. A new Azure AD
# Kerberos Server object will be created in this Active Directory domain.
$domain = $env:USERDNSDOMAIN

# Enter a UPN of an Azure Active Directory global administrator
$userPrincipalName = "[email protected]"

# Enter a domain administrator username and password.
$domainCred = Get-Credential

# Create the new Azure AD Kerberos Server object in Active Directory
# and then publish it to Azure Active Directory.
# Open an interactive sign-in prompt with given username to access the Azure AD.
Set-AzureADKerberosServer -Domain $domain -UserPrincipalName $userPrincipalName -DomainCredential $domainCred
View and verify the Azure AD Kerberos Server
You can view and verify the newly created Azure AD Kerberos Server by using the following command:
Get-AzureADKerberosServer -Domain $domain -CloudCredential $cloudCred -DomainCredential $domainCred
This command outputs the properties of the Azure AD Kerberos Server. You can review the properties to verify that everything is in good order.
Remove the Azure AD Kerberos Server
If you want to revert the scenario and remove the Azure AD Kerberos Server from both the on-premises Active Directory and Azure AD, run the following command:
Remove-AzureADKerberosServer -Domain $domain -CloudCredential $cloudCred -DomainCredential $domainCred
Warning: If your password has expired, signing in with FIDO is blocked. The expectation is that users reset their passwords before they can log in by using FIDO.
Multiforest and multidomain scenarios
The Azure AD Kerberos Server object is represented in Azure AD as a KerberosDomain object. Each on-premises Active Directory domain is represented as a single KerberosDomain object in Azure AD.
For example, let’s say that your organization has an Active Directory forest with two domains, example.com
and example2.com. If you choose to allow Azure AD to issue Kerberos TGTs for the entire forest, there are two
KerberosDomain objects in Azure AD, one KerberosDomain object for example.com and the other
for example2.com. If you have multiple Active Directory forests, there is one KerberosDomain object for each
domain in each forest.
Follow the instructions in Create a Kerberos Server object in each domain and forest in your organization that contains Azure AD users.
What can I do if I’m unable to use the FIDO security key immediately after I create a hybrid Azure AD-joined machine?
If you’re clean-installing a hybrid Azure AD-joined machine, after the domain join and restart process, you must sign in with a password and wait for the policy to sync before you can use the FIDO security key to sign in.
- Check your current status by running dsregcmd /status in a Command Prompt window, and check to ensure that both the AzureAdJoined and DomainJoined statuses are showing as YES.
- This delay in syncing is a known limitation of domain-joined devices and isn’t FIDO-specific.
+---------------------------------------------------+
| Device State                                      |
+---------------------------------------------------+
             AzureAdJoined : YES
          EnterpriseJoined : NO
              DomainJoined : YES
                DomainName : IDMELON
+---------------------------------------------------+
Enabling login permission with security key in Active Directory
To enable FIDO security key sign-in. The setting can be found under Computer Configuration > Administrative Templates > System > Logon > Turn on security key sign-in
- Setting this policy to Enabled allows users to sign in with security keys.
- Setting this policy to Disabled or Not Configured stops users from signing in with security keys.

Register a Security Key
- Go to the My Profile page at My Account and sign in if you haven’t already done so.
- Select Security Info, select Add method, and then select Security key from the Add a method list.
- Select Add, and then select the type of security key you have, either USB device or NFC device.
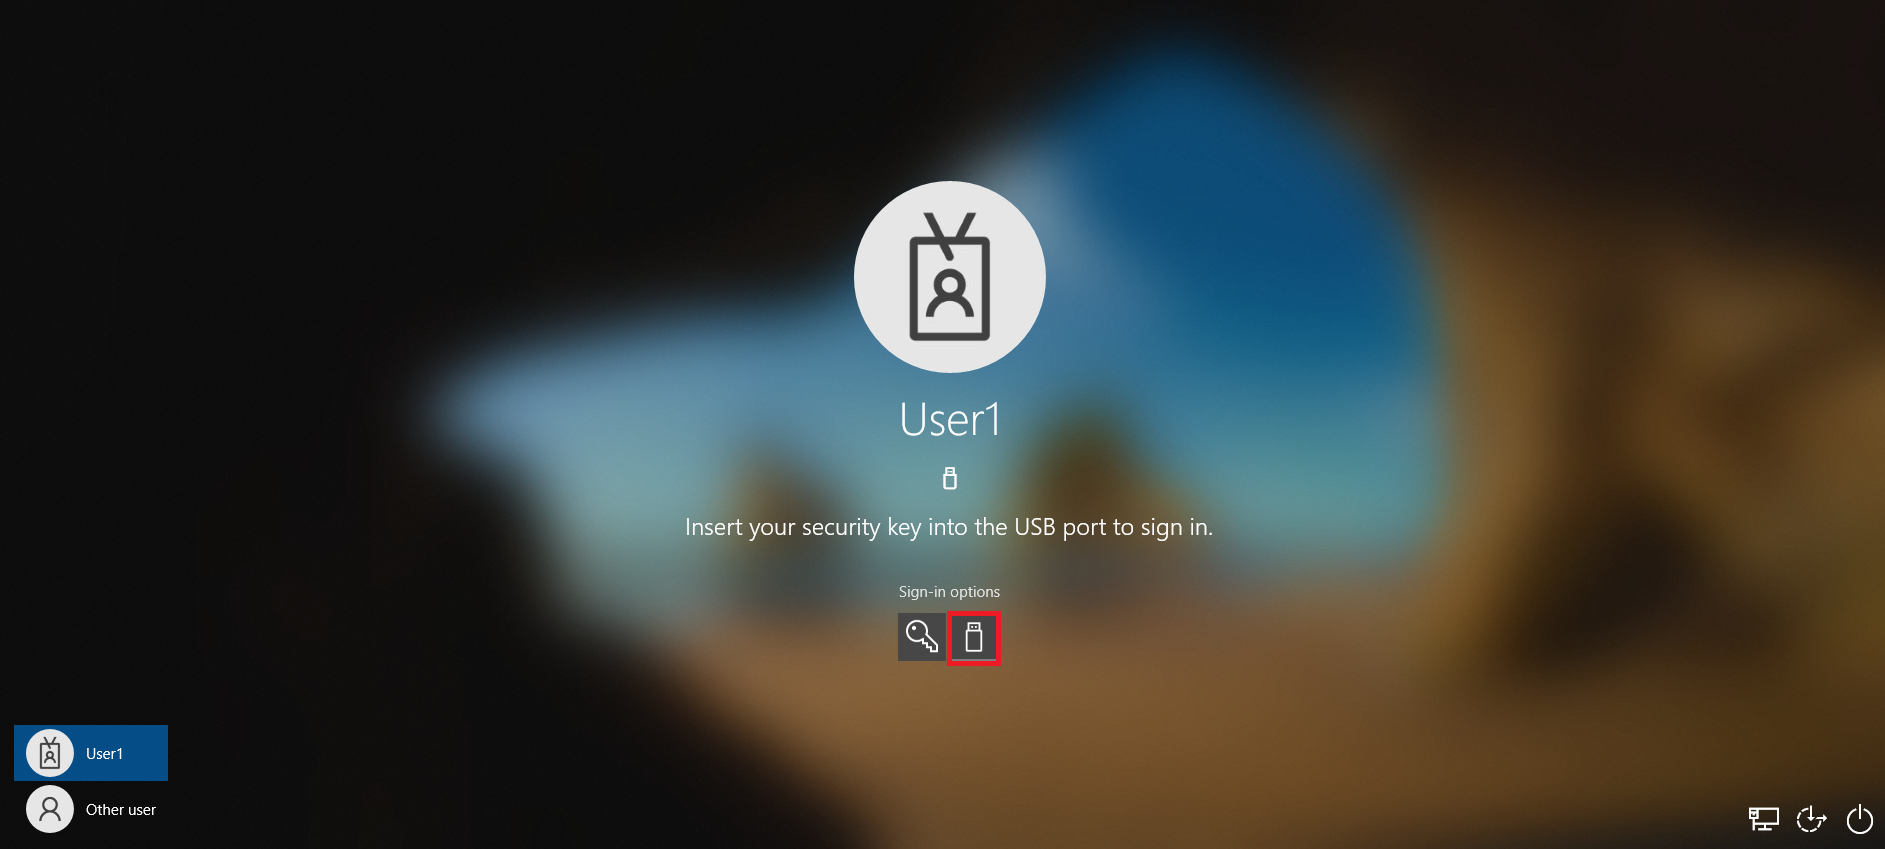
Log in with the Security Key
If you have followed all the above steps correctly, now the sign in option should appear on the lock screen of the client system and you can enter by selecting the FIDO security key option.
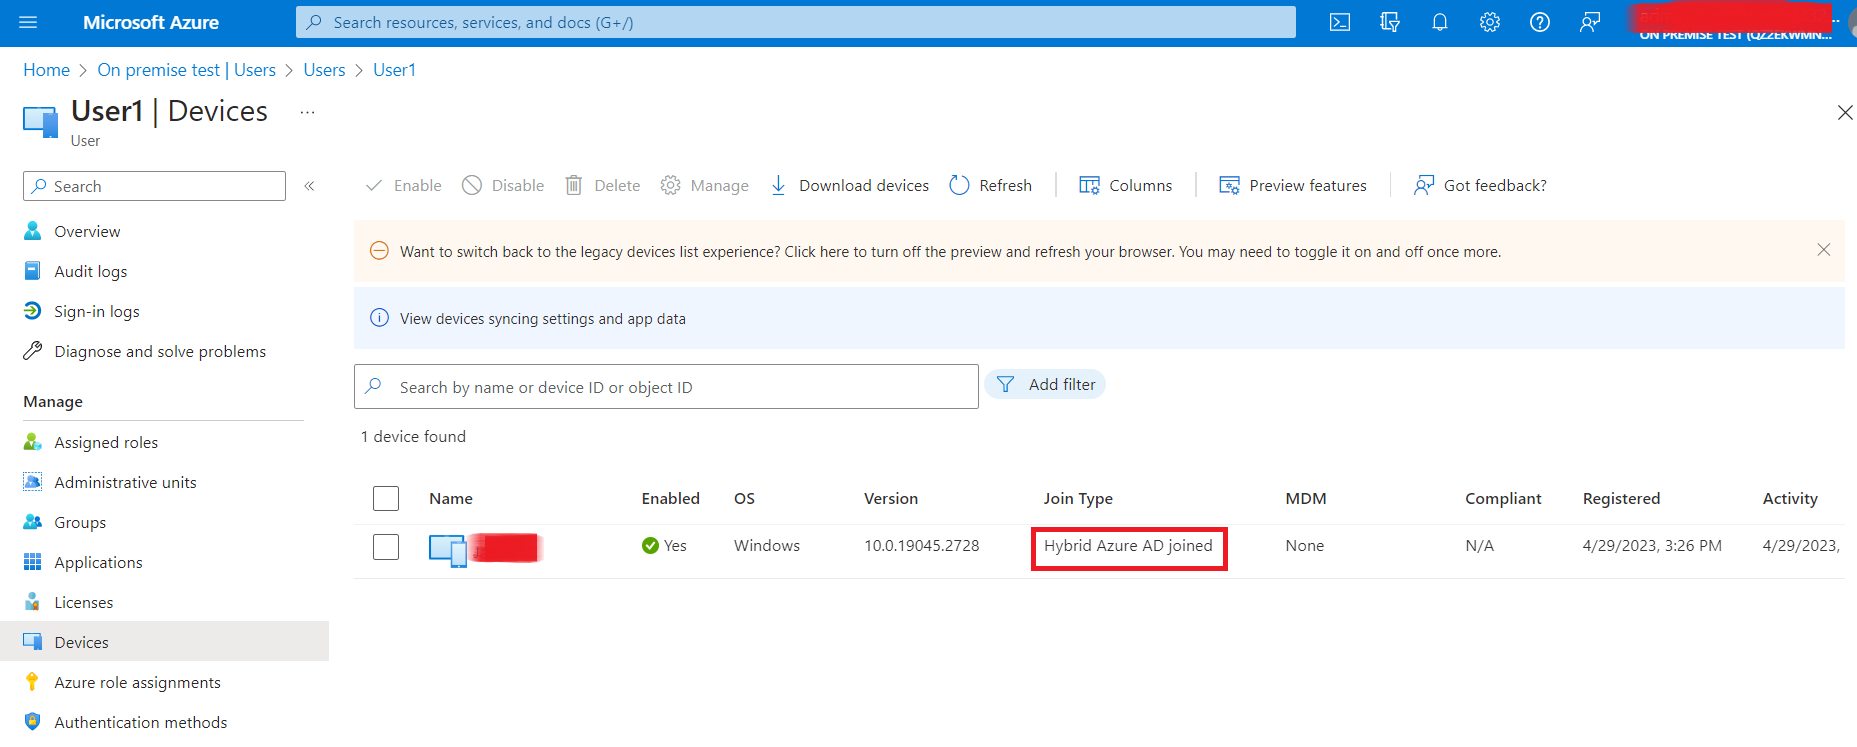
Registered Devices
Refer to Users > [select user] > Devices to make sure that the client PCs are registered in the Azure portal.
References
- Azure AD Connect: Accounts and permissions
- Enable passwordless security key sign-in to on-premises resources by using Azure AD
- Enable passwordless security key sign-in
- Prerequisites for Azure AD Connect
- Deployment frequently asked questions (FAQs) for hybrid FIDO2 security keys in Azure AD
- Get started with Azure AD Connect by using express settings