SCIM Synchronization with Microsoft Entra ID
This document describes how to configure SCIM synchronization between Microsoft Entra ID and IDmelon for automated user provisioning.
Setup IDmelon For Provisioning
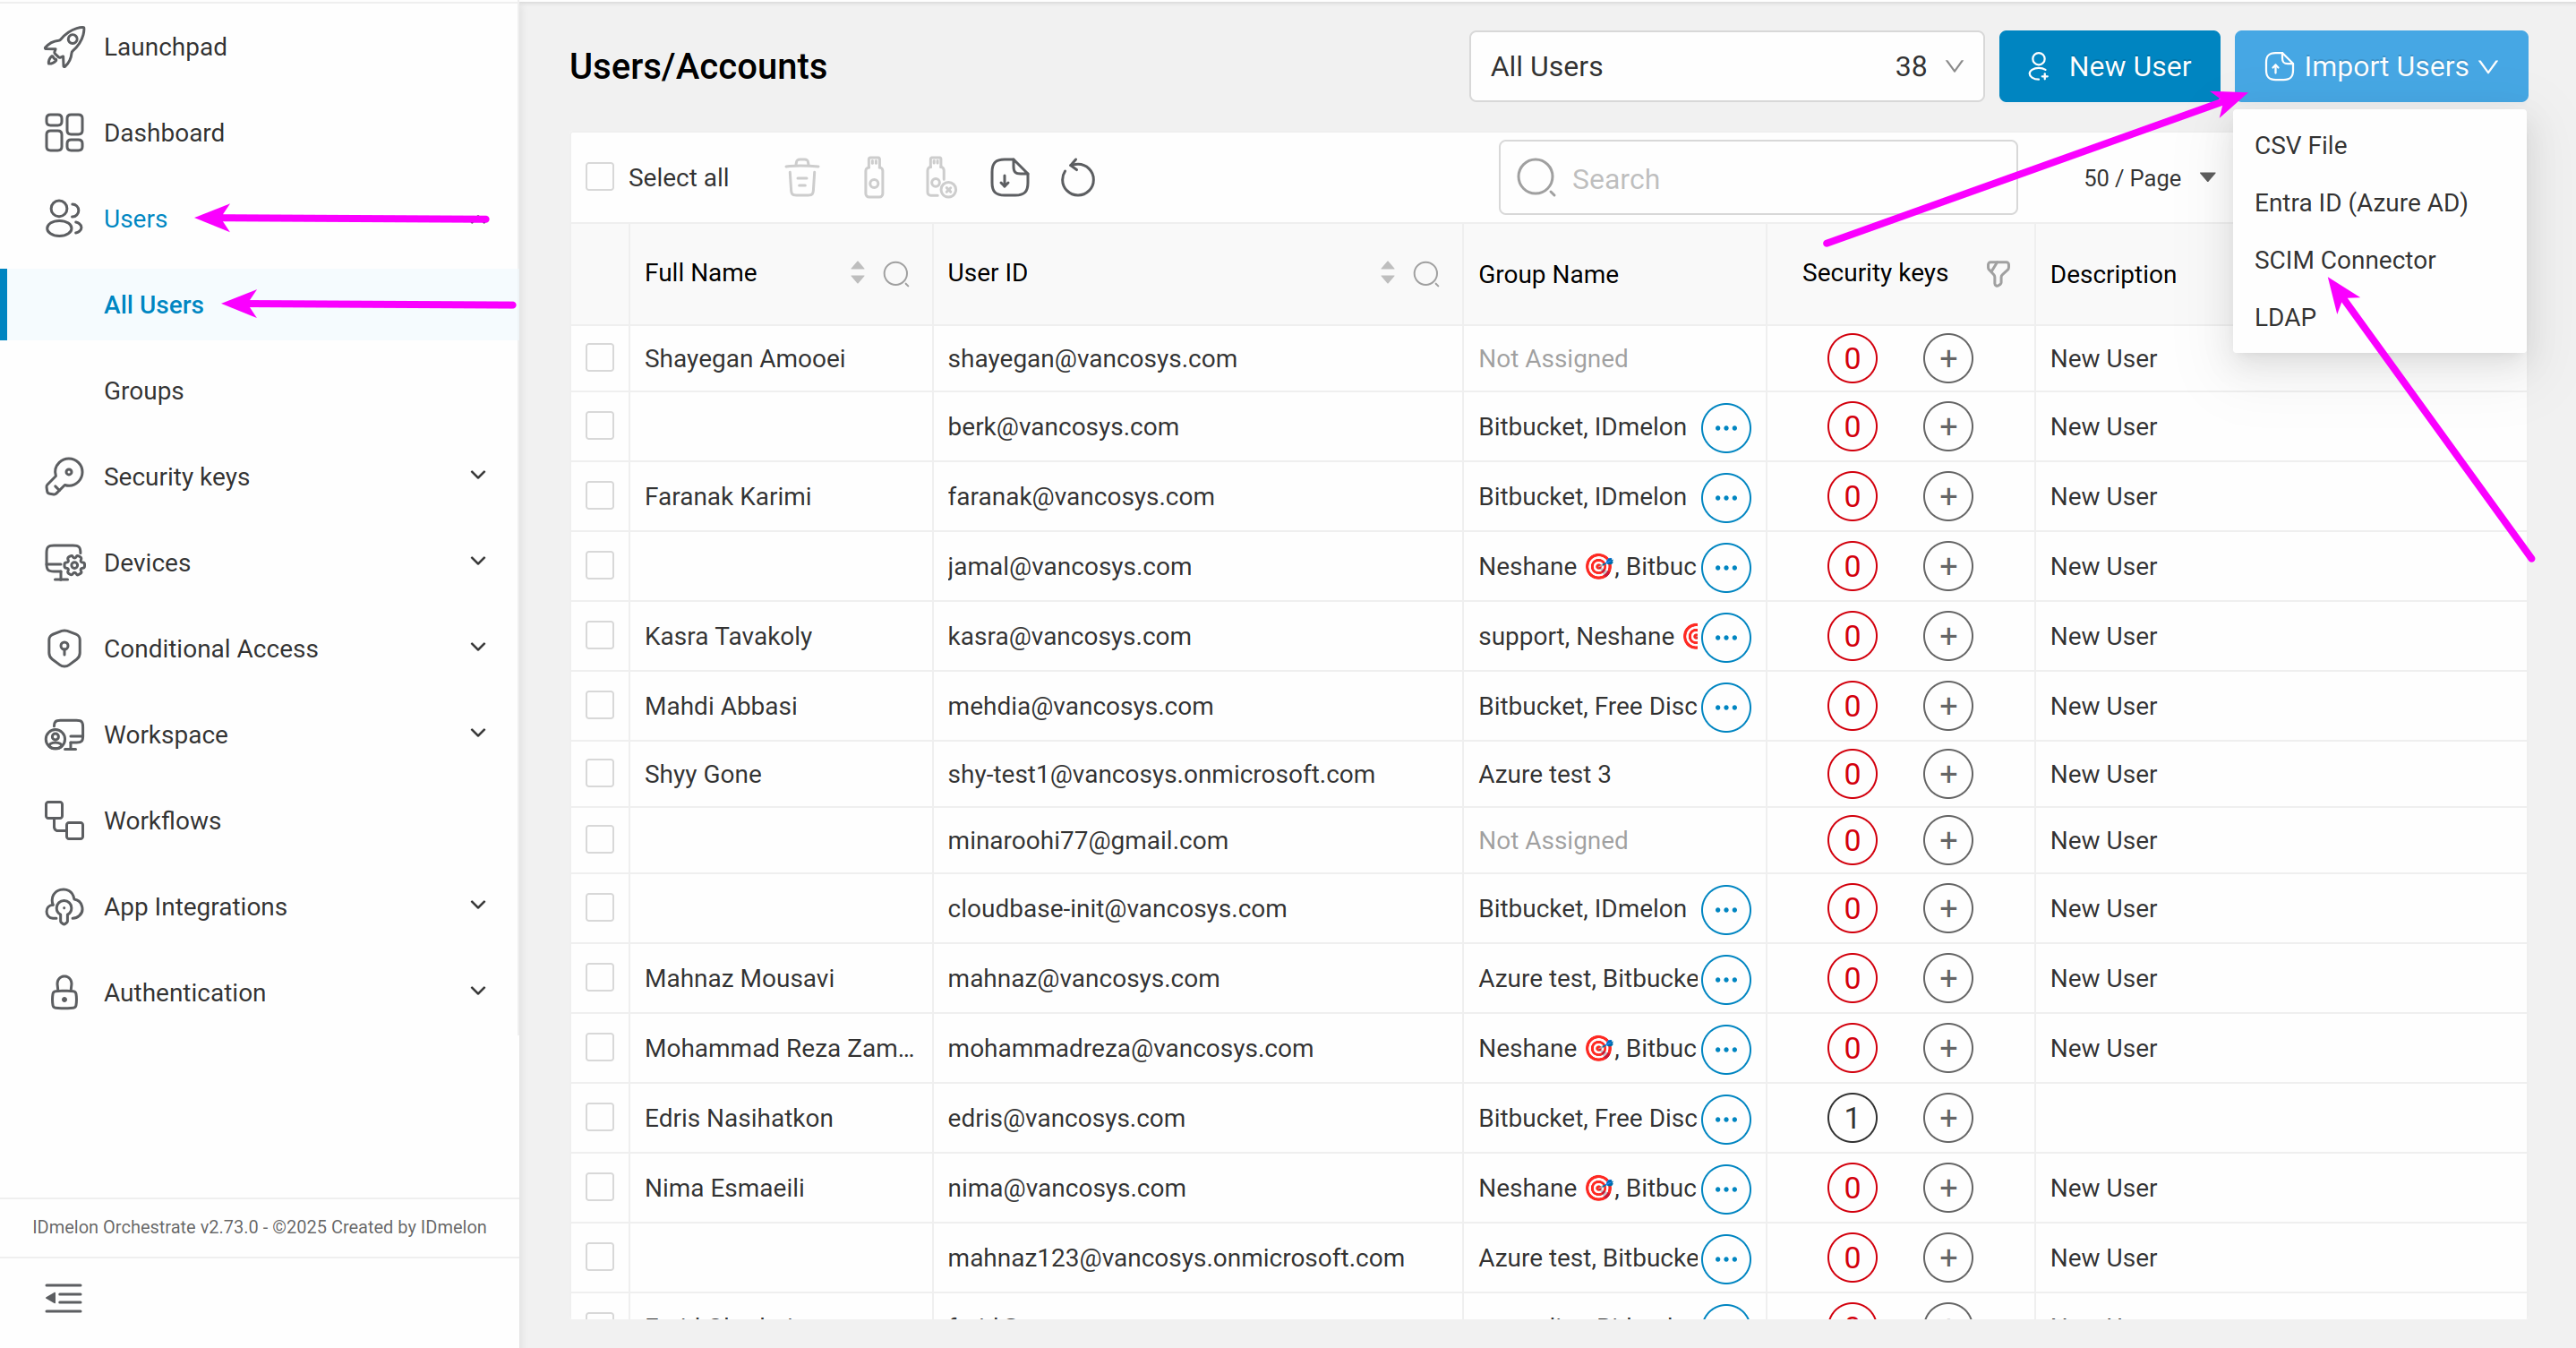
Log in to the IDmelon panel, go to App Integrations > SCIM, and click Microsoft Entra ID.
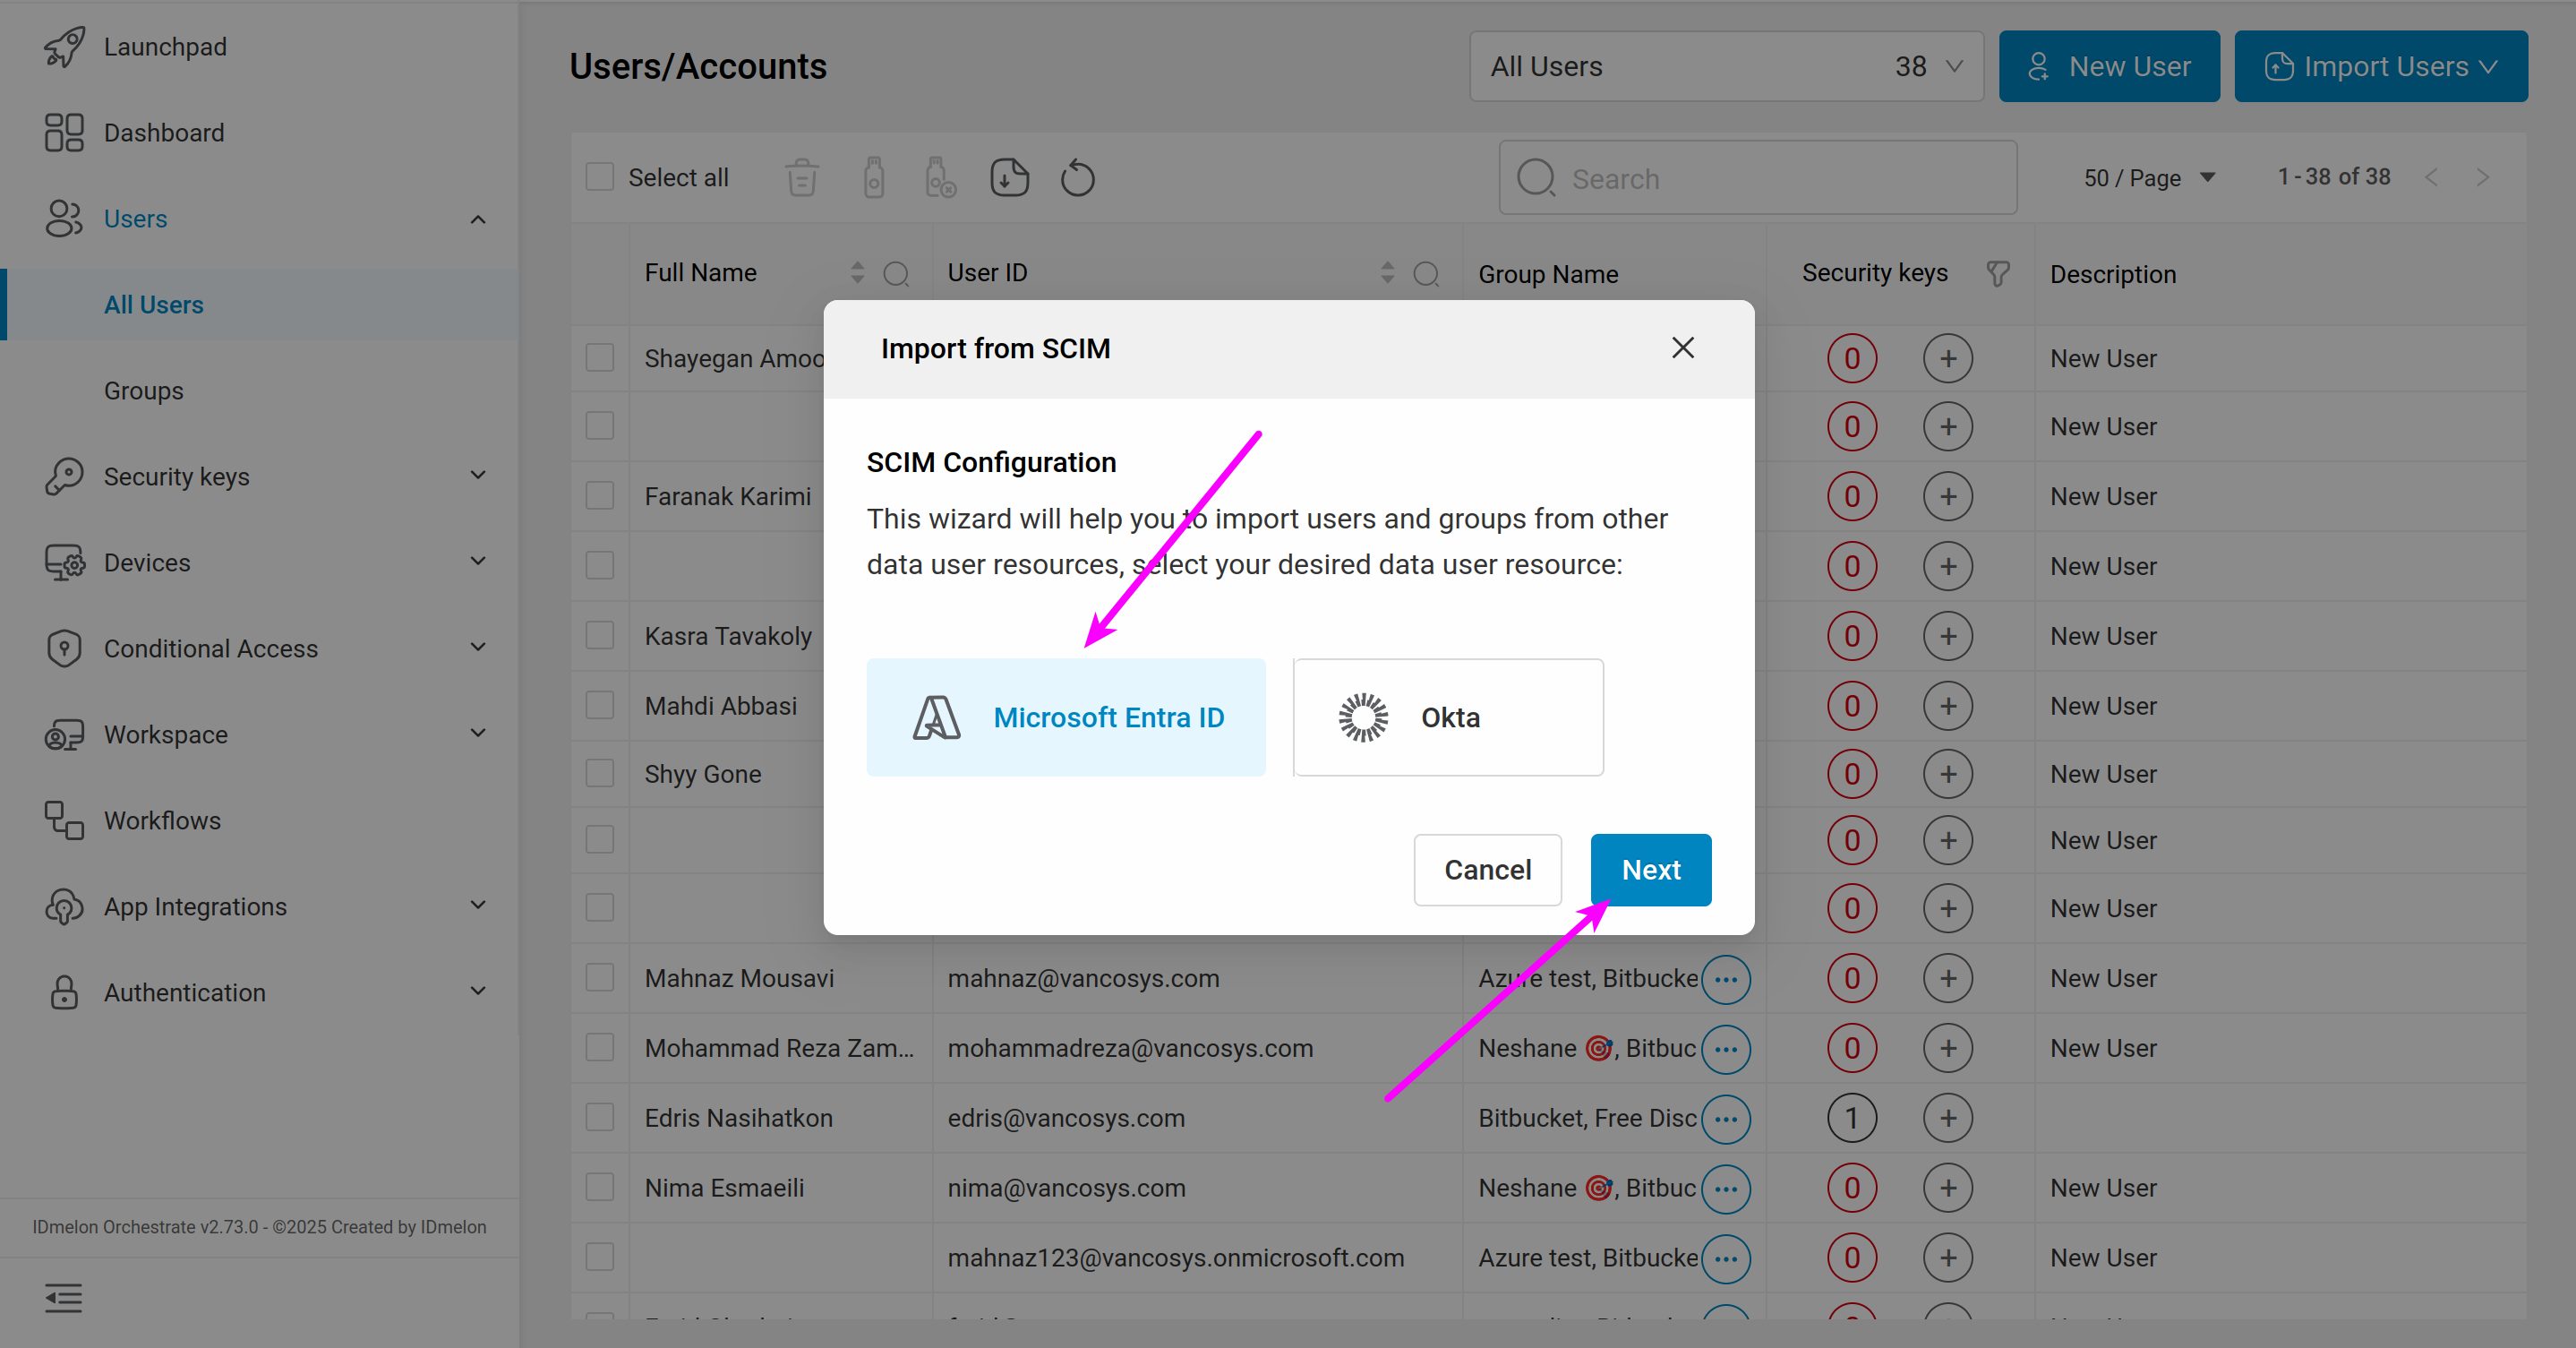
Enable the connection by clicking the switch button.
You can see the SCIM URL and SCIM Token to use in the Microsoft Entra ID panel.
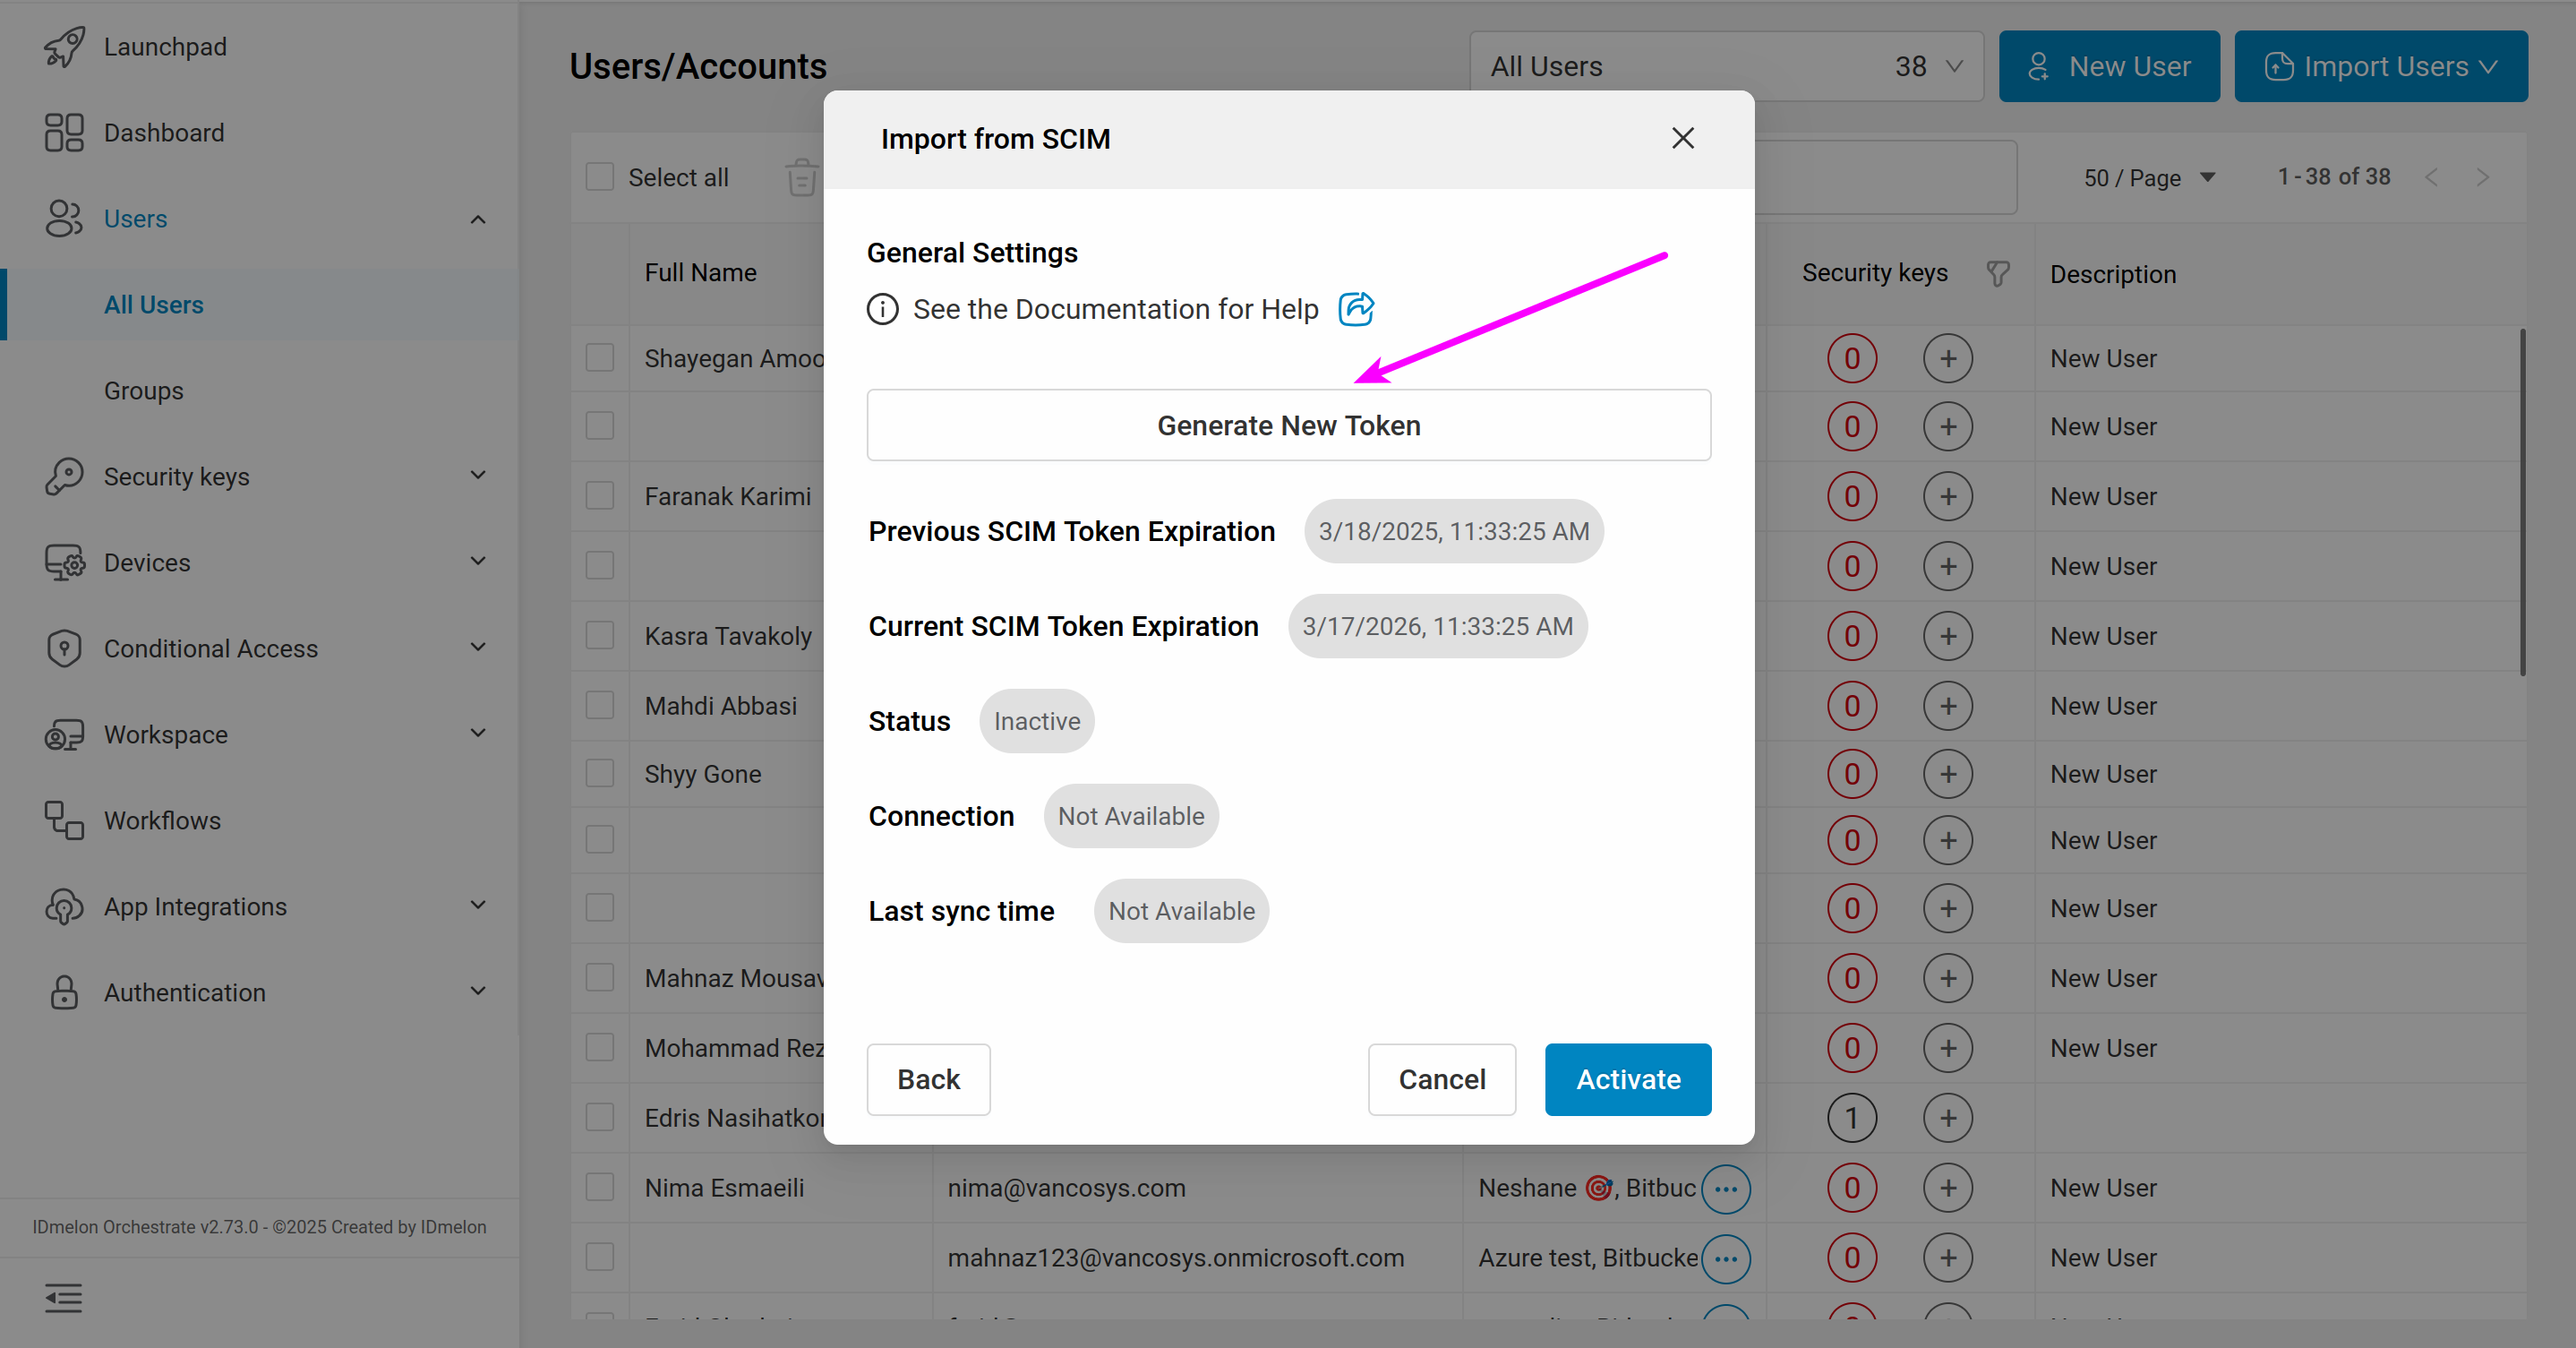
The newly generated token will be shown only once. Make sure to copy and save it. If you created the first token and want to generate a new token, you can click on the New SCIM Token icon.
Setup Microsoft Entra ID For Provisioning
Step 1 - Login to Microsoft Entra ID
Log in to the Microsoft Entra ID admin panel at: https://portal.azure.com/#home, and click Enterprise applications.
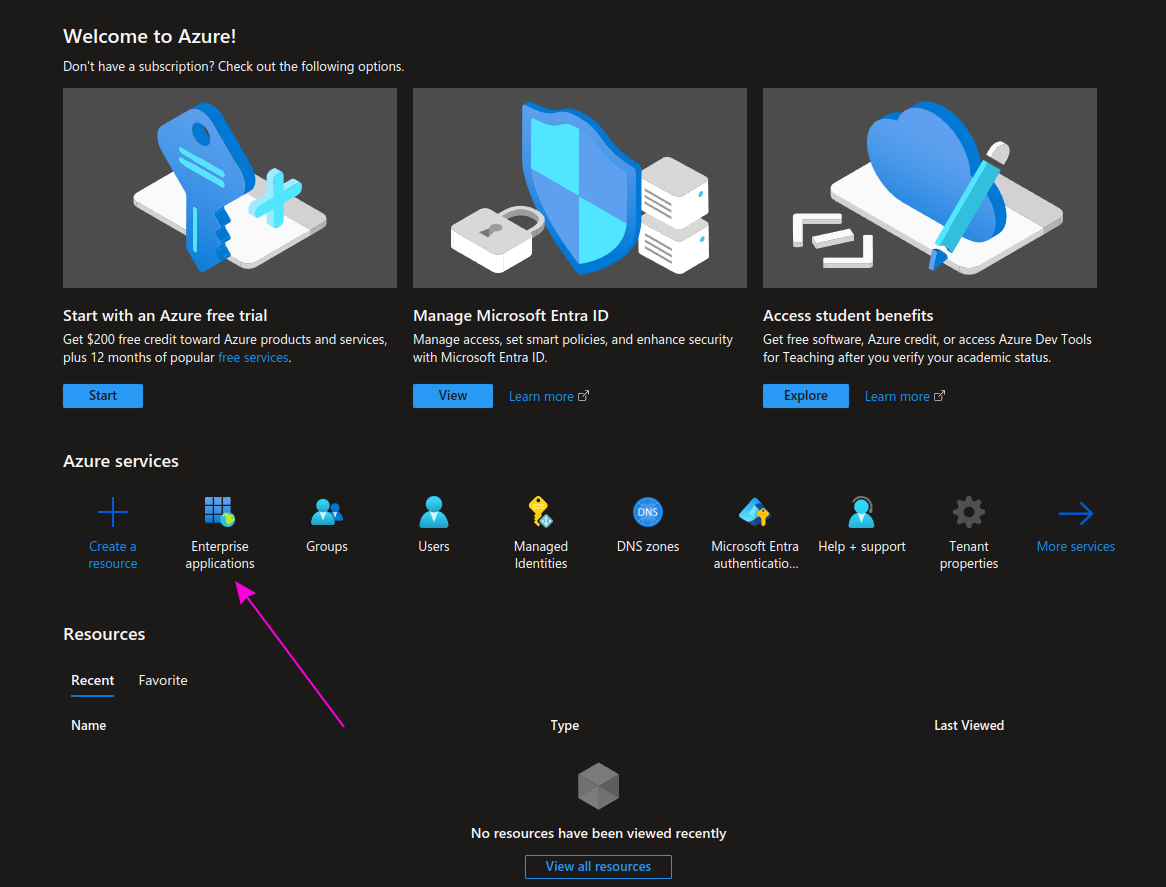
Step 2 - Enterprise applications
From the All applications menu, click New application.
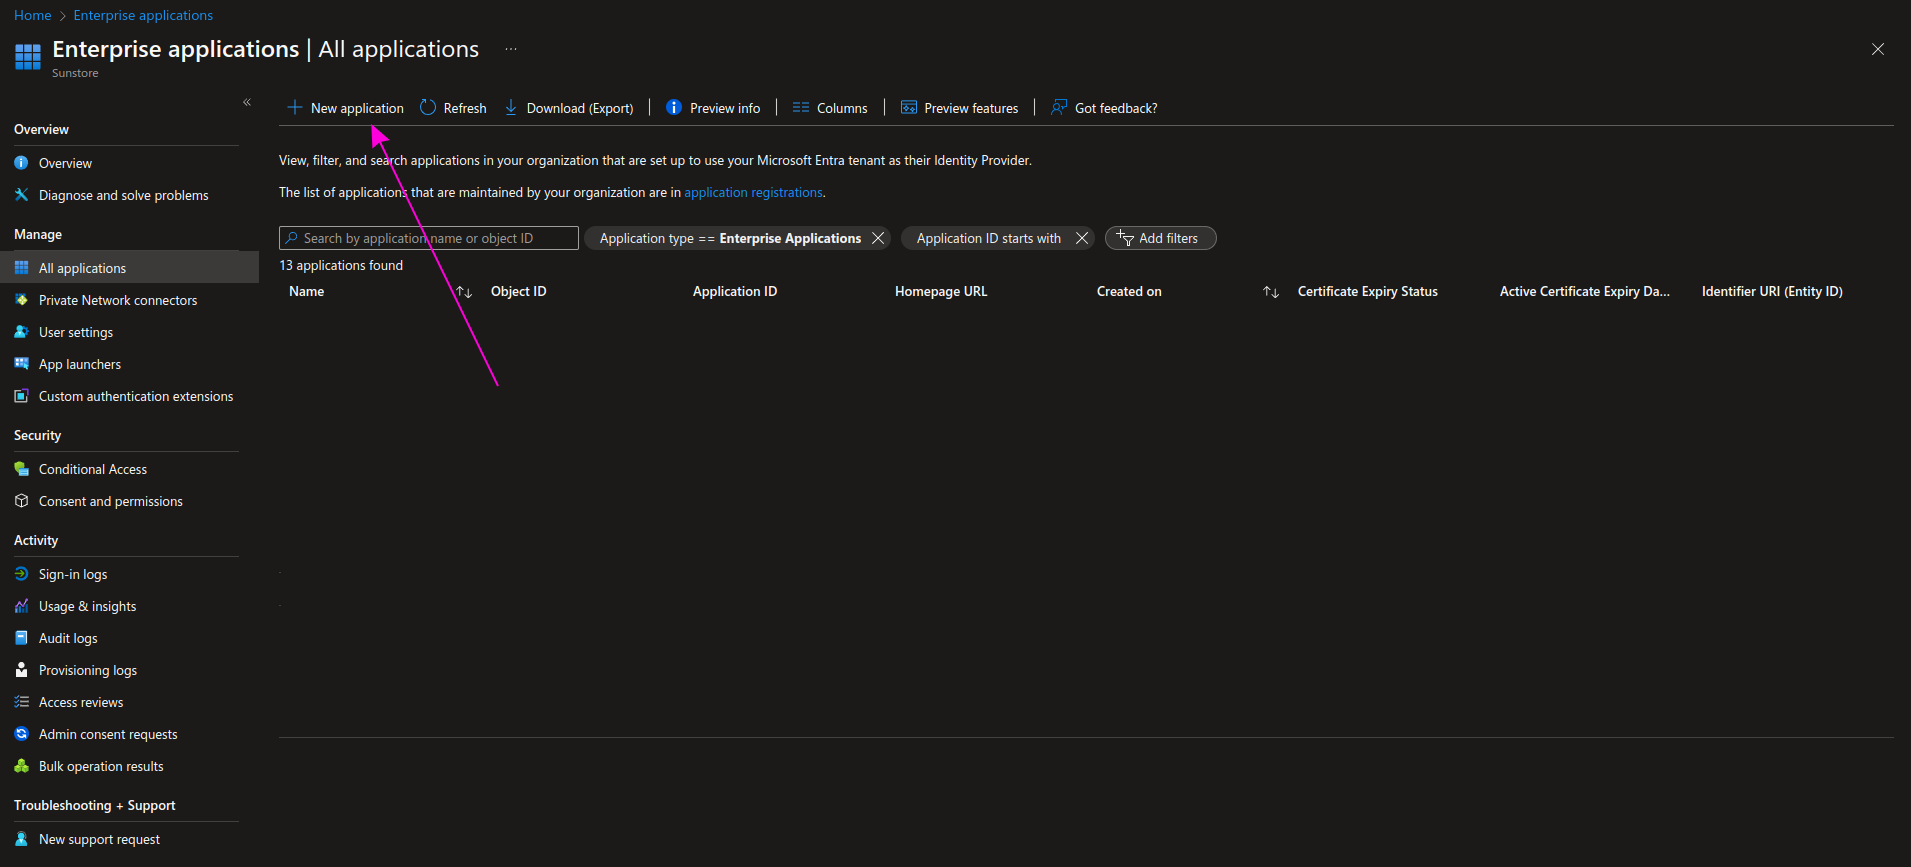
Step 3 - Create your own new application
Click on Create your own application.
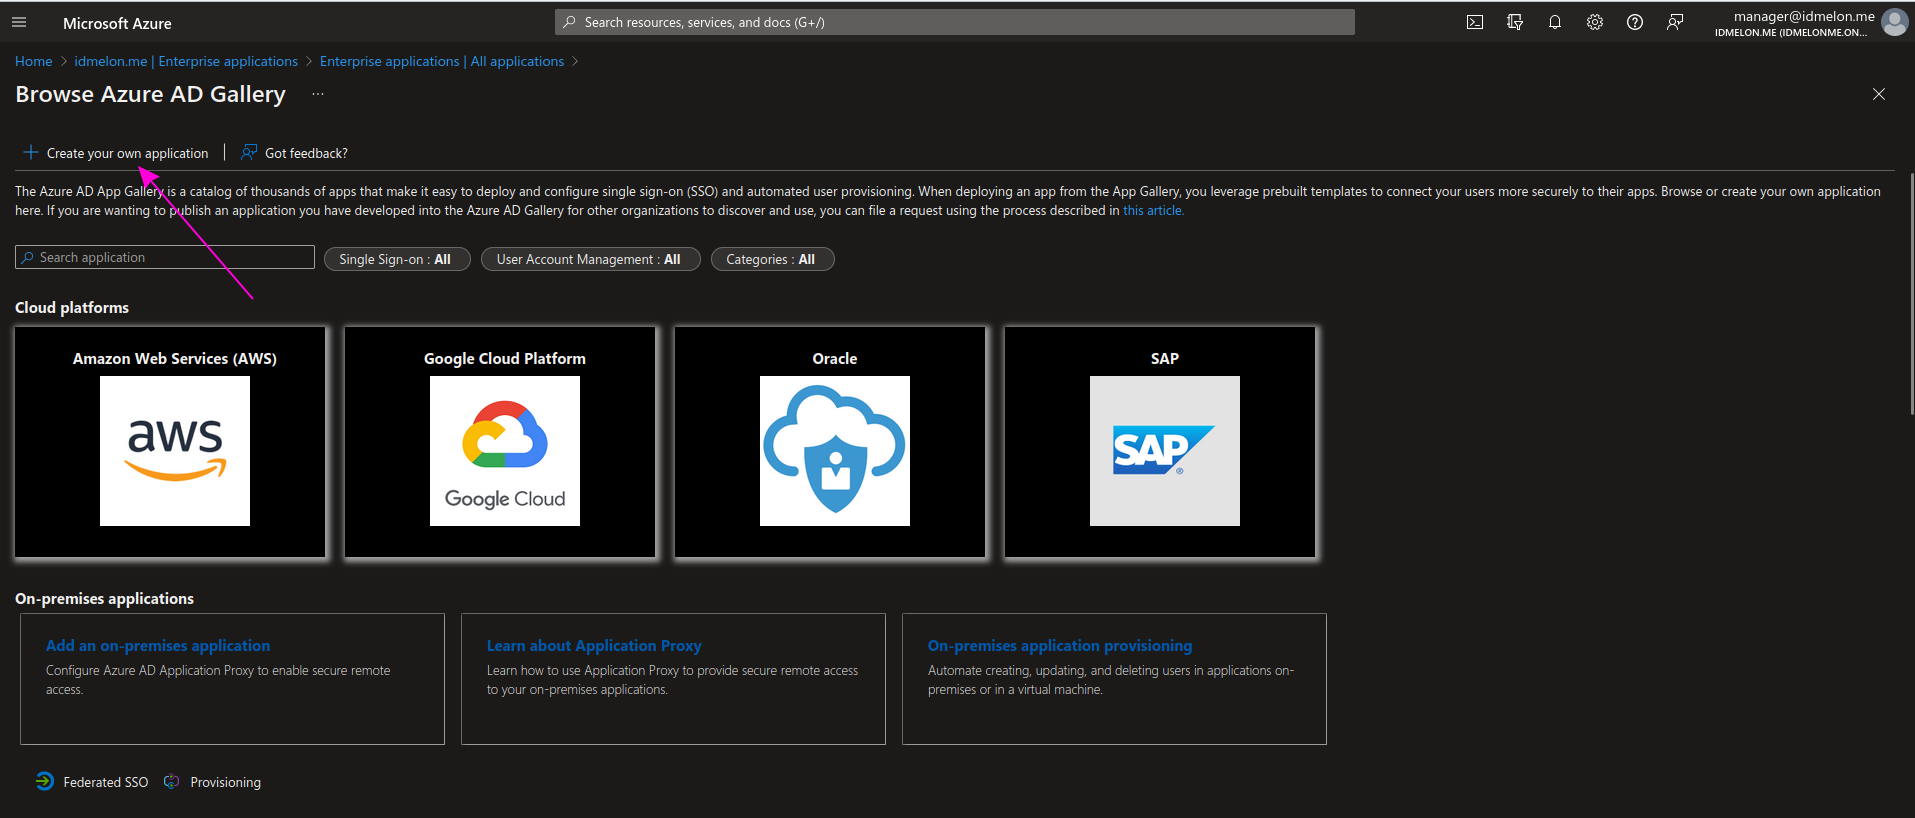
Step 4 - Configure your own new application
Fill in the fields of the opened form as follows:
- What’s the name of your app?
- IDmelon
- What are you looking to do with your application?
- Integrate any other application you don’t find in the gallery (Non-gallery)
Then click the Create button.
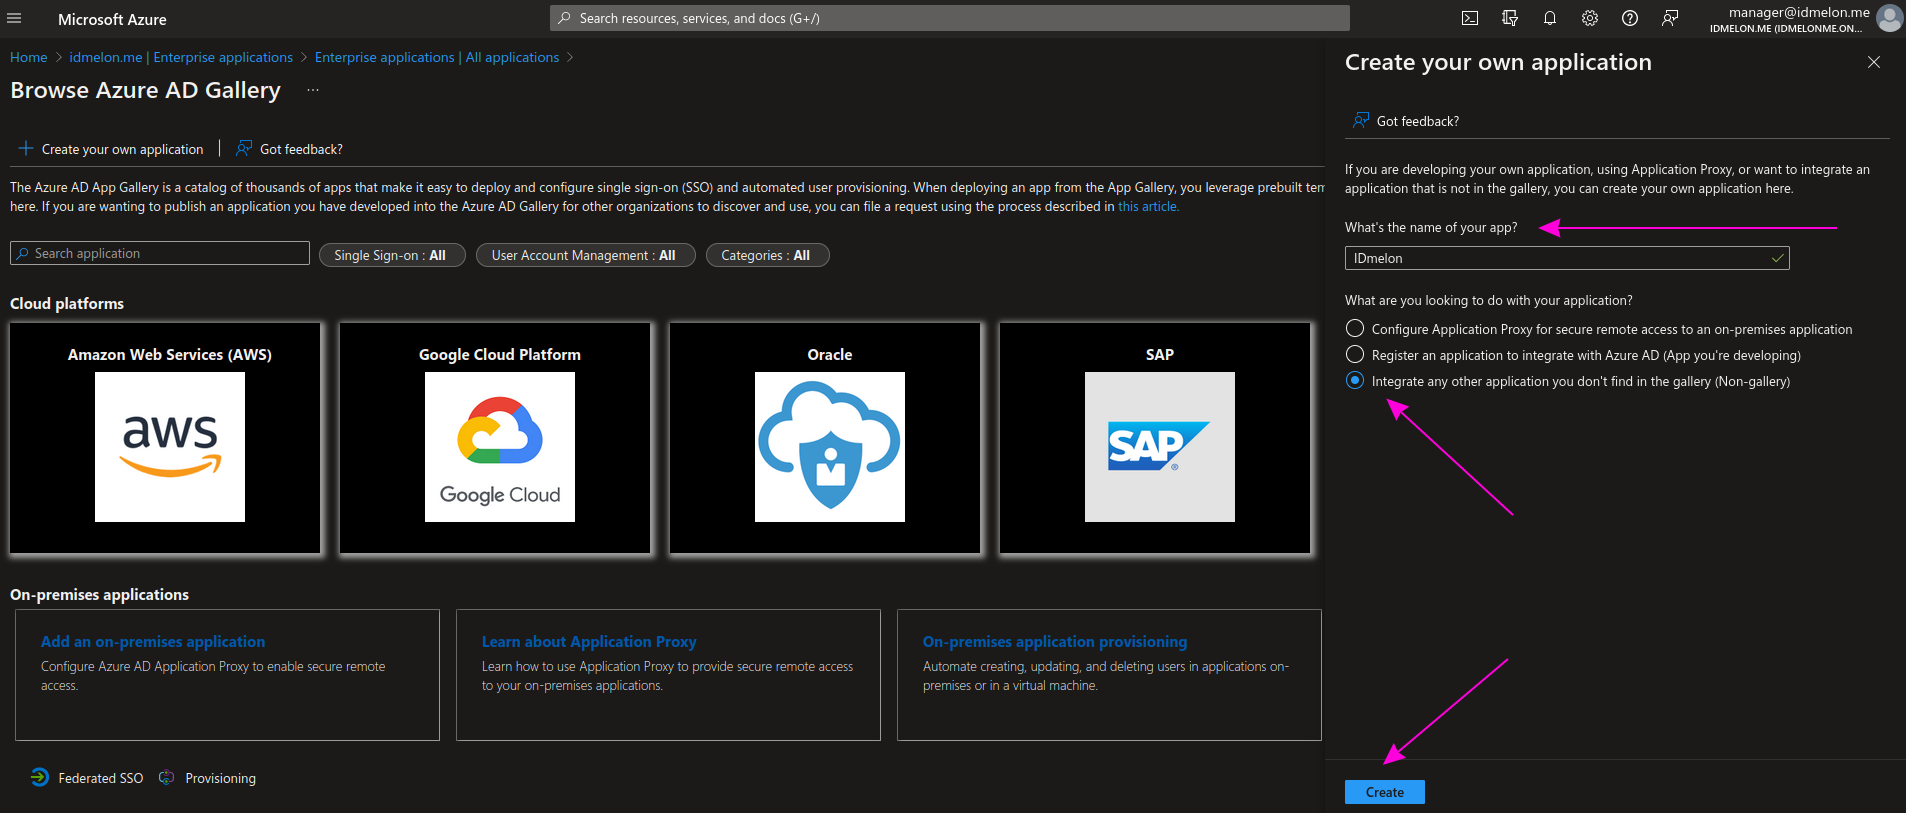
Step 5 - Provisioning
On the opened page, click Get started in the Provision User Accounts section.
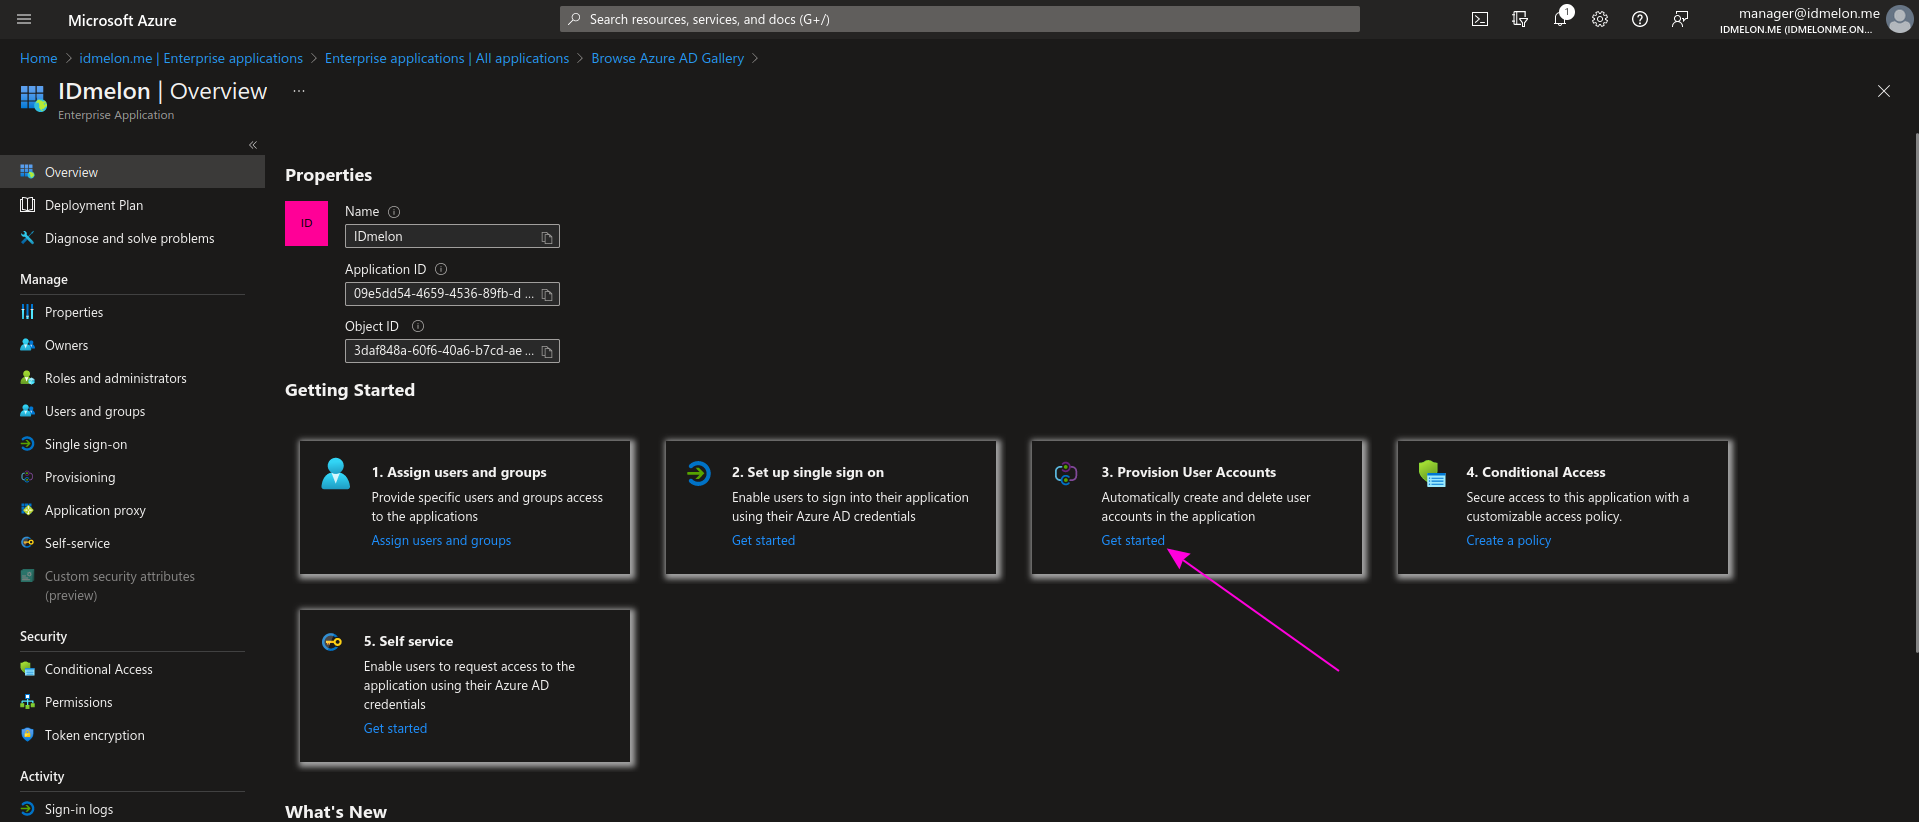
Step 6 - Provisioning
On the next page, click Get started from the main section again.
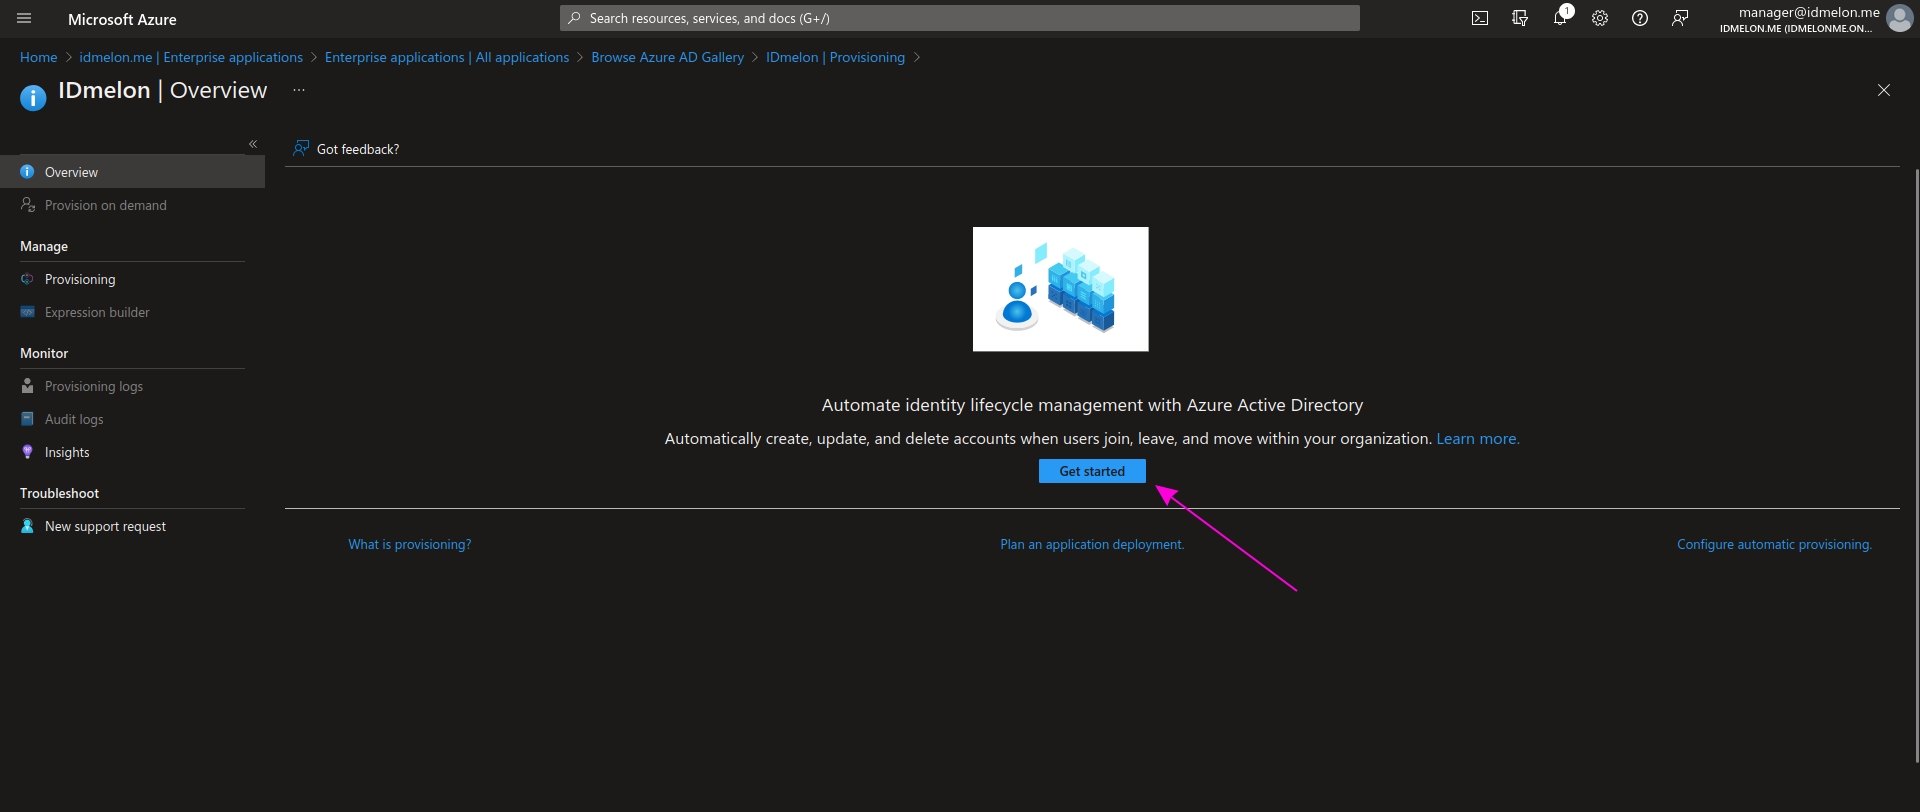
Step 7 - Update credentials
On the next page, fill in the fields of the opened form as follows:
- Provisioning mode
- Automatic
In the Admin Credentials section:
Tenant URL
- https://skm.idmelon.com/api/scim/v2/
Secret Token
- PASTE THIS VALUE FROM IDMELON PANEL
Click Test connection to verify the connection to IDmelon is successful.
Then click Save.
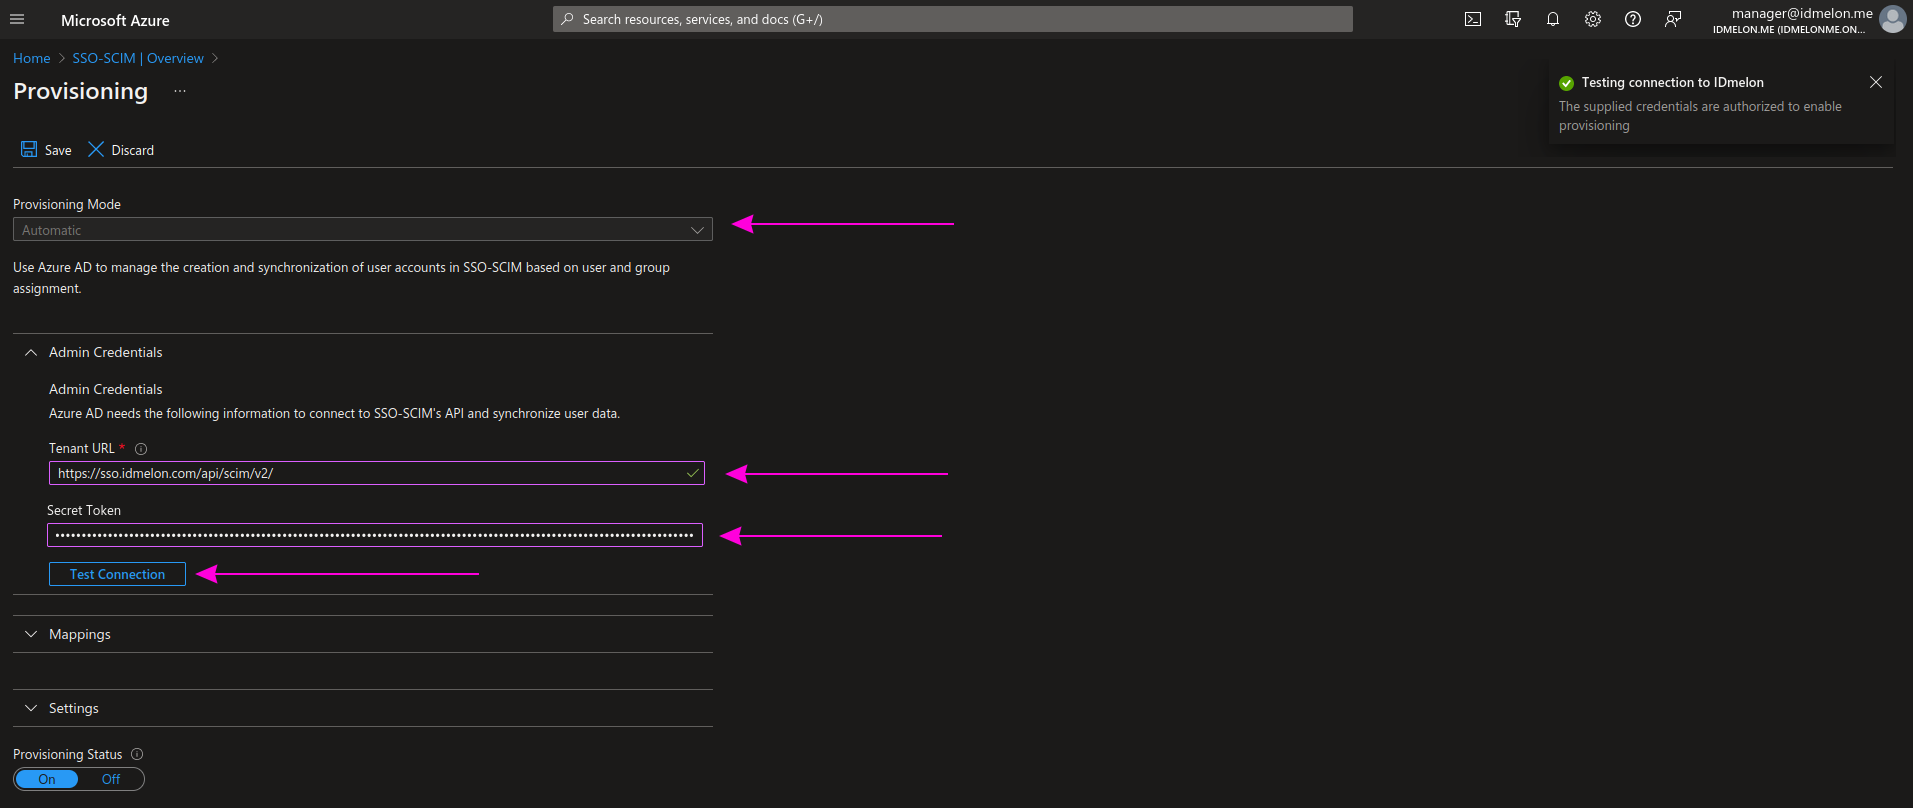
Step 8 - Update Settings
Based on your requirements, change the Scope to Sync all users and groups.
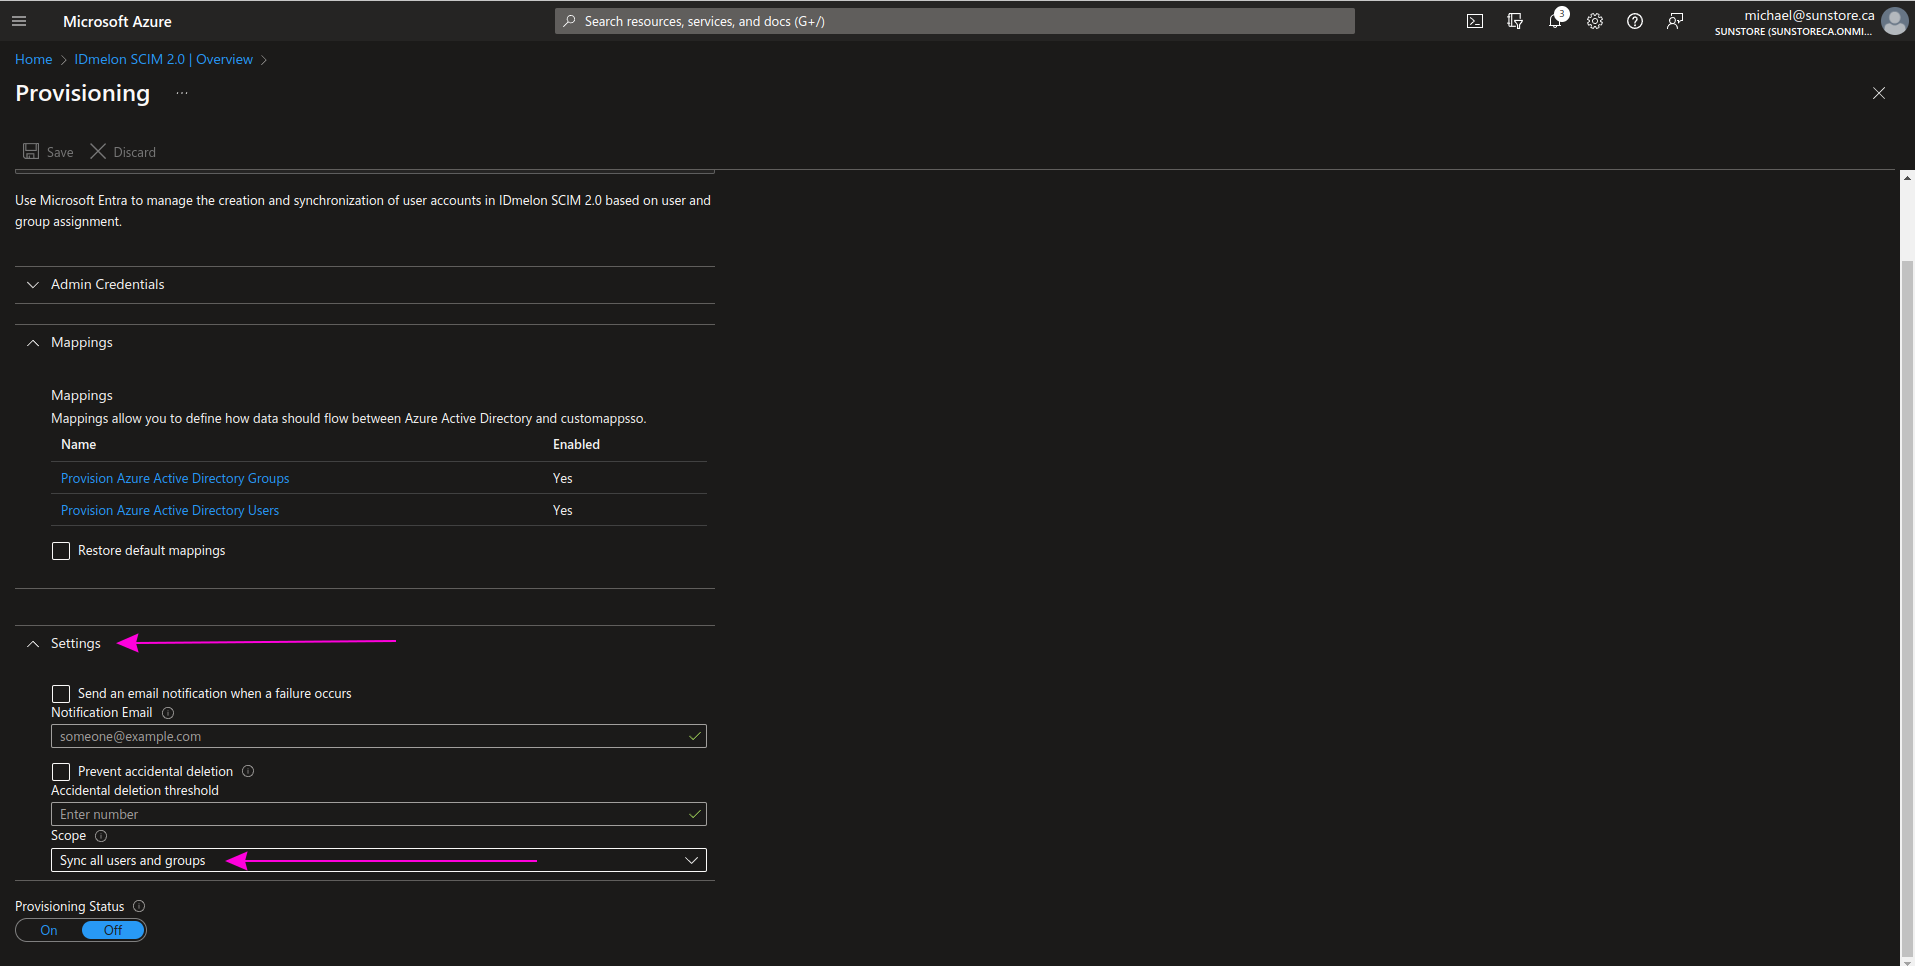
Step 9 - User Attribute mapping
Expand the Mapping section and click on Provision Microsoft Entra ID Users.
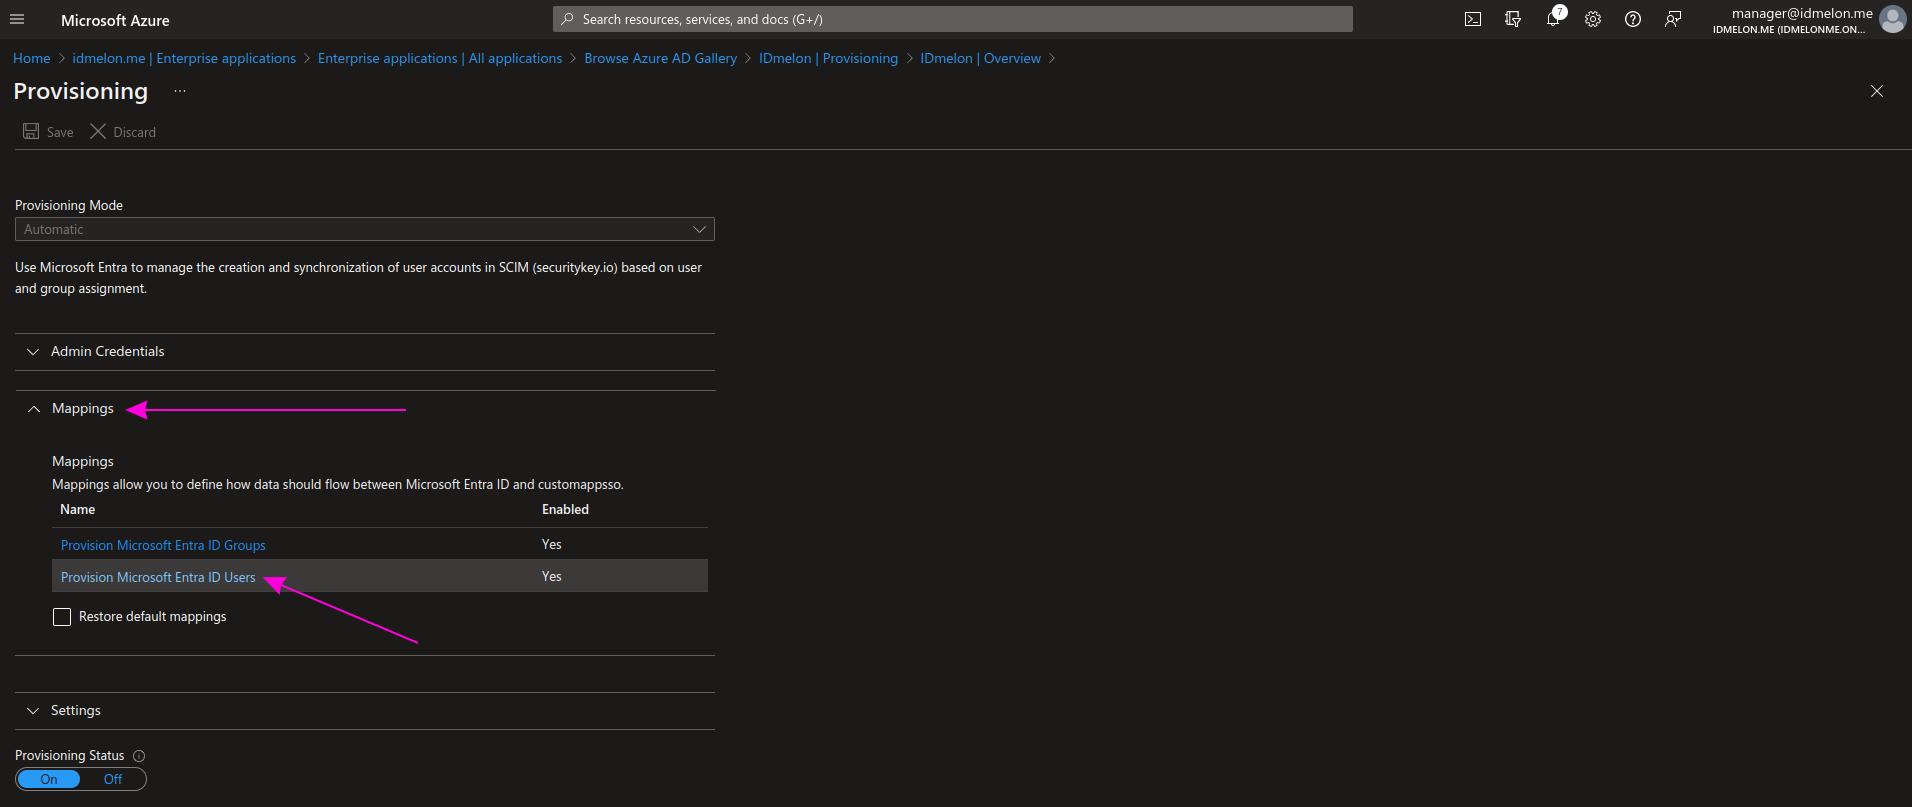
Step 10 - User attribute mapping - Advanced options
In the Attribute Mappings section, check the Show advanced options option, and then click on Edit attribute list for customappsso:
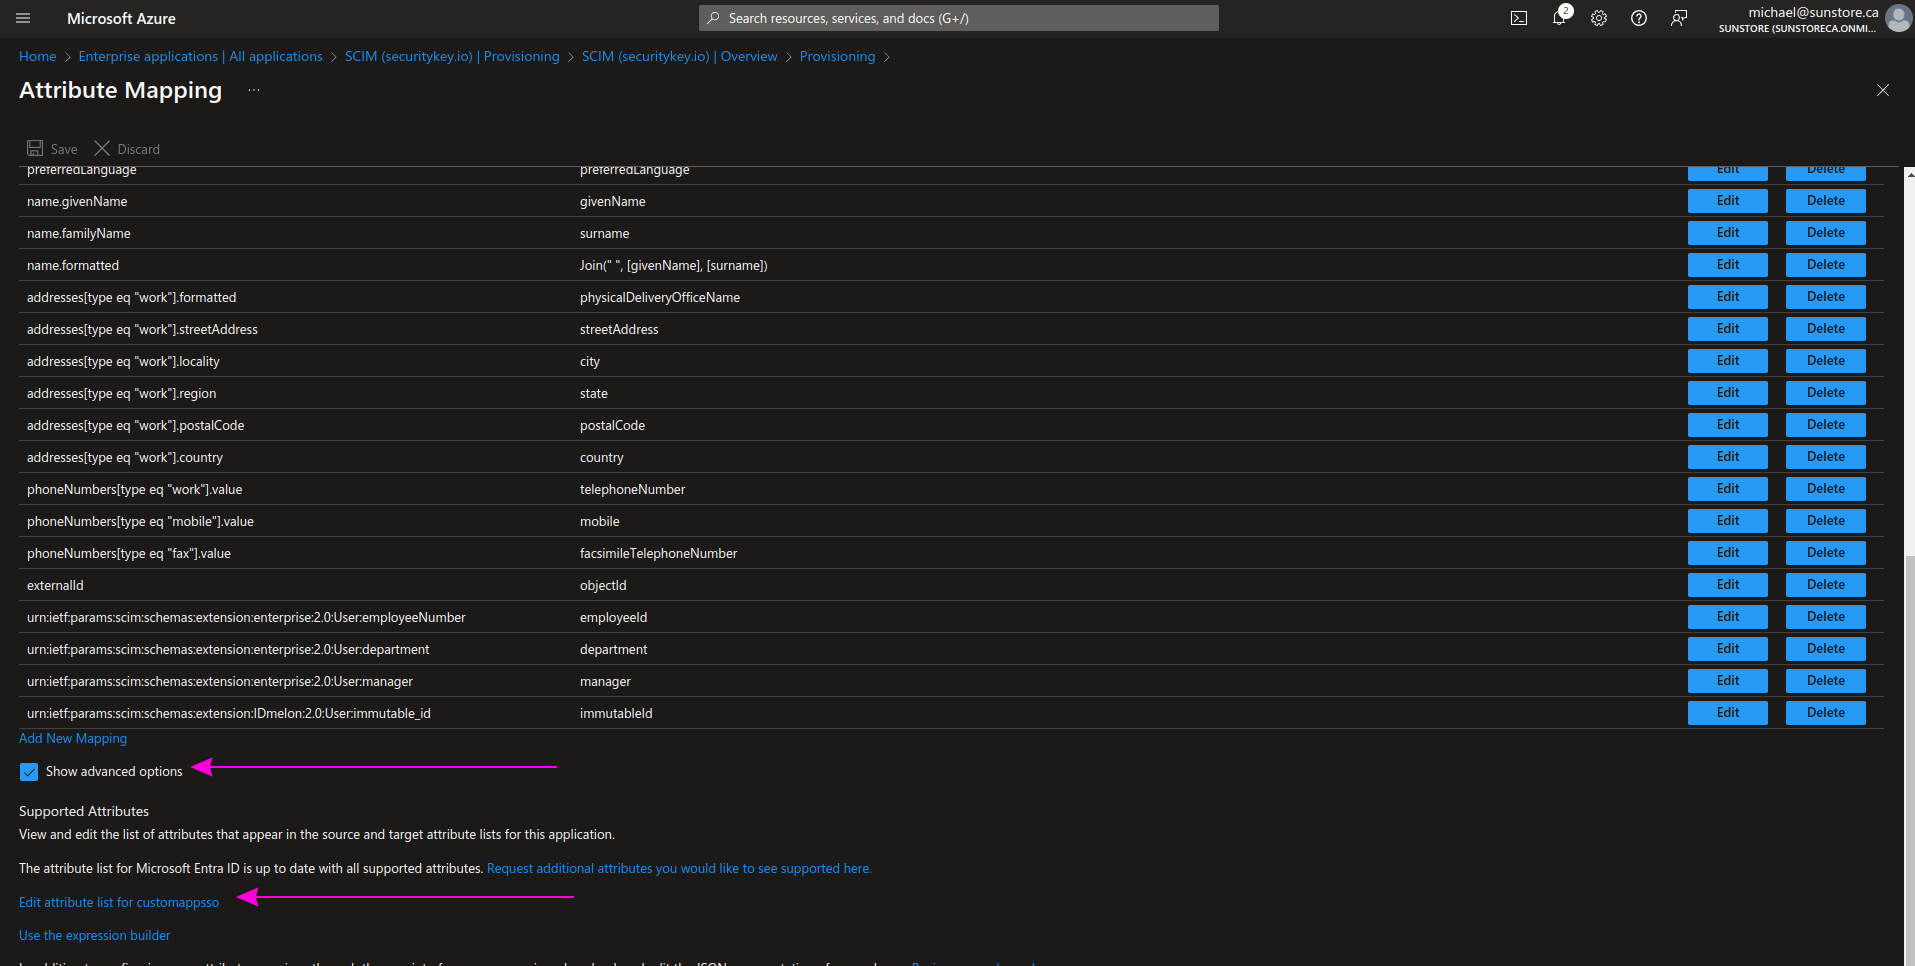
Add a new immutableId field as shown in the picture and the table below, then click Save.
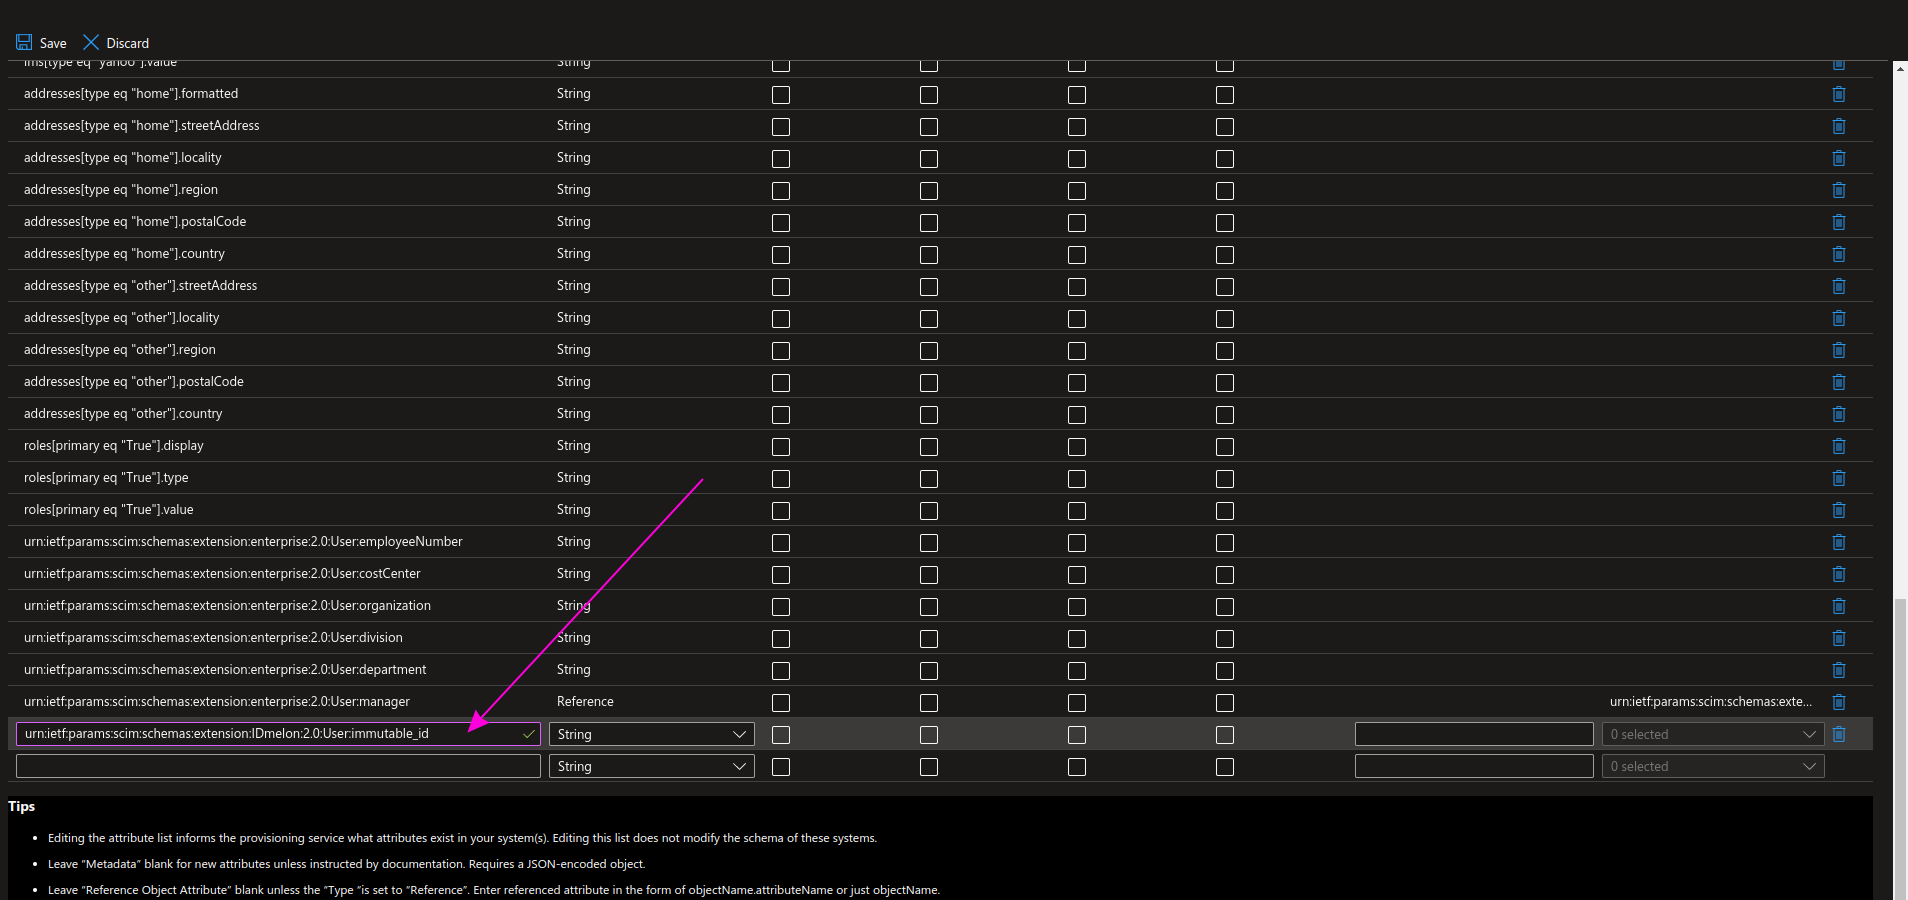
| Name | Type |
|---|---|
| urn:ietf:params:scim:schemas:extension:IDmelon:2.0:User:immutable_id | String |
Step 11 - User attribute mapping
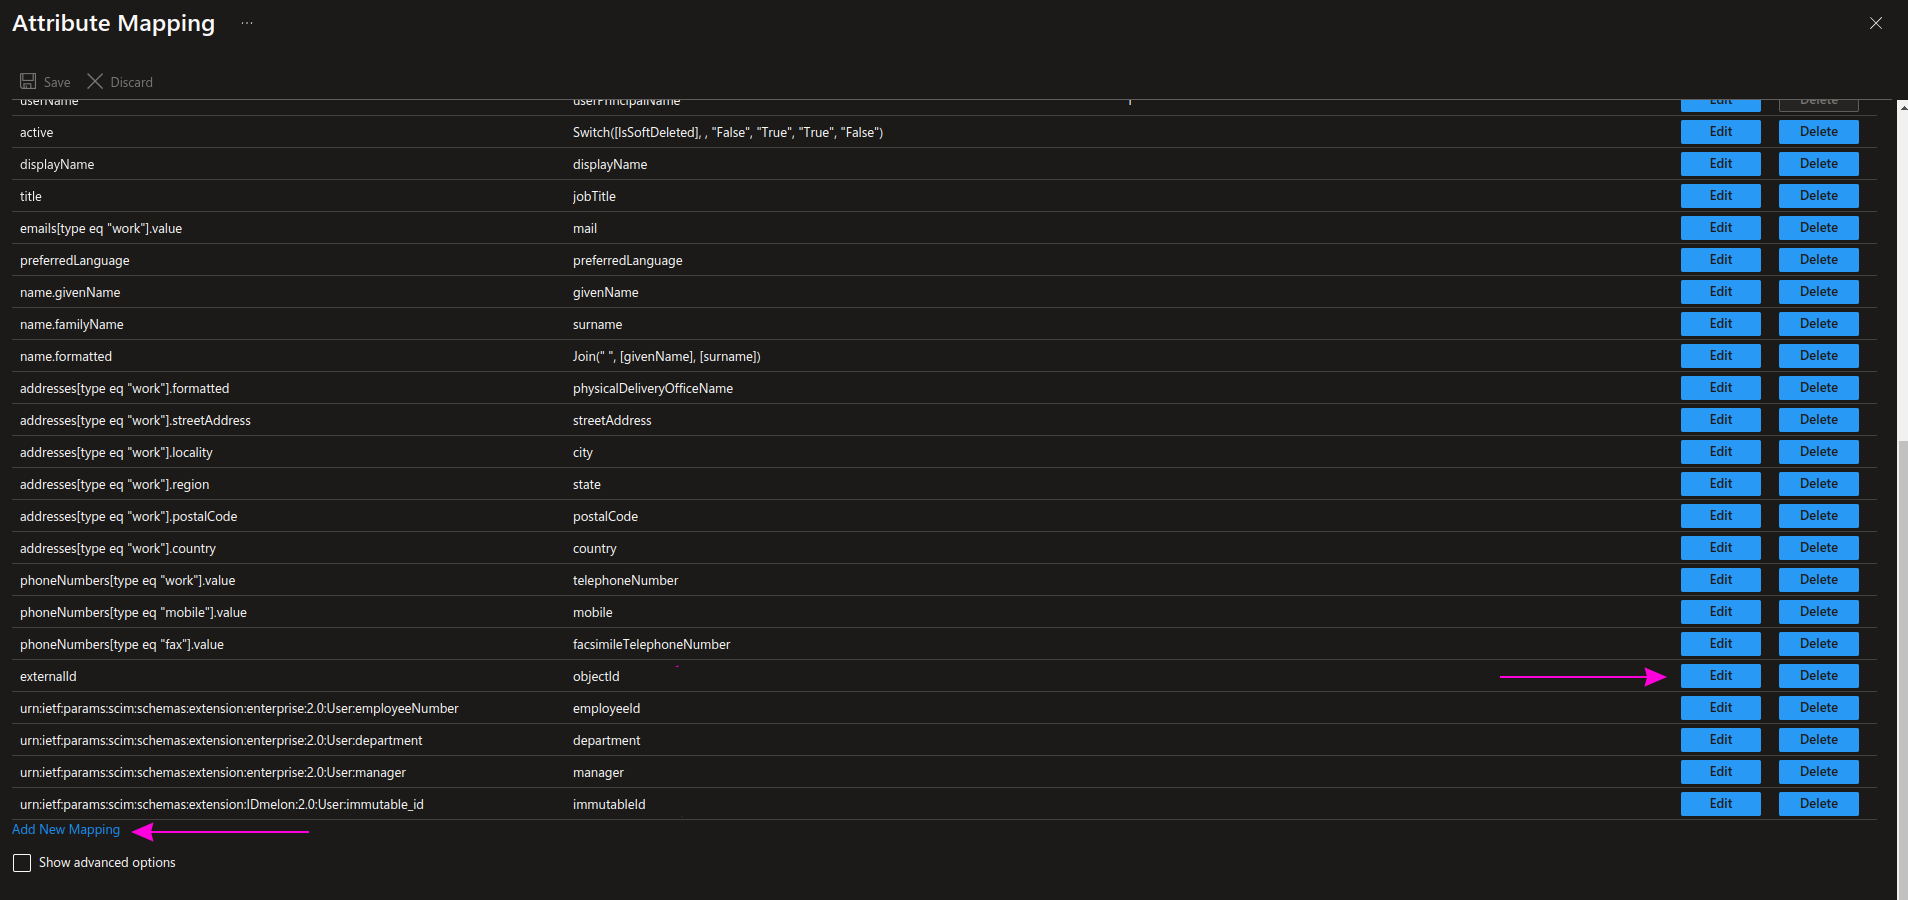
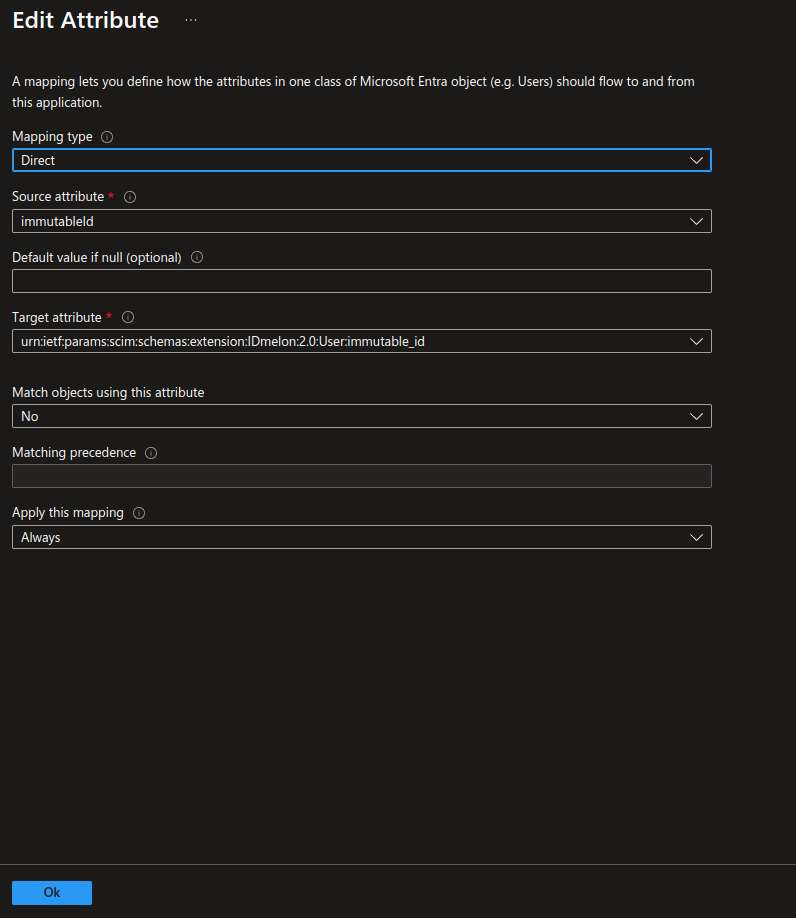
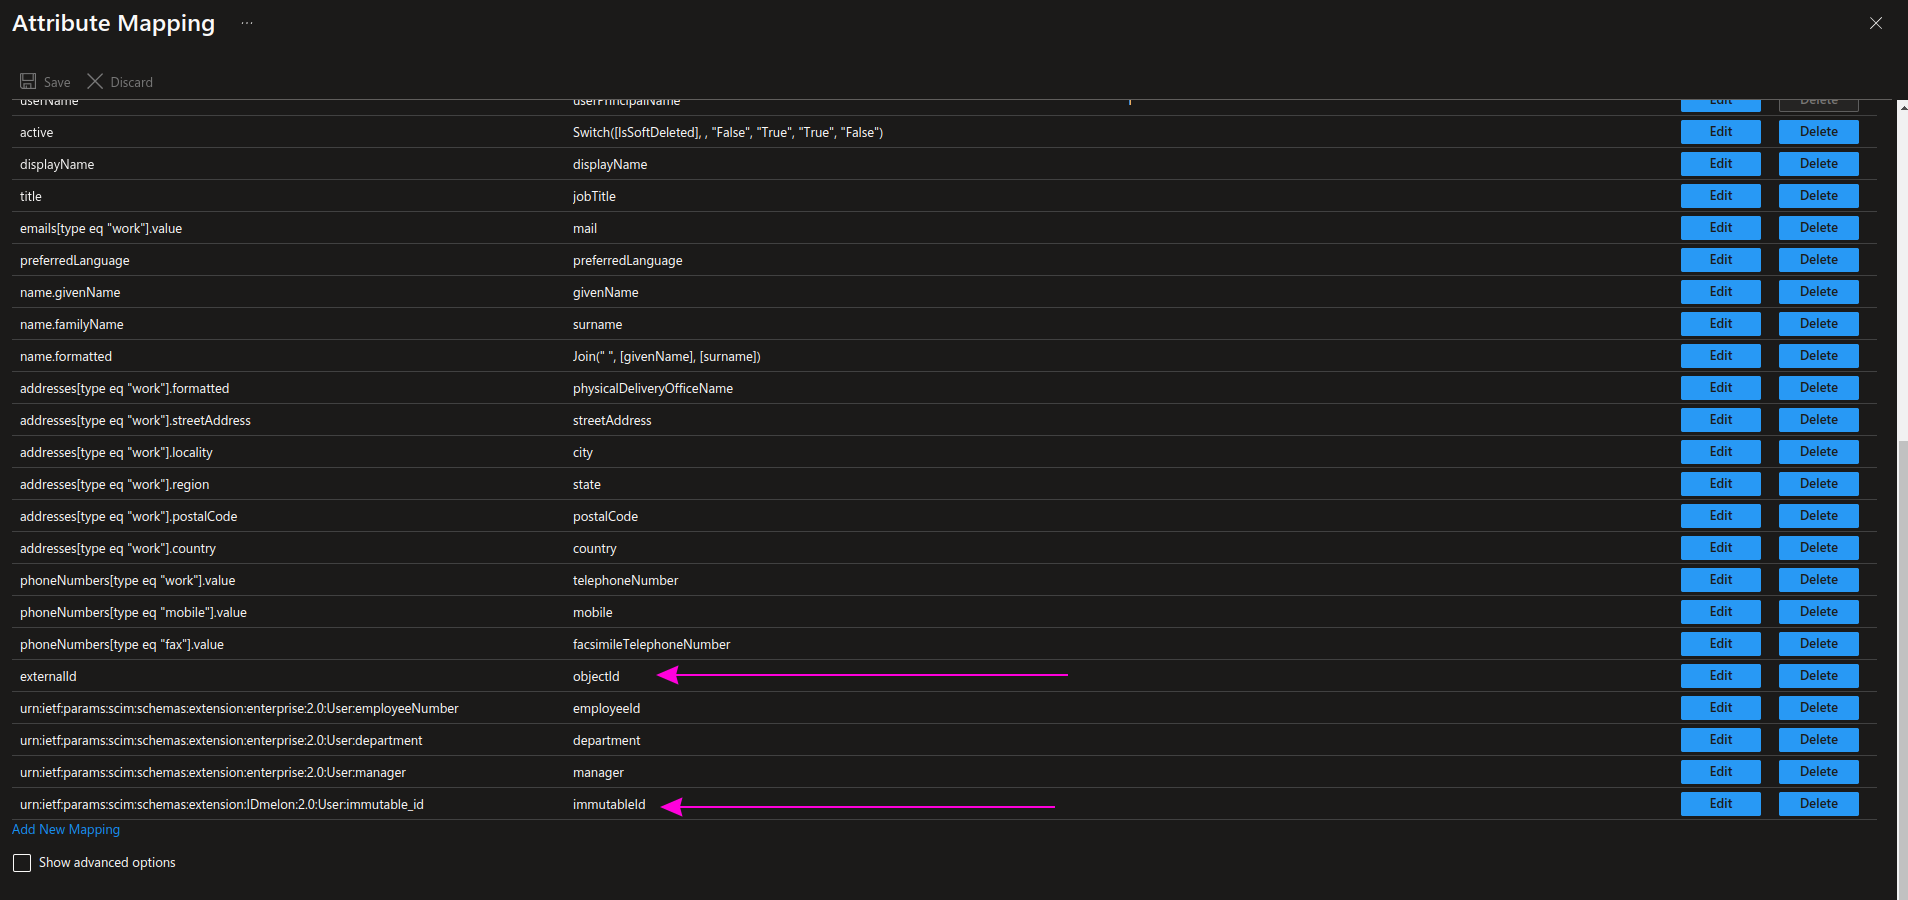
Return to the Attribute Mappings section, and from the default list, apply these two changes and then click Save.
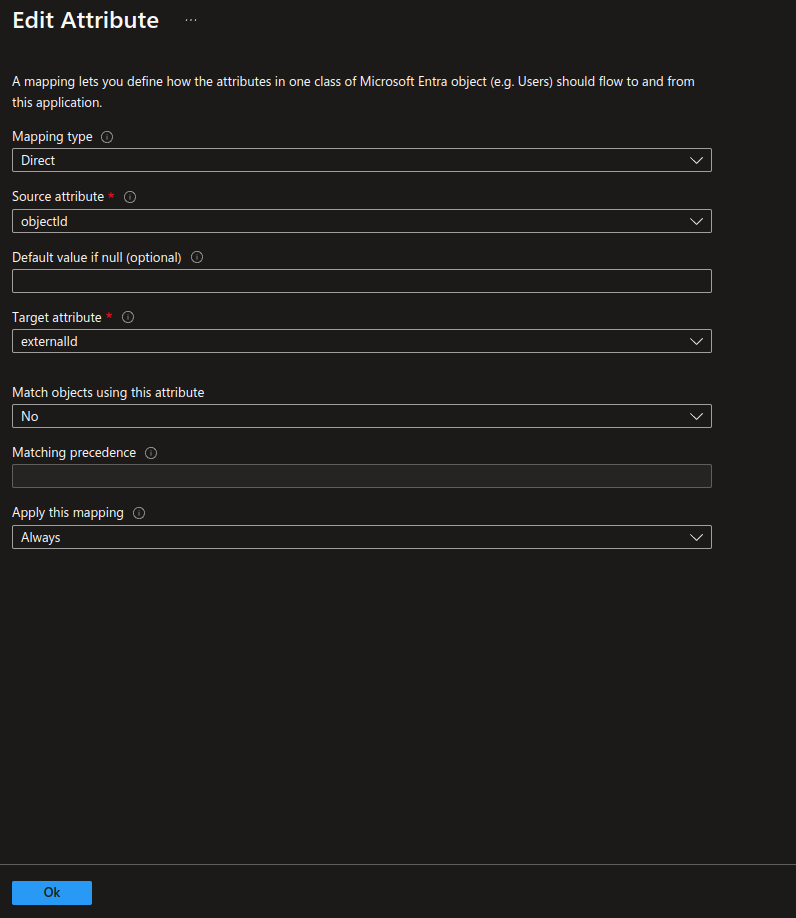
- Change the objectId field by clicking the Edit button.
- Add the immutableId field by clicking Add New Mapping.
| customappsso Attribute | Microsoft Entra ID Attribute | Matching precedence |
|---|---|---|
| objectId | externalId | |
| immutableId | urn:ietf:params:scim:schemas:extension:IDmelon:2.0:User:immutable_id |
Step 12 - Group Attribute mapping
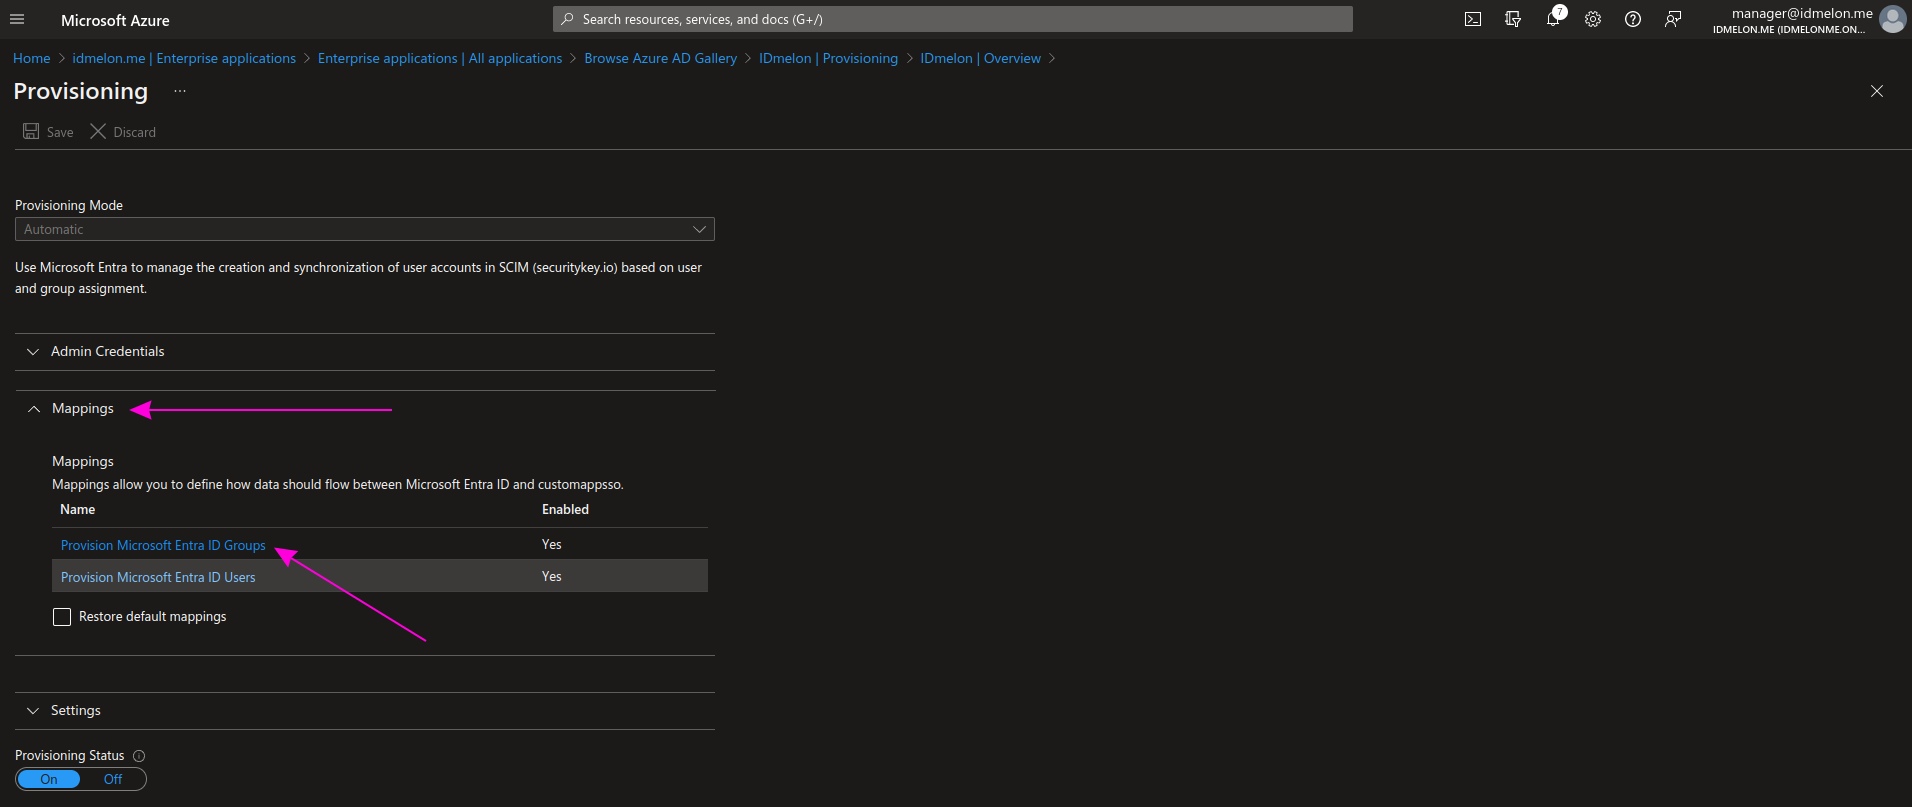
Expand the Mapping section and click on Provision Microsoft Entra ID Group.
Step 13 - Group attribute mapping - Advanced options
In the Attribute Mappings section, check the Show advanced options option, and then click on Edit attribute list for customappsso:
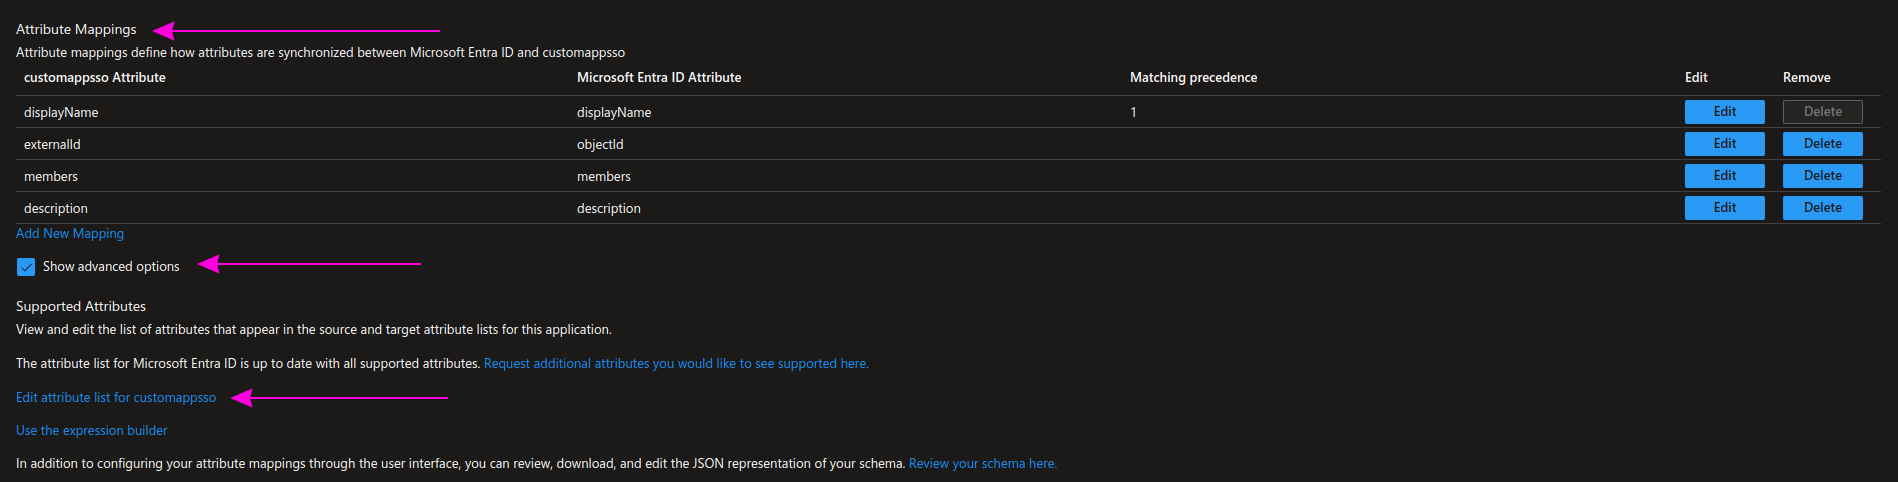
Add a new description field as shown in the picture and the table below, then click Save.
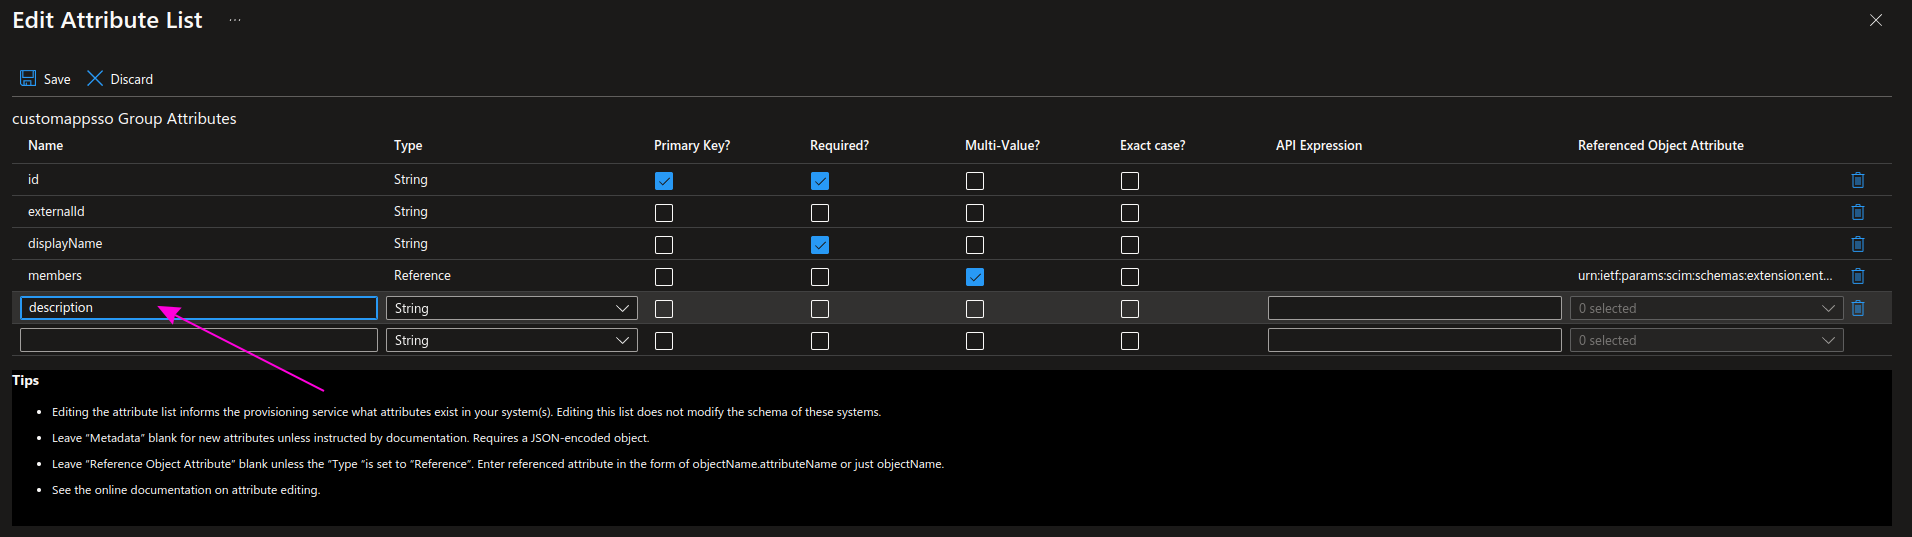
| Name | Type |
|---|---|
| description | String |
Step 14 - Group attribute mapping
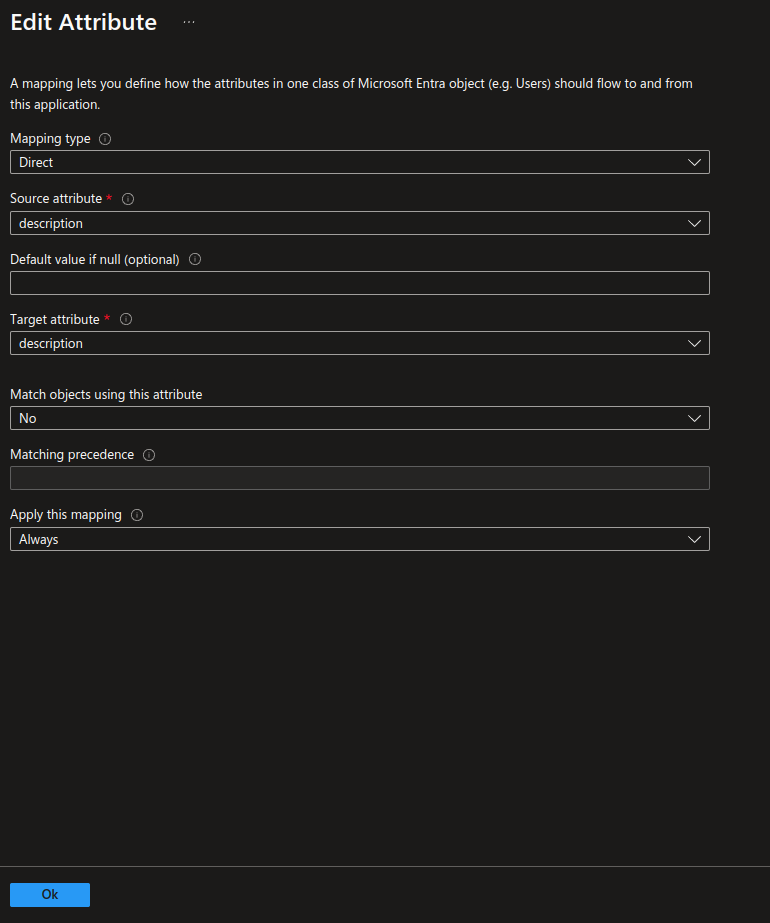
Return to the Attribute Mappings section, and from the default list, apply this change and then click Save.
- Add the description field by clicking Add New Mapping.
| customappsso Attribute | Microsoft Entra ID Attribute | Matching precedence |
|---|---|---|
| description | description |


Adding Custom Attributes
To configure custom attributes for SCIM provisioning in Microsoft Entra ID, follow these steps:
Step 1 - User attribute mapping
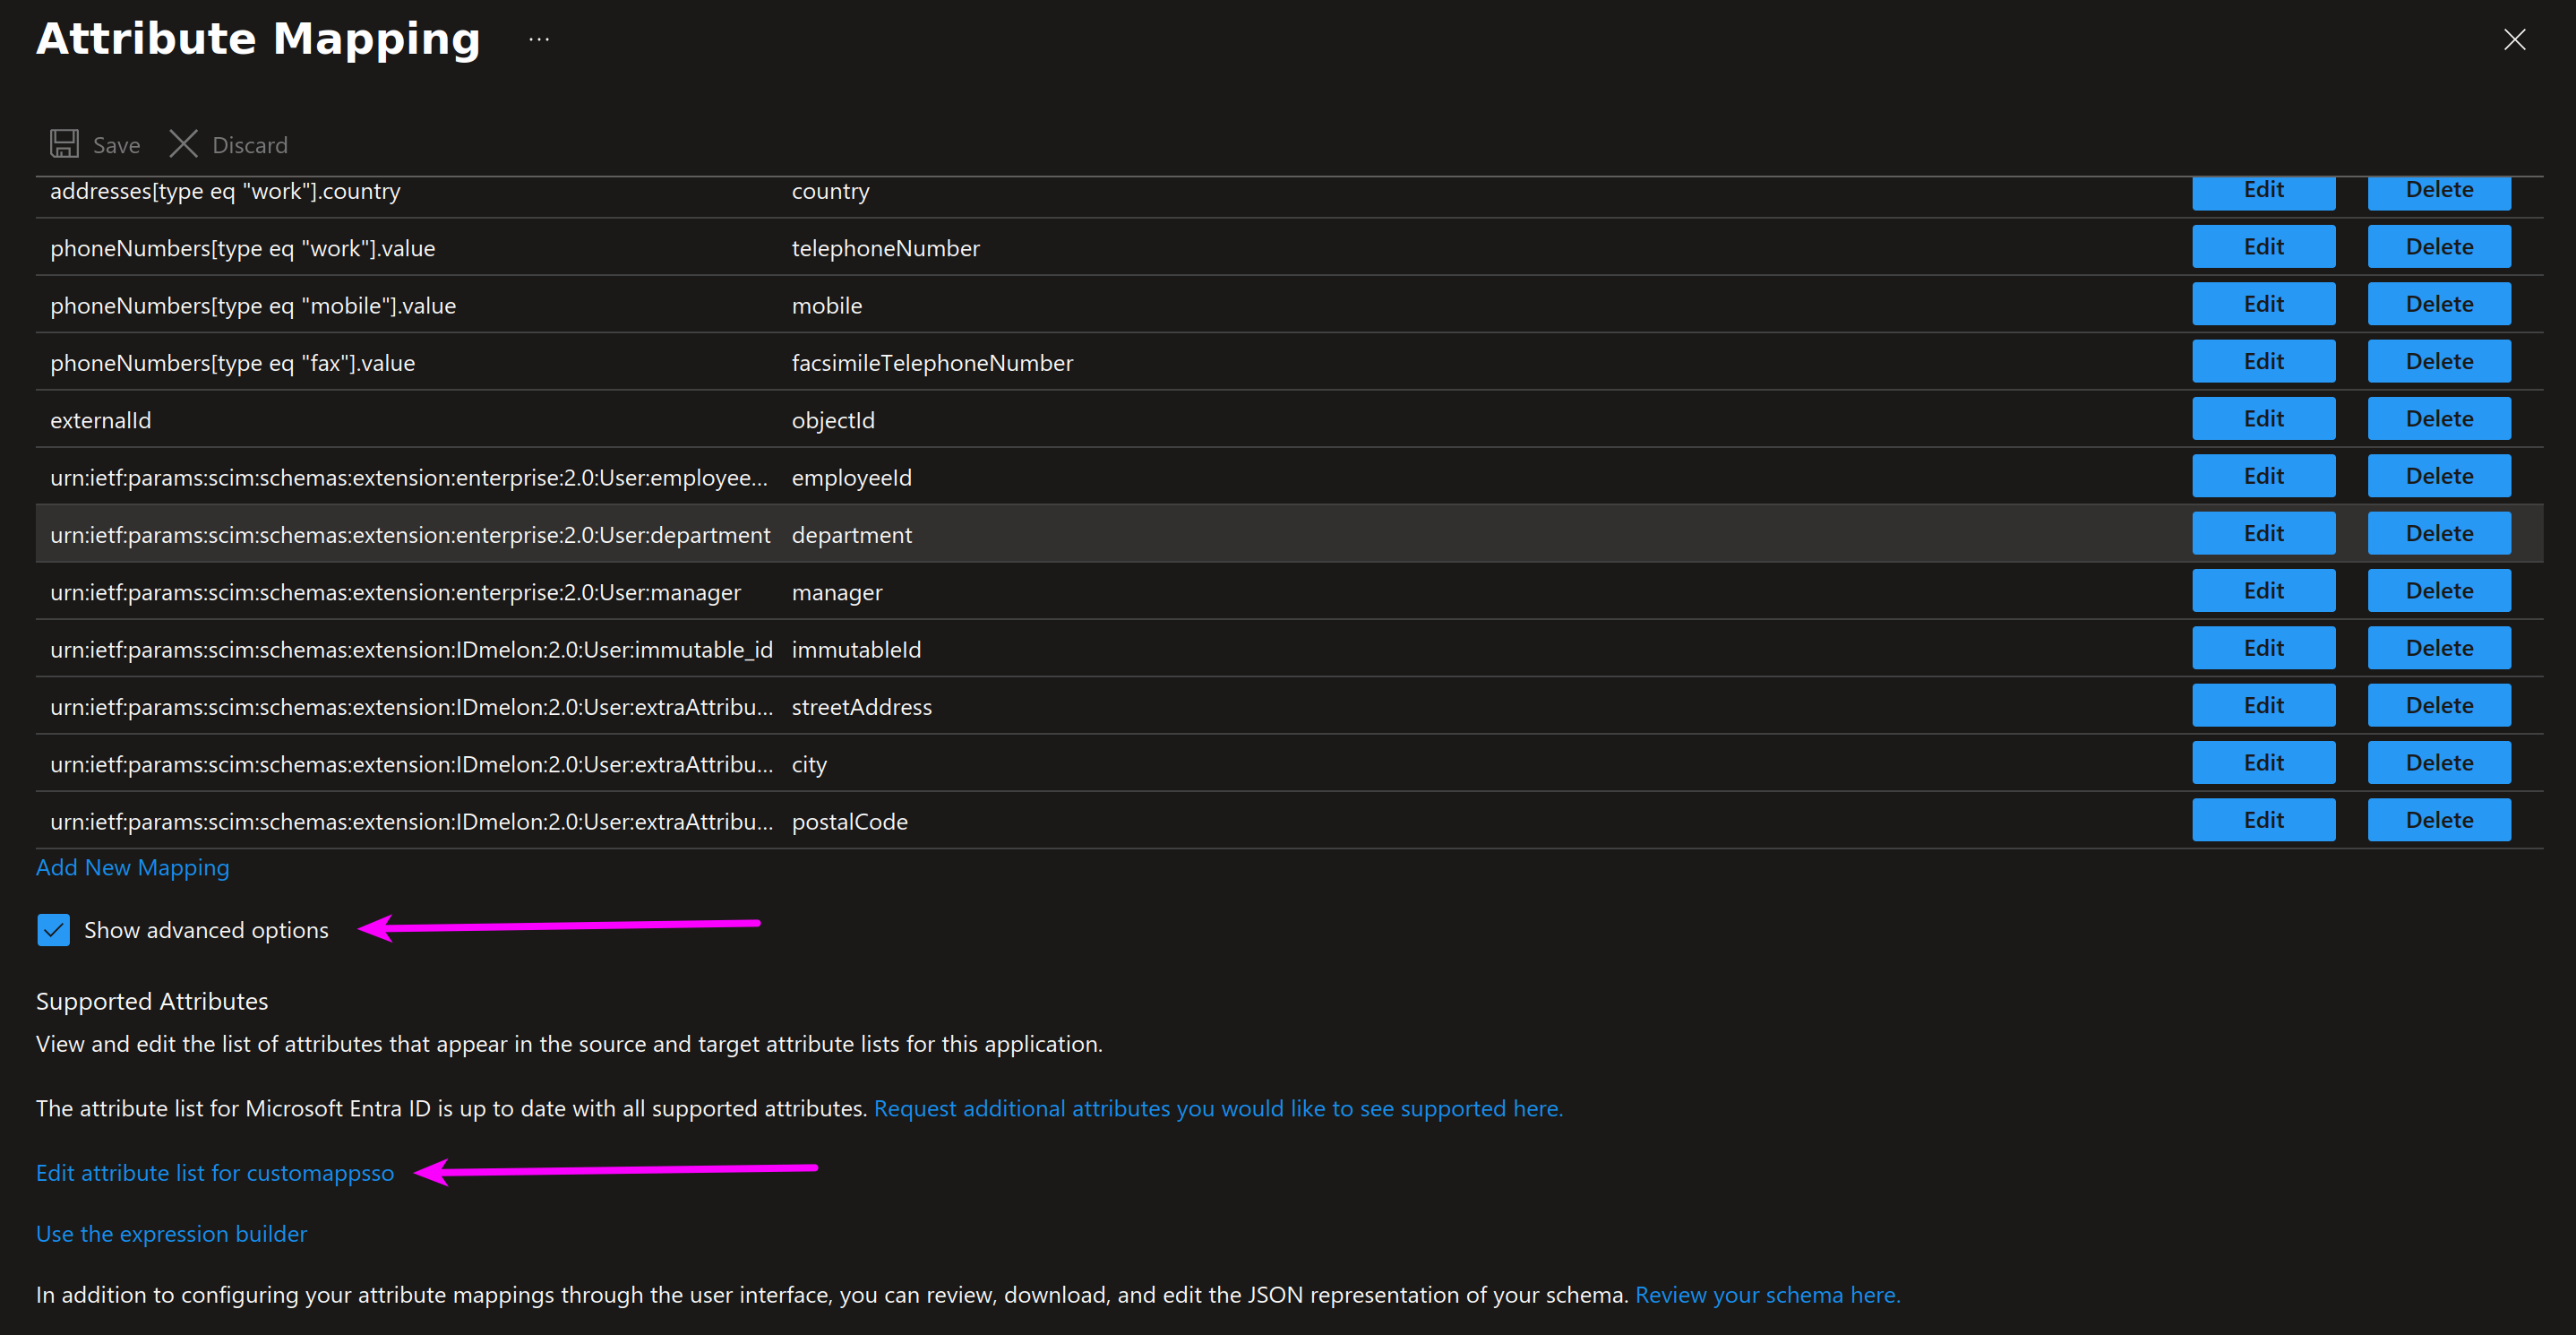
Return to the Attribute Mappings section, check the Show advanced options option, and then click on Edit attribute list for customappsso:
Step 2 - Edit attribute list
Add new custom fields as shown in the picture and the table below, then click Save.
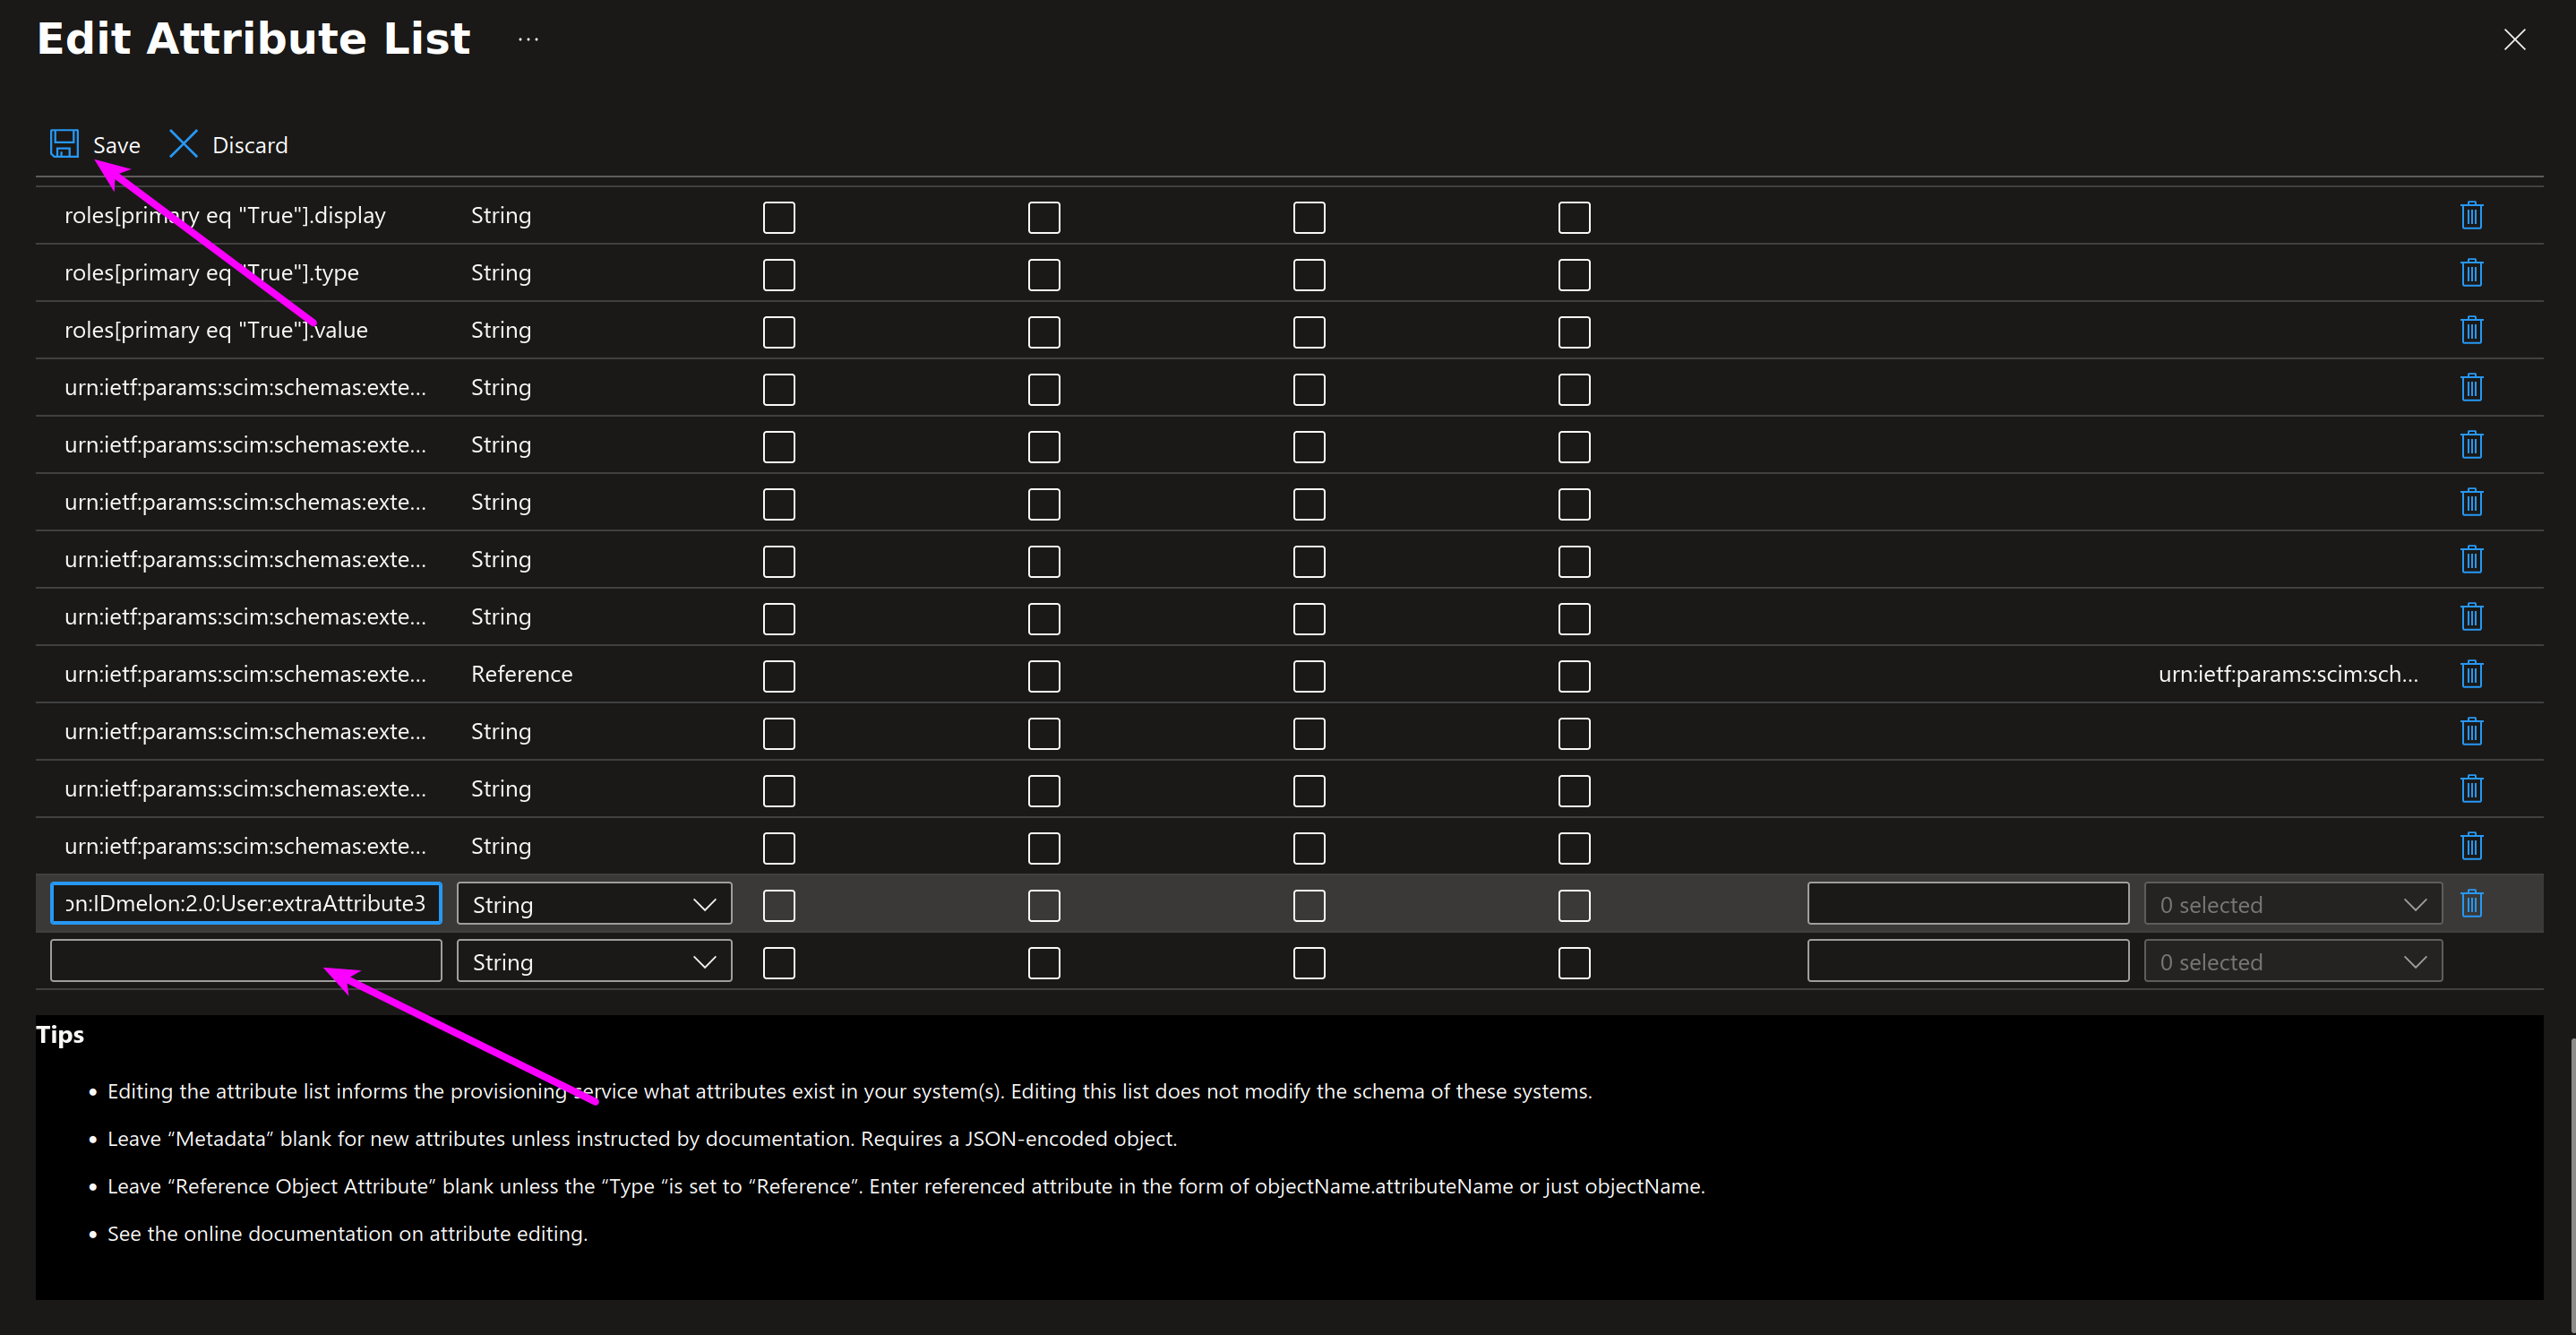
You can map up to five custom attributes using the following target fields.
| Name | Type |
|---|---|
| urn:ietf:params:scim:schemas:extension:IDmelon:2.0:User:extraAttribute1 | String |
| urn:ietf:params:scim:schemas:extension:IDmelon:2.0:User:extraAttribute2 | String |
| urn:ietf:params:scim:schemas:extension:IDmelon:2.0:User:extraAttribute3 | String |
| urn:ietf:params:scim:schemas:extension:IDmelon:2.0:User:extraAttribute4 | String |
| urn:ietf:params:scim:schemas:extension:IDmelon:2.0:User:extraAttribute5 | String |
Step 3 - User attribute mapping
Return to the Attribute Mappings section once more and click Add New Mapping.
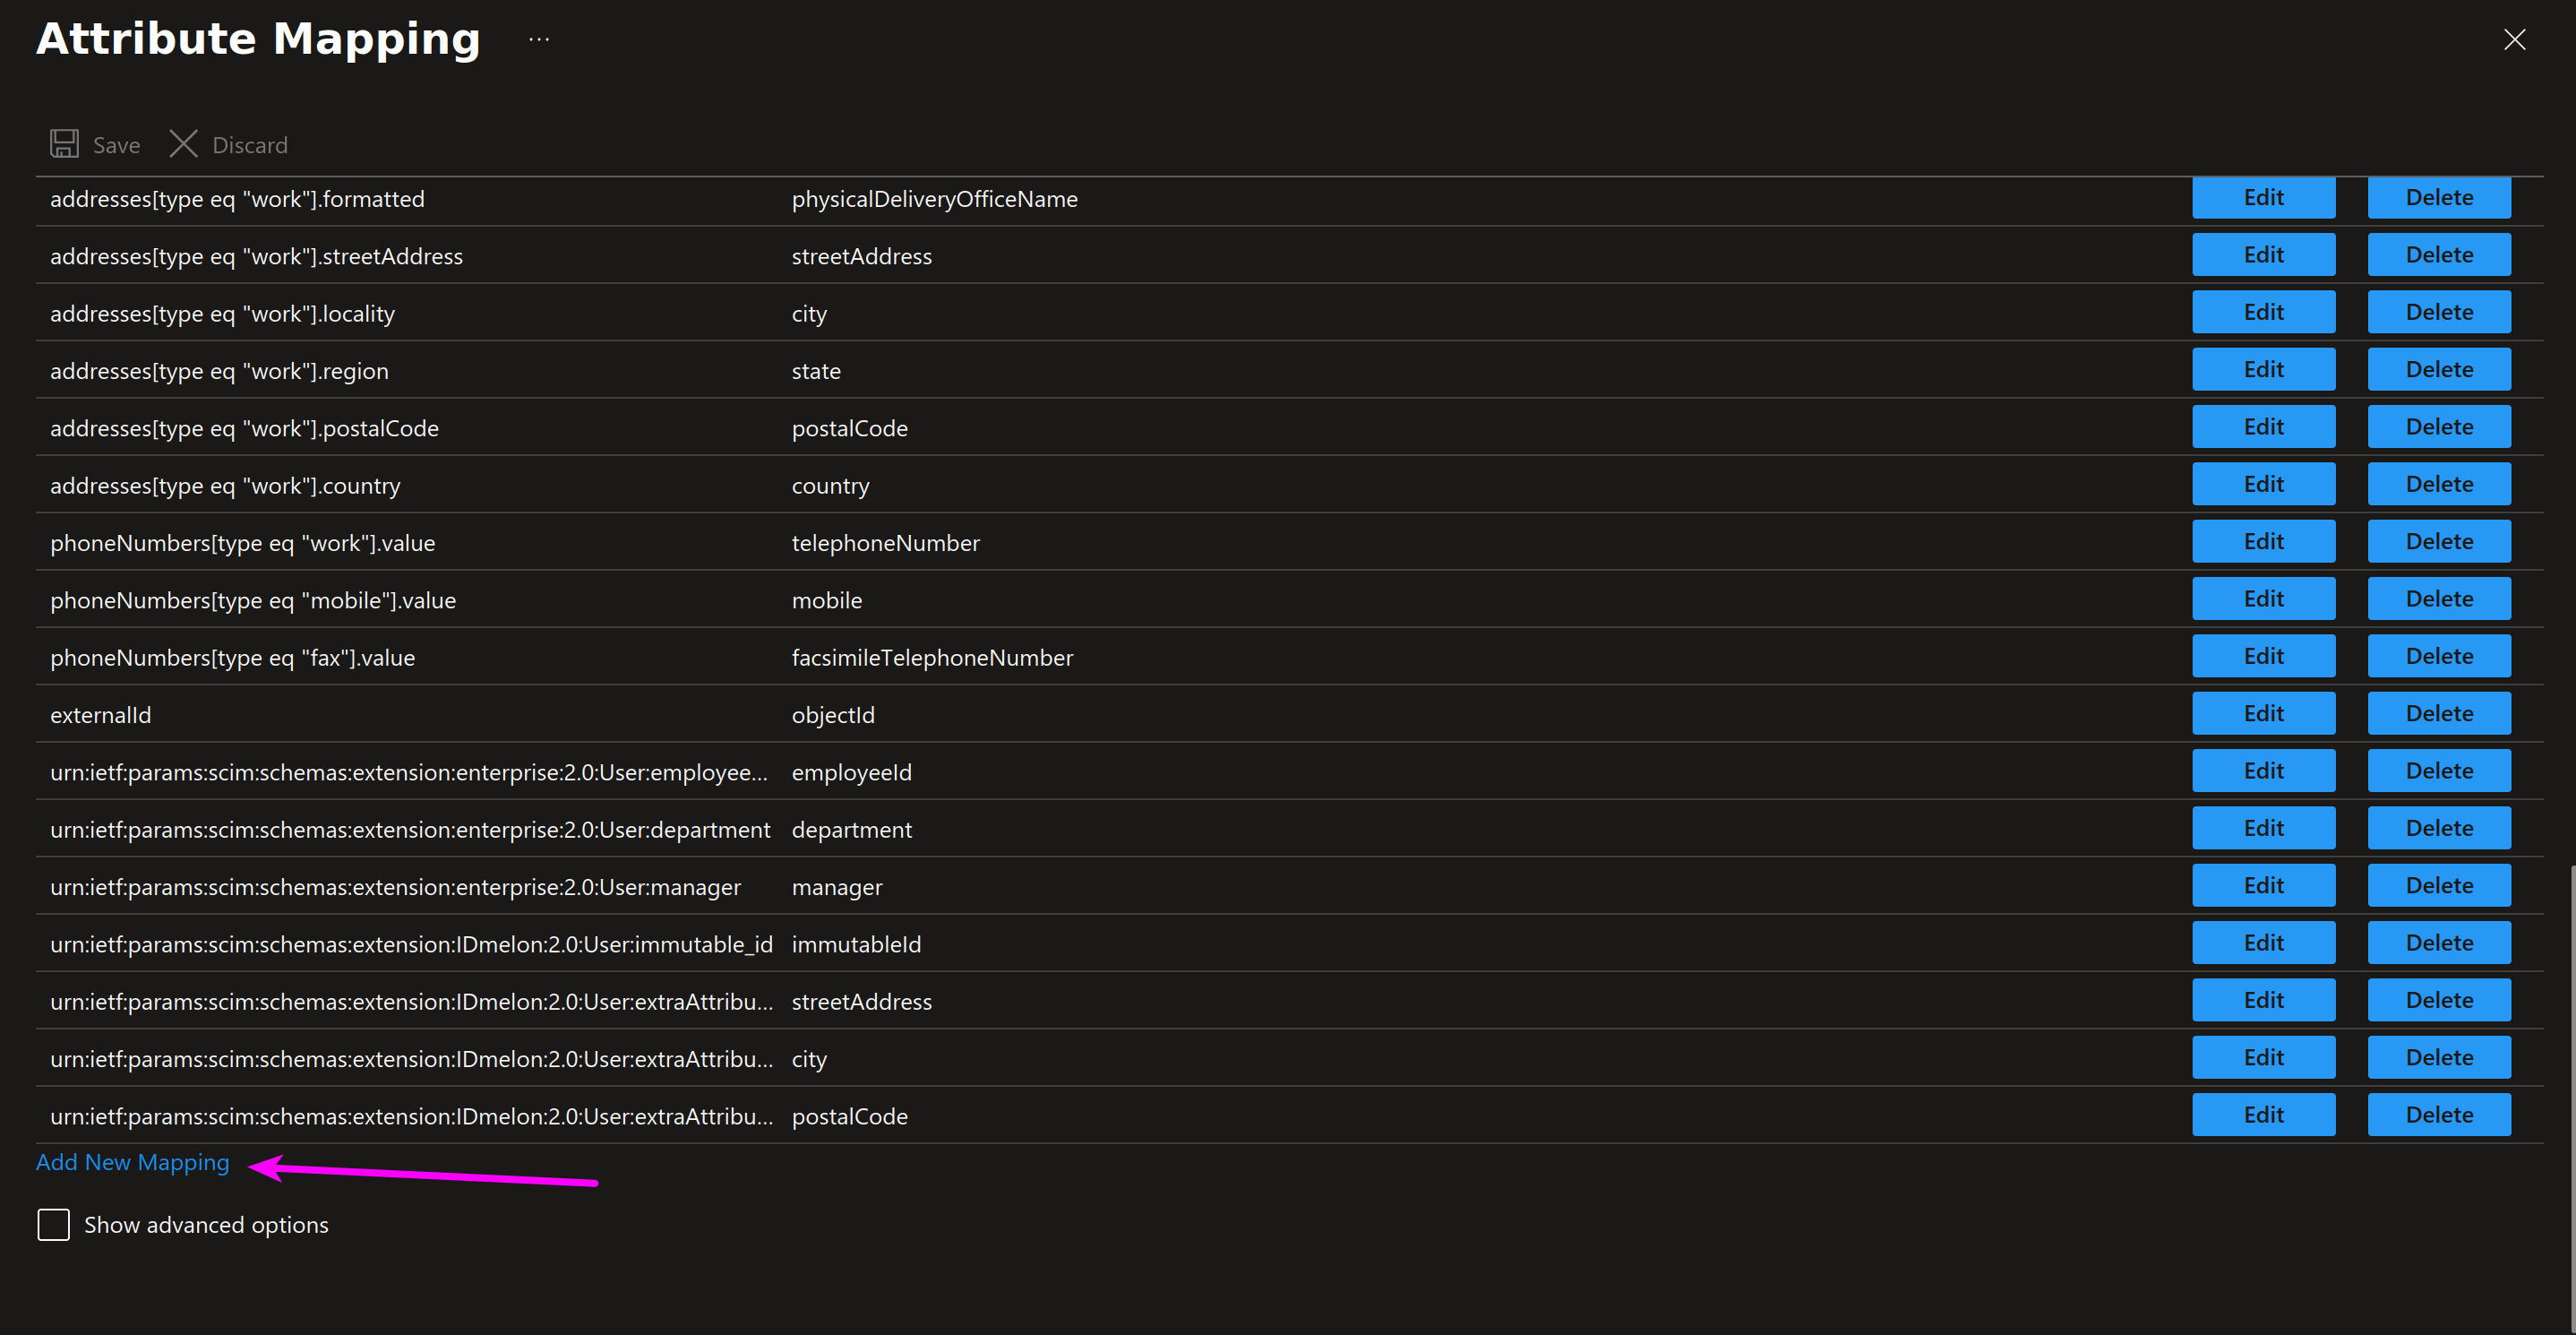
Step 4 - Edit attribute
Select the desired Microsoft Entra ID attribute to map in the Source attribute field, then choose the corresponding custom IDmelon attribute for the Target attribute field. Once both are selected, click OK.
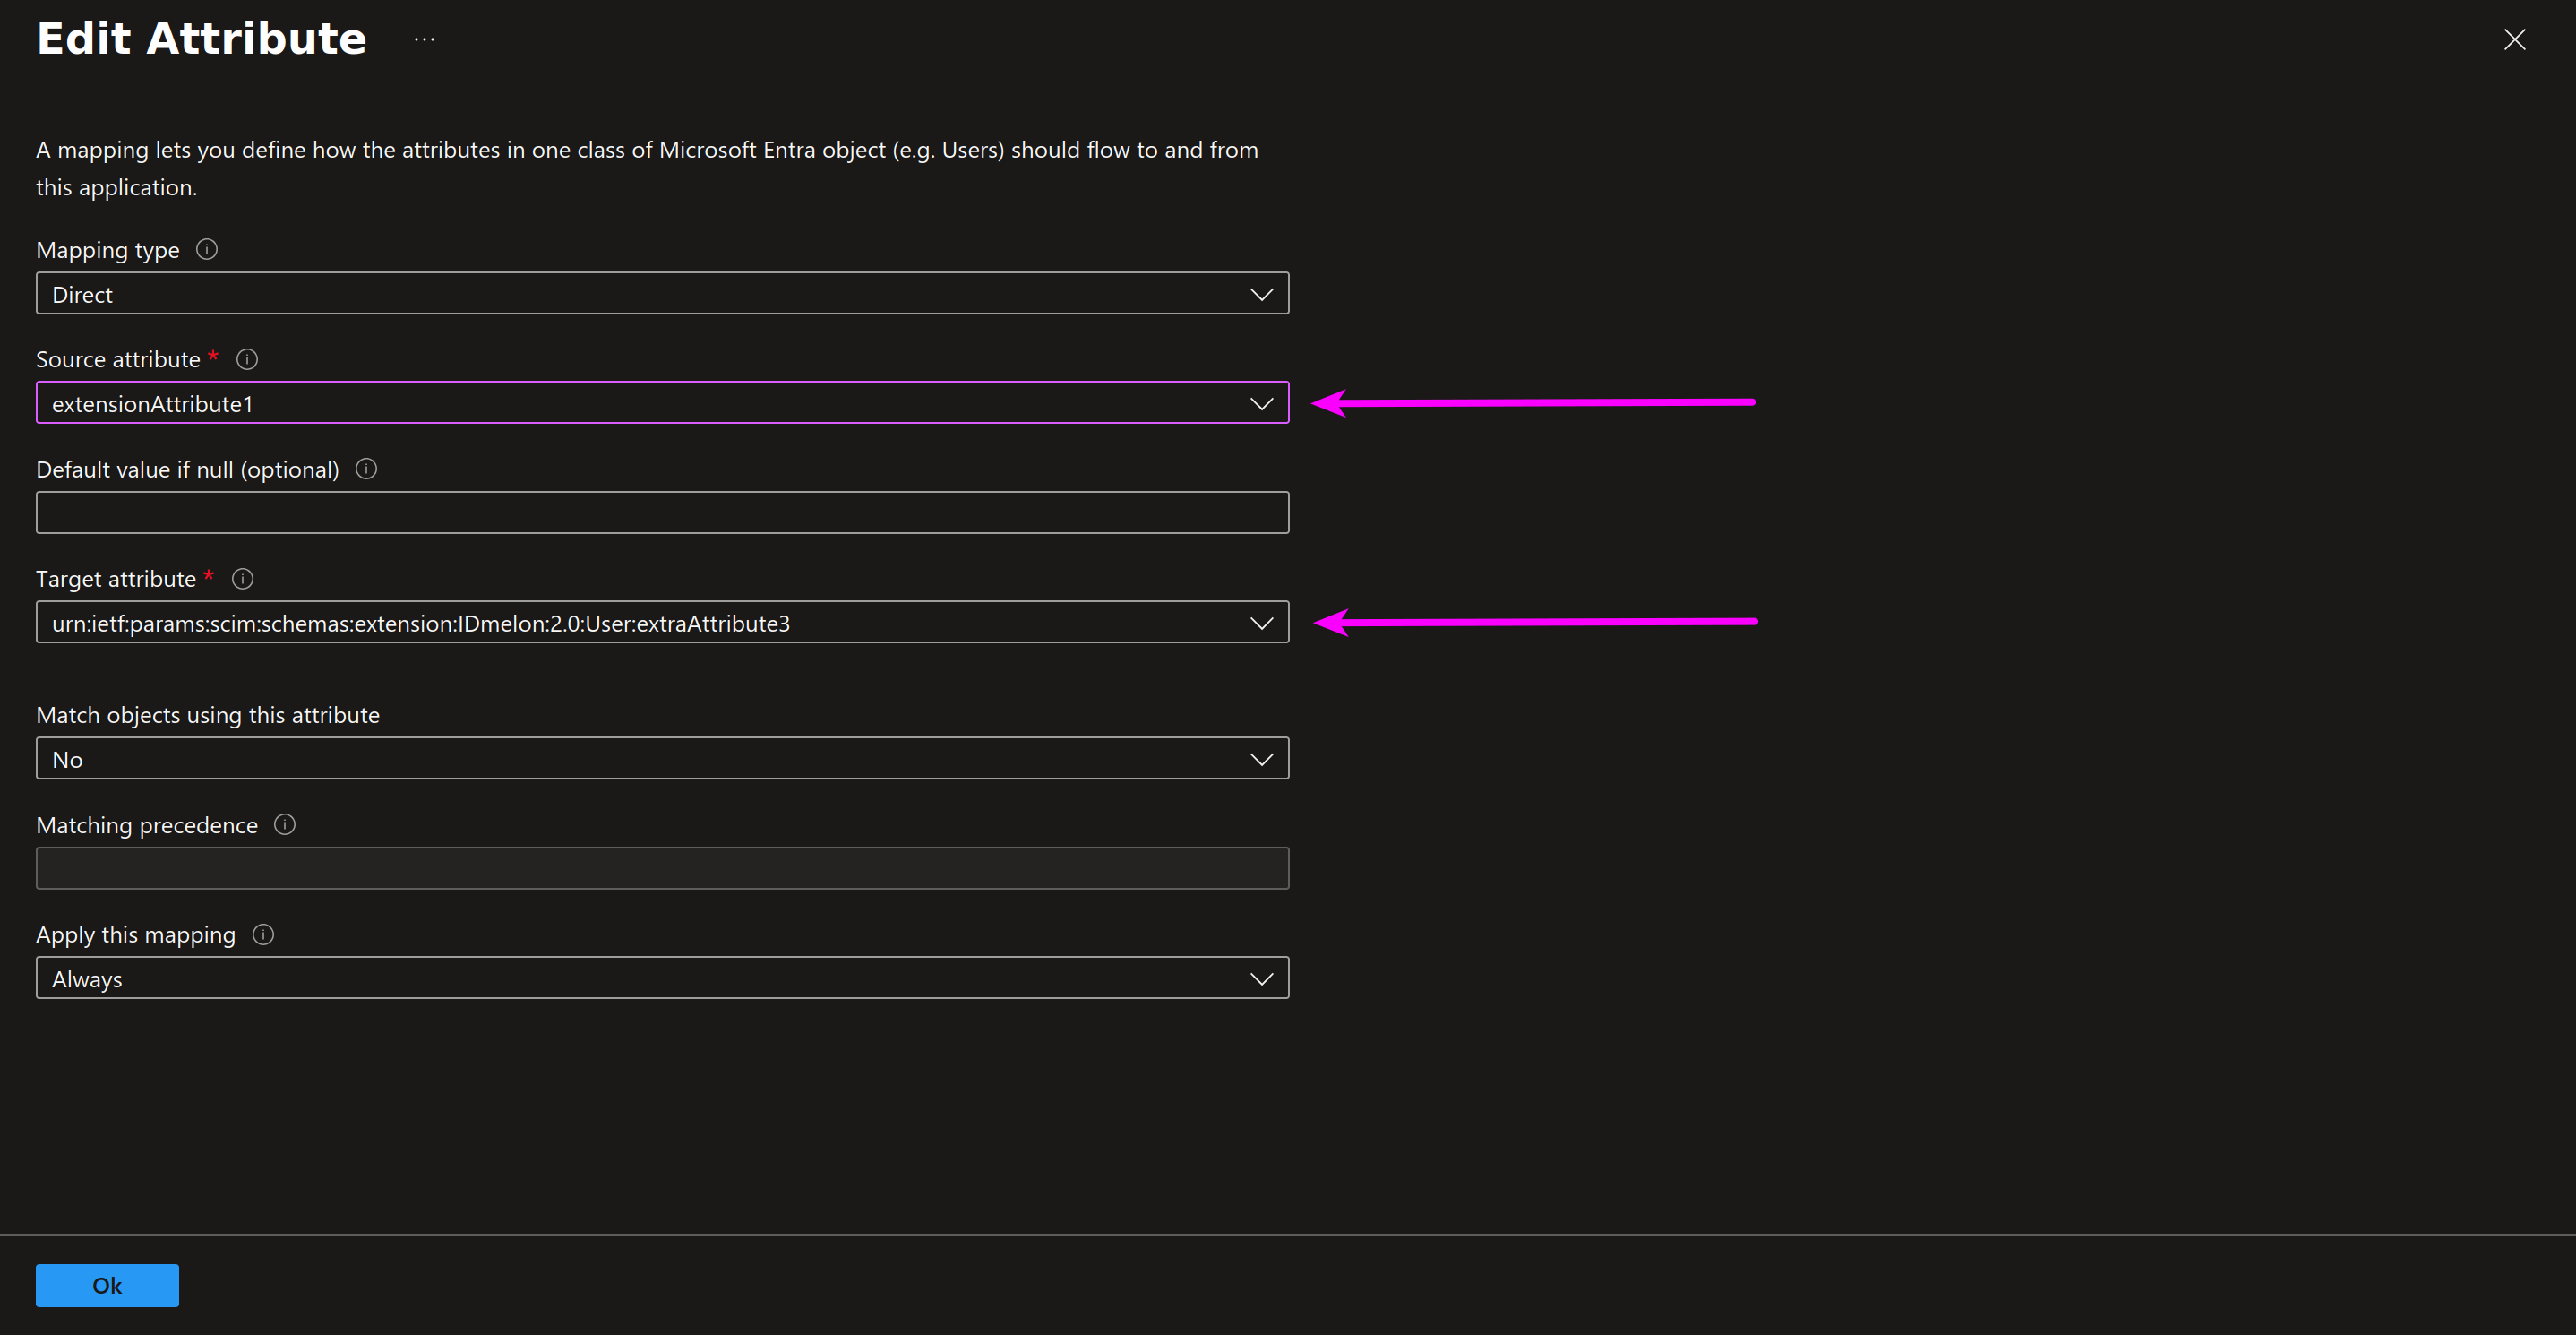
Finally, Save your changes.
Deprovisioning
The rules for deprovisioning are as follows:
Sync Only Assigned Users and Groups
If you have set the SCIM sync to be dependent on specific users and groups (Sync only assigned users and groups), removing a user on the IDmelon side can be done in the following ways:
- Method 1: Remove the user from the specified group on the Microsoft Entra ID side.
- Method 2: Disable the user on the Microsoft Entra ID side.
- Method 3: Delete the user on the Microsoft Entra ID side.
Sync All Users and Groups
If the SCIM sync is set to include all users and groups (Sync all users and groups), removing a user on the IDmelon side can be done as follows:
- Method 1: Disable the user on the Microsoft Entra ID side.
- Method 2: Delete the user on the Microsoft Entra ID side.